Before I start I want to give credit to Spas Kaloferov original blog on this subject. I think you should take the time to check it out specially if your considering using ADFS, as his blog includes the ADFS configuration steps where in my setup I didn’t use ADFS! there for there will be a few caveats.
ADFS allows login for vRealize Automation users that are not in ServiceNow. However, it does not allow login for ServiceNow users that are not in vRealize Automation.
If you use the default authentication like we are going to do here, there are some restrictions and requirements around authentication that you should be aware of, as described in the following table.

The vRealize Automation Plugin for ITSM 3.0 was released by VMware October 5, 2017 with a couple of Enhancements that I will touch on as part of the Step by Step Installation and configuration guide. I m hoping I do it justice, so lets dive right in.
The vRealize Automation plug-in for ServiceNow enables ServiceNow users to deploy virtual machines and perform day 2 actions on CMDB resources using vRealize Automation catalog and governance capabilities.
The vRealize Automation plug-ins for ServiceNow 3.0 works only with vRealize Automation 7.3, and are available only for the ServiceNow Istanbul and Jakarta releases. Also, the optional ADFS configuration , still uses ADFS 2.0.
For previous iterations of the ServiceNow ITSM plug-in please visit the solution exchange and search for ITSM. You will find ITSM 1.0 and ITSM 2.0
The latest version of the plug-in still supports vSphere and Amazon virtual machine provisioning but unlike the previous versions, we now have added support for Azure, and XaaS blueprints as well, including day 2 operations like Power ON/OFF, Reboot, and Destroy.
Stage 1 – Configuring a MID Server
Before installing the plug-in, you must configure a Management, Instrumentation, and Discovery (MID) Server to facilitate communication between ServiceNow and vRealize Automation.
Creating a MID Server User Account in ServiceNow
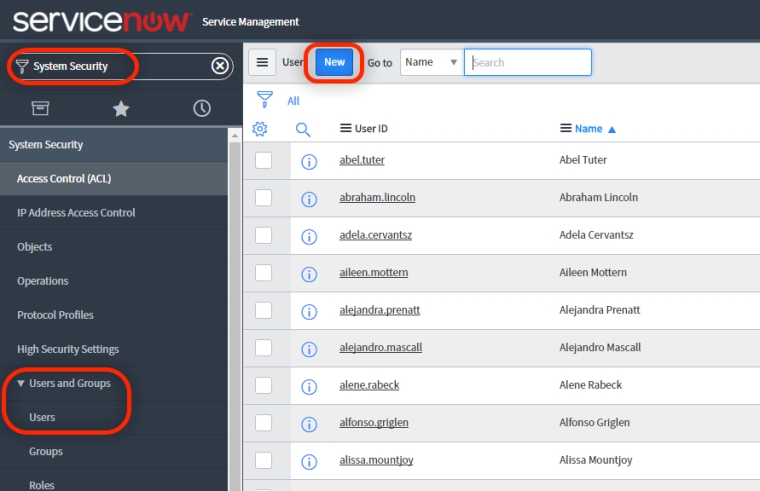
- Log in to your ServiceNow portal and type System Security in the search field.
- Expand Users and Groups > select Users > Click New to create a new user account.
- Fill the required information and click Submit

- Find the user you just created by using the search field and select it from the list by clicking on it.

- At the bottom of the screen, click Edit within the Role tab.

- Search for the mid_Server role and add it the user account, then click Save to get back to the user information page.


- Enter a password for the user account and click Update.

- Now lets logoff and login back to ServiceNow using the MID server user to verify that the account is working properly, then logoff.

Installing and Configuring a MID Server Instance
In this step we will cover how to install and configure a MID Server instance which can be done on any servers in your DMZ or private Network as long as we have access to internet where we can communicate with our ServiceNow instance.
- Login back to your ServiceNow instance with your admin account
- Search for Mid Server in the search field and select Downloads

- Select the appropriate Mid Server package for your desired operating system, in our case here we will download the Windows 64 bit
- On your Mid Server, create a folder called <MID Server> on your C: drive and then create a sub-folder and give it the name of your Mid Server.
- Extract the package you downloaded into your <MID Server>/Server name folder. The resulting directory structure would be //agent

- Navigate to the //agent directory and edit the config.xml file as follows:
Change 1
– Find the <parameter name=”url” value=”https ://YOUR_INSTANCE.service-now.com”/> element and change the value to the URL of your ServiceNow instance.
Change 2
– Enter the MID user credentials you created earlier in the mid.instance.username and mid.instance.password parameters.
Change 3
– Find the <parameter name=”name” value=”YOUR_MIDSERVER_NAME”/> element and change the value for the MID Server name. Use the same name you’ve used form the directory earlier.
Change 4 (Optional)
– Enter connection information for the proxy server. Remove the appropriate comment tags from the proxy configuration information. For example, you can configure the mid.proxy.use_proxy, mid.proxy.host, mid.proxy.port, mid.proxy.username, and mid.proxy.password.
- Save the config.xml file and execute the start.bat script to start the service.

- Login back to your ServiceNow instance with your admin account
- Search for Mid Server in the search field and select Server

- Select the Mid Server name by clicking the check box and select validate from Actions menu on the selected row. click OK to accept the initial criteria.

Stage 2 – Installing the vRealize Automation Plug-in For ServiceNow
Now its time to install the XML plug-in which you must download from the Solution Exchange website Here for your ServiceNow version, either Istanbul or Jakarta type instance.
The plug-in when installed enables vRealize Automation to do the following :
- Creates vRealize Automation Catalog and Resources menu items within the ServicesNow self-service module.
- Creates a workflow for requesting vRealize Automation items.
- Creates the catalog admin role and assigns it to the System Administrator.
- Grants the users with the catalog admin role access to the integration > vRealize Automation module.
Procedure
- Log in to your ServiceNow portal as a system administrator and type System System Update Sets in the search field.
- Select Retrieved Update Sets from the menu and click on Import Update Set From XML

- Click Choose File on the dialog to choose the file to upload, and then select the vRealize Automation ServiceNow XML file you downloaded from the solution exchange and click Upload.

- In the Retrieved Update Sets list, select the vRealize Automation ServiceNow update set in the Name column and then Loaded in the State column.

- Select Preview Update Set to validate the update set before committing it. A dialog box confirms update set validation


- Inspect the update set information, and then click Commit Update Set.

- A dialog box opens automatically after you click Commit Update Set while the commit action is in progress. A Close button appears on the dialog when the commit completes. Click this button to dismiss the dialog.

- Click Udpate

- Select Retrieved Update Sets in the left menu and verify that the VMware update set has a status of Committed.

Stage 3 – Configure Users for the vRealize Automation Plug-in for ServiceNow
You can configure users either before or after installing the vRealize Automation plug-in for ServiceNow. as I mentioned before we not leveraging ADFS here
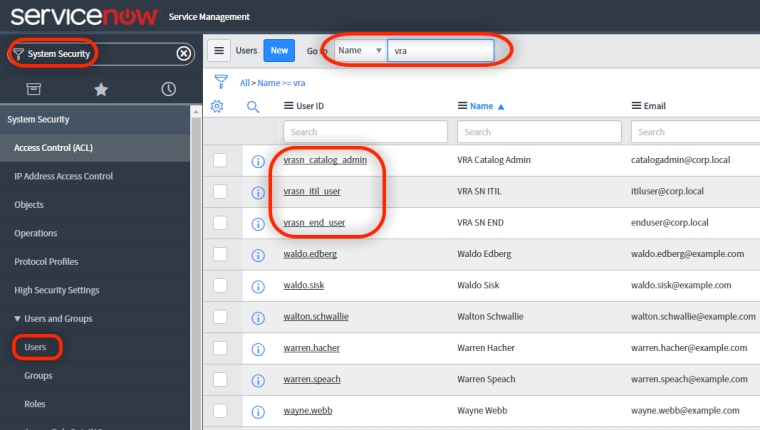
Add the role vra_user in ServiceNow for all users that must access vRealize Automation, including vrasn_end_user, vrasn_catalog_admin, and vrasn_itil_user, to enable those users to see vRealize Automation catalog items.
- Search for System Security and select Users and Groups > Users. Type vra into the user search. add the vra_user role to the above mentioned built-in users for now, in addition to any user that must access vRealize Automation which you can do at the end.

- Verify and, if necessary, update the appropriate users and roles in ServiceNow. See
Creating Users and Associating to a group and Creating Roles for more information about working with users, groups, and roles in ServiceNow. - The ServiceNow plug-in for vRealize Automation uses the following ServiceNow roles:

Stage 4 – Configure the vRealize Automation Workflow for Requested Items
The system admin can configure the vRA Workflow for Requested Item using the workflow editor.
At a minimum, you must assign the approval group that contains your ApprovalMgr. When users request vRealize Automation catalog items, this workflow runs, and approvals are sent to the ApprovalMgr within the approval group before the request is submitted to vRealize Automation.
Follow the steps below to use your own approval group and add it to the vRealize Automation workflow:
- Search for Workflow Editor in the ServiceNow navigation pane and click it.

- Search for vRealize Automation Workflow for Requested Item and open it by clicking on it.

- Click the menu button and select Checkout.

- Double-click the Approval group stage in the workflow

- Click the Edit Groups button. Search the list of groups and make the appropriate selections, then Lock your selection by clicking the Lock icon -> Click Update -> Click the menu button -> Click Publish.

- By default you will see that the vRealizeAutomaion-ApprovalManagersGroup is already added. in my instance I made sure that the ServiceNow System Administrator is part of this group.
Stage 5 – Set Basic Configurations the vRealize Automation Plug-in for ServiceNow
You must set up a vRealize Automation integration user. ServiceNow requires this user to import catalog items, categories, request statuses, and resources from vRealize Automation.
In order to import items, the integration users must be a business group manager within the business groups that you want ServiceNow to manage. The integration user does not require a role within ServiceNow.
Procedure
- Log in to vRealize Automation as a business group manager.
- Edit your business groups and assign the integration user as a business group manager. in my lab as you see below i will be using the cloudadmin which is a member of the cloudadmins group which has all the roles within vRealize Automation in addition to all the Business group Roles.

Now that we installed the vRealize Automation plug-in for ServiceNow, and configured users and the integration user “cloudadmin“, we can complete the set up with basic configurations.
- Search for Integration-vRealize Automation in the ServiceNow navigation pane -> click on Basic Configuration -> Enter the appropriate settings for your MIDServer Name, vRealize Automation tenant, URL, Integration Username and Password and plug-in.
Note : The MidServer Name should be the same as the Server folder name you created at earlier stage when you extracted the Mid Server config files.

Stage 6 – Register the Plug-in for ServiceNow as a vRealize Automation OAuth 2.0 Client.
After setting up Basic Configurations, you must register the plug-in as a vRealize Automation OAuth 2.0 client.
To register the plug-in, you must provide user credentials to authenticate to vRealize Automation. we have two options here :
Option 1 : If you plan to use the vsphere.local tenant, you can use the administrator from the vsphere.local tenant. Set administrator as the username in the Register the Plug-in as a vRealize Automation OAuth 2.0 client dialog.
Option 2: Use the system admin, is to set up a user with local user and tenant admin roles within your tenant and provide these user credentials. This option registers the
ServiceNow plug-in only in the specified tenant. Providing the same tenant is set in Basic Configurations, this tenant is configured for the end users.
in my case we will be using Option 1.
Procedure
- Search for Integration-vRealize Automation in the ServiceNow navigation pane -> Click Client Registration
- Enter the user credentials in the Register the Plug-in as a vRealize Automation OAuth 2.0 Client dialog and since we are using Option 1, we will enter Administrator as the user and provide the password. – > click Submit

- Set the Client ID and Client Secret in the Set the Client ID and Client Secret dialog. You must choose what to set. for me I used the same account and password as the Client ID and Client Secret.

- Once set, the values are saved in the vrasn.clientID and vrasn.clientSecret properties within Integration > vRealize Automation > System Properties. Client ID and Client Secret are later used to get the access token of the users on login within the tenant specified in Basic Configurations.
- On completion, you are redirected to the Basic Configurations page.
Note : You MUST logoff from ServiceNow and login again into the portal so you can be redirected to vRA ( you must be on Intranet, so you can reach vRA ) and logon using the integration User. This has to happen at least once after that is just black magic.
After that you can even access ServiceNow portal from the internet and when you are redirected to vRA obviously it will fail since you can’t reach vRA from the internet . Here you can re-enter the ServiceNow URL again and it will let you in the 2nd time. you can even request vRA blueprint .
Stage 7 – Configure and Run Scheduled Import Jobs in ServicesNow
On a first time install of the plug-in, you must manually execute scheduled jobs to import the catalog and resources. Though there is a default schedule for running jobs, you should edit the schedule time in each import according to your needs as you execute each job.
For example, you might want to import catalog items every 10 minutes for high
provisioning use.
The plug-in provides scheduled imports with the following functions. Scheduled imports should be configured and run in the order shown in the table below :


Procedure
- Log in as the ServiceNow System admin
- Search for Integration-vRealize Automation in the ServiceNow navigation pane and click on Scheduled Imports

- This would be a good time to Click on the applicable job name and change the Repeat Interval in Days, Hours, Minutes, and Seconds and update the Import Job Schedule based on your needs
- Run scheduled jobs in the order shown in the table. Ensure that each job is complete before starting the next one. Completed jobs are shown as processed in the Scheduled Import Queue
- For now will execute each manual based on the order outlined in the table mentioned above by opening the import job and click Execute Now

- Completed jobs are shown as processed in the Scheduled Import Queue. Click the Updated column which you need to add of the Scheduled Import Queue to refresh. The last updated time of the corresponding properties for these scheduled imports is also updated.
- One thing I had to do in my instance which is mentioned in the Troubleshooting section of the Plug-in documentation is that in some cases, you may need to clear the Value field of the corresponding property in Integration > vRealize
Automation > Properties and update the property prior to executing the appropriate scheduled import. Once the Value field was clear for all 5 records I started seeing all the jobs in the Scheduled Import Queue when I executed them in order.
Stage 8 – Configure the vRealize Automation Catalog in ServiceNow
Now its time to Choose the catalogs that you want end users to use for provisioning requests.
Procedure
- Log in a the catalog admin or system admin
- Select the vRealize Automation Catalog, then clear / delete all the default widgets. if you don’t that you wont see the Add here Section when you select the Category later.
- Select the plus sign in the upper right corner to add vRealize Automation services, known as Catalog Categories in the ServiceNow, for provisioning

- Highlight the Catalog categories in the center pane -> Select Category Items to display the items within the Category and select Add Here based on where you want to place within the catalog page.

- Repeat the process for others Categories, to setup your final catalog and start provisioning.

The End Eh!

But once we raised request from servicenow catalog. We are not able to track the completion of the request. In “My Requests it is open stage”
LikeLiked by 1 person
Hi Mady. in my case all my requests shows Completed within the request it self on ServiceNow once the request is marked successful in vRA.
LikeLike
Request status will change only when request approved in ServiceNow and succeeded/failed at vRA and “vRealize-Automation-ImportRequestStatuses” import job has run at ServiceNow.
LikeLiked by 1 person
Awesome post, Maher! It had me up an running in 15 minutes!
LikeLiked by 1 person
Thanks for another great article. Where else could anybody get that type of info in such a perfect way of writing? I have a presentation next week, and I’m on the look for such information.
LikeLiked by 1 person
After integrating the plugin, I could see the catalog names (services) appearing in SNOW, but catalog items are missing. After running the jobs, I see the error 401:Unauthorized , incorrect Username:Password Combo . However, I can login using the same credentials to vRA portal and catalog items are visible. The postman query is also failing with same error.
GET https://FQDN/catalog-service/api/consumer/entitledCatlogItemsView
LikeLike
Which version of the ITSM plug in are you using?
LikeLike
SASIDHARKE there is a known issue / defect with the existing ITSM 4.0 that we found and there is a hot fix .xml file that you need to commit the same way you committed the original plug-in to fix the Password Combo error.
LikeLike
Will this work if the vRA catalog item(s) have input fields that are dependent on other input fields, either by static lists or calls to vRO?
LikeLike
Yes field backed with vRO workflows are supported according to the documentation
LikeLike
Please guide me a procedure using REST API calls to import Catalog Items, our requirement is to use SNOW as Front end to request Catalog items, if plugin is not working, the other way is to use REST APIs. A exiting vRO package would be really helpful. Thanks in advance.
LikeLike
sasidharke
The Rest API calls for vRA are publicly available and there are reference documentations for that. there is a new vRA -ServiceNow ITSM plug-in that will be announced soon that i would recommend looking in too as it uses a new ServiceNow technology to allow the integration with vRA. also i would recommend looking at Sovelabs as they also have two plug-ins that you can leverage for vRA – Service now integration.
LikeLike