vRealize Automation 7.3 is Released! – What’s New – Part 3

vRA-Product-Icon-Mac_0

Continuing again on the same theme – Make the Private Cloud Easy – that we mentioned in the two previous blog post vRA 7.3 What’s New – Part 1 and What’s New – Part 2 we will continue to highlight more of the NSX integration Enhancements and for this part of the series we will be focusing on the Enhanced NAT Port Forwarding Rules.


So let’s get started Eh!

Enhanced NAT Port Forwarding Rules

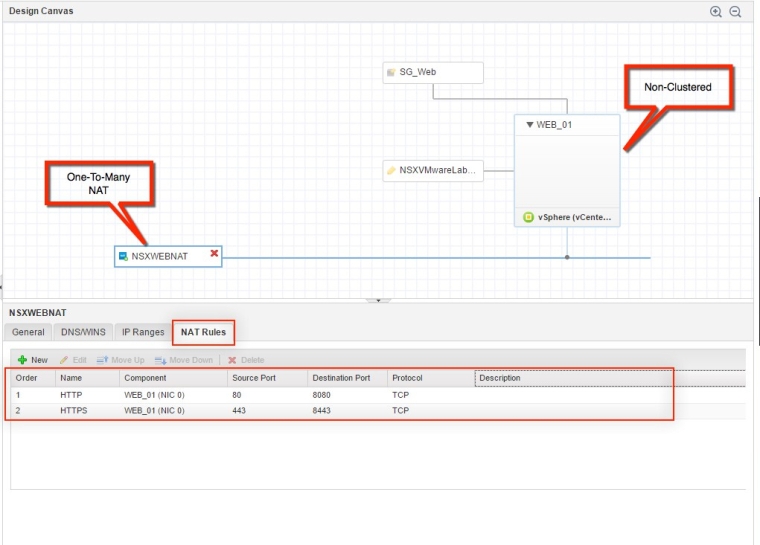
You now have the ability as you configure the On-Demand NAT Network in the CBP (Converged Blue Print) – to create forwarding NAT rules at design time, to a One-To-Many type NAT network component when you associate it with a Non-Clustered vSphere Machine component or an On-Demand NSX load balancer component.

You can define NAT rules for any NSX-supported protocol then map a port or a port range from (Source) the external IP address of an Edge to (Destination) a private IP address in the NAT network component.

These Rules can be set in a specific Order when configured at design time. it Also can be added, removed, and re-ordered after you create them for an existing deployment as a day-2 action/operation.

Important Notes:

  • This will only work with One-To-Many type NAT network component, which means that One-To-One type NAT network component isn’t supported to create NAT rules for, in the CBP.

    nattype

    NAT Type One-to-Many

  • Also the NAT network component can be only connected to a Non-Clustered vSphere Machine which means the number of configured instances for the vSphere Machine in the blueprint can’t be more than 1 for the instances minimum and maximum setting, a user can request for a deployment.

    web01

    Non-Clustered


Option1

D-NAT Rules that can be Ordered

  • If you must use a Clustered vSphere Machine, you have to leverage an On-demand load balancer if you want to create a NAT rule on One-To-Many type NAT network component that can be associated with the VIP network of the an NSX load balancer component. 
clustered

Clustered Machine > 1 x Deployment

option3

Load Balancer VIP settings depending on the network association

  • In the above picture because that NAT rules are publishing HTTP-Port 80 and HTTPS-Port 443 on the external IP address of an Edge, then mapping those ports to the private IP and destination ports HTTP-Port 8080 and HTTPs-Port 8443 of the destination vSphere Machine and since the Load balancer VIP network is on the internal private network connected to NIC 0 of the clustered vSphere machines, we create the virtual servers on load balancer using HTTP-Port 8080 and HTTPs-Port 8443. 

option2

Again I really want to highlight the fact that the following elements are not supported for creating NAT rules:

  • NICs that are not in the current network
  • NICs that are configured to get IP addresses by using DHCP
  • Machine clusters without the use of a Load balancer
  • One-To-One type NAT network component

Change NAT Rules in a Exiting Deployment

Now after a successful deployment that includes 1 or more NAT forwarding rules, a user can later add, edit, and delete any existing NSX NAT rules in a deployed one-to-many NAT network.  The user/owner can also change the order in which the NAT rules are processed just like how we showcased when you can do that during the design of the blueprint.

Important Notes :

  • The Change NAT Rules operation is not supported for deployments that were upgraded or migrated from vRealize Automation 6.2.x to this vRealize Automation release.
  • You cannot add a NAT rule to a deployment that is mapped to a third-party IPAM endpoint such as Infoblox.

a user must log in to vRA as a machine owner, support user, business group user with a shared access role, or a business group manager to be entitled to change a NAT rules in a network.

Once that is verified, a user can :

  1. Select Items > Deployment.

Pro1

2. Locate the deployment and display its children components.

Pro2

3. Select the NAT network component to edit.

4. Click Change NAT Rules from the Actions menu.

Pro3

5. Add new NAT port forwarding rules, reorder rules, edit existing rules, or delete rules. What ever makes you happy!!

6. When you have finished making changes, click Save or Submit to submit the reconfiguration request.

Pro3

7. Check the status of your request under the Request Tab, that it is successful.

Pro5

8. In my case i have simply changed the order where I placed the HTTPS forwarding NAT rule to apply first. so you if you click on the Request ID after its successfully complete you will see just that.

Pro6

This was short and sweet, hope you enjoyed it. Now go give it a shot.

The End Eh!

Automation and Orchestration vRA Blueprints vRealize Automation

vRealize Automation 7.3 is Released! – What’s New – Part 2

vRA-Product-Icon-Mac_0Continuing on the same theme – Make the Private Cloud Easy – that we mentioned in the pervious blog post vRA 7.3 What’s New – Part 1 , we will highlight the NSX integration Enhancements for just the NSX Endpoint and On-Demand Load balancer that was added in this release. there are a lot more enhancement around the NSX integration that will touch on in other parts of this What’s new blog series but because I want to make each part short and sweet, I am going to just talk about the above mentioned enhancements

So let’s get started Eh!

NSX Endpoint

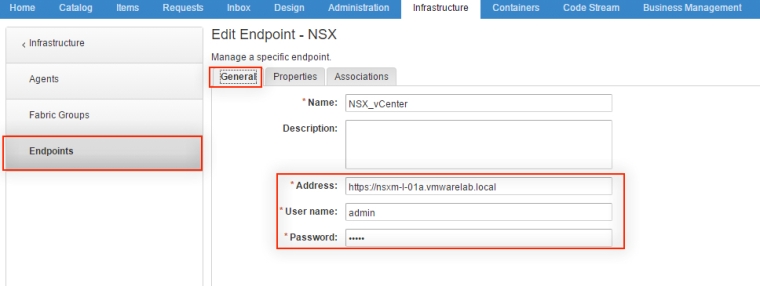
First thing first, with the new release of vRA 7.3 you can now create you own independent NSX Endpoint and then associate its NSX settings to an existing vSphere/vCenter endpoint. As you probably know or maybe you don’t, that in the pervious version prior to vRA 7.3, the NSX Manager was add as part of the vSphere/vCenter endpoint creation.

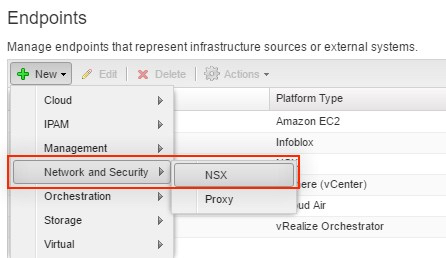
To create a new NSX Endpoint – >Select Infrastructure > Endpoints > Select New > Network and Security > NSX.

NSXEndpiont

Adding New NSX Endpoint

Now if  your like me happen to do an upgrade or perhaps migrated a vSphere/vCenter endpoint that was using an NSX Manager to a vRA 7.3 instance, a new NSX Endpoint is created for you that contains an association between the source vSphere/vCenter endpoint and a new created NSX endpoint.

NSXEndpointDetails1

Existing NSX Endpoint

NSXEndpointDetails2

NSX Endpoint vSphere to NSX Association


On-demand Load Balancer Controls

if you worked with vRA and tried to create a blueprint you know that if you have NSX configured for vSphere, that you can drag an NSX on-demand load balancer component onto the design canvas and configure its settings for use with vSphere machine components and container components in the blueprint.

With the new release we made it even better and added many enhancements that allows you now to have full control on how the load balancer can be configured and deployyed on request time when requesting aCentric networking and security based type of an application.

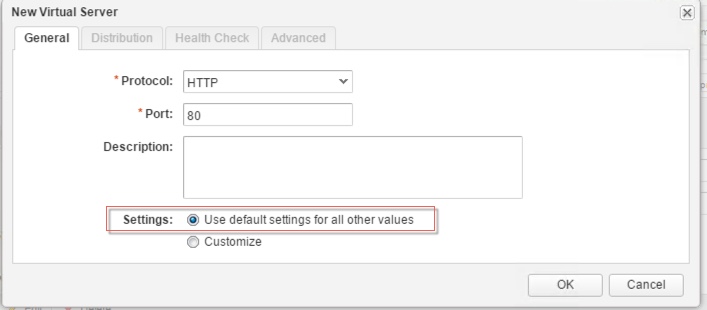
  1. When you add a load balancer component to a blueprint in the design canvas, you can choose either a default or custom option when creating which is a new feature you couldn’t do before or just like the pervious release, editing your virtual server definitions in the load balancer component.
  2. The default option allows you to specify the virtual server protocol ( HTTP, HTTPS, TCP, UDP ), port, and description and use defaults for all other settings such as Distribution, Health Check and Advanced settings such as connection limits, etc which therefor are all dimmed and disabled.

NewVirtualServerDefault

3. The custom option allows you to define additional levels of detail for Distribution, Health Check and even more advanced settings that you can configure and define.

NewVirtualServerCustom

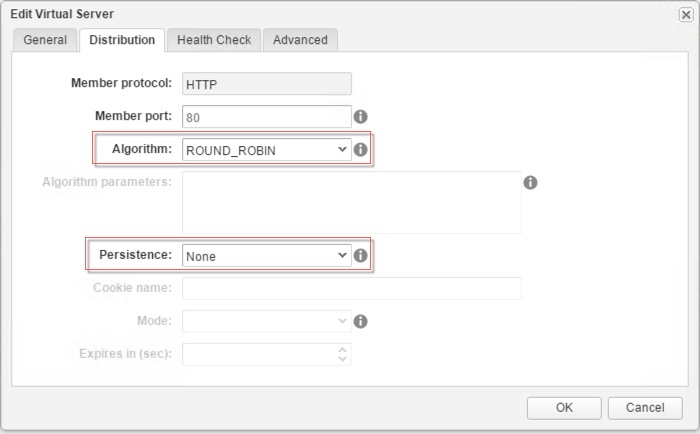
Distribution Tab

In the Distribution tab you can specifies the algorithm balancing method for this pool member.

ROUND_ROBIN: Each server is used in turn according to the weight assigned to it.

IP-HASH: Selects a server based on a hash of the source IP address and the total weight of all the running servers.

LEASTCONN: Distributes client requests to multiple servers based on the number of connections already on the server. New connections are sent to the server with the fewest connections.

URI: The left part of the URI (before the question mark) is hashed and divided by the total weight of the running servers. The result designates which server receives the request. The URI is always directed to the same server as long as no server goes up or down.

HTTPHEADER: The HTTP header name is looked up in each HTTP request. If the header is absent or does not contain a value, the round robin algorithm is applied.

URL: The URL parameter specified in the argument is looked up in the query string of each HTTP GET request. If no value or parameter is found, then a round robin algorithm is applied.

 You can also Specifies how persistence tracks and stores session data. Requests are      directed to the same pool member for the life of a session or during subsequent sessions.

None : No persistence. Session data is not stored or tracked.

Cookie : Uses a unique cookie to identify the session the first time that a client accesses the site. In subsequent requests, the cookie persists the connection to the appropriate server.

Source IP : Tracks sessions based on the source IP address. When a client requests a connection to a virtual server that supports source address affinity persistence, if the client has previously connected it is returned to the same pool member.

MSRDP :Maintains persistent sessions between Windows clients and servers that are running the Microsoft Remote Desktop Protocol (RDP) service.

SSL Session ID : Uses an NSX-supported HTTPS traffic pattern to store and track sessions

HealthCheck

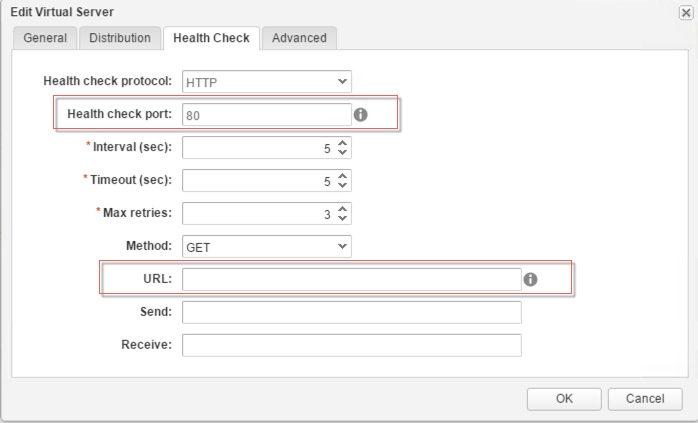
Health Check Tab

The Health Check tab allows you to specify the port number on which the load balancer listens to monitor the health of the virtual server member and the URL is used in the sample request to check a web site’s Health based on the available settings.

adavnced

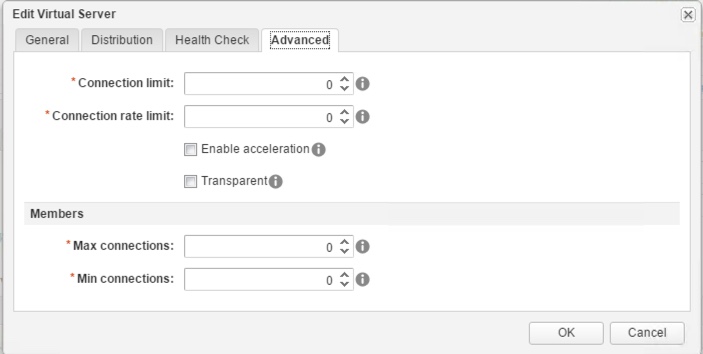
in the advanced tab you further configure the NSX virtual server for things like

Connection limit: The maximum concurrent connections in NSX that the virtual server can process. This setting considers the number of all member connections. ( 0 = no limit )

Connection rate limit: The Maximum number of incoming connection requests in NSX that can be accepted per second. This setting considers the number of all member connections. ( 0 = no limit )

Enable Acceleration: Specifies that each virtual IP uses faster L4 load balancer rather than the L7 load balancer

Transparent: Allow the load balancer pool members to see the IP address of the machines that calling the load balancer. if not selected, the member of the load balancer pool members see the traffic source IP address as the load balancer internal IP address

Max Connections: The  maximum number of concurrent connections that a single member can recognize. if the number of incoming requests is higher than this value, requests are queued and then processed in the order which they are received as connections are released  ( 0 = no limit )

Min Connections: The minimum number of concurrent connections that a single member must always accept. ( 0 = no minimum)

The End Eh!


Automation and Orchestration vRA Blueprints vRealize Automation

vRealize Automation 7.3 is Released! – What’s New – Part 1

vRA-Product-Icon-Mac_0Oh my god I can’t believe that this is only a dot-release as you read through the What’s New section in the vRA 7.3 Release Notes, looking at the massive amount of features we are releasing with this release, its just mind blowing.

I can’t describe the amount of excitement that I m experiencing right now that a new version of vRA is officially out and that I can finally talk about it, and showcase some of its new 20+ spotlight features in this multi part vRA 7.3 What’s New blog series.

VMware continues the trend of delivering awesome innovations, improved user experience, and greater / deeper integration into the ecosystem its managing, while aligning its automation technology with the following core investment strategies :

  • Make the Private Cloud Easy
  • Enable Developers
  • Manage Across Clouds

In part 1 of this series of vRA 7.3 what’s new blogs, I will be showcasing the Prameterized Blueprints feature which fall under the  “Make the Private Cloud Easy” strategy pillar.

But before we get started I thought I would mention these Important upgrade Side Notes :

  • You must upgrade to either vRealize Automation 6.2.5 or 7.1, before you can upgrade to version 7.3
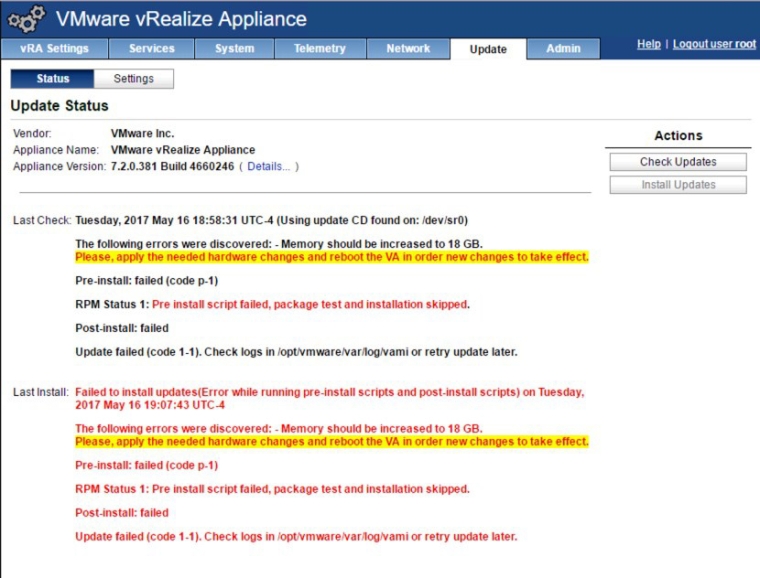
  • The Memory configuration should be increased to 18 GB on the vRA Appliance if you happened to reduce it, like I did myself in my lab otherwise you will get an error like the one below.

Memory Sizing Error

  • System Reboot is required of-course to complete the update, assuming everything went well with the vRA master appliance and its replicas if any.

upgrdeComplete

  • After you reboot the vRA appliance, Waiting for all services to start update Status appears on the Update Status page. The IaaS update automatically starts when the system is fully initialized and all services are running. So you don’t have to upgrade the IaaS component your self manually like what we used to do with the older editions, BUT instead You can sit back, relax and simply observe the IaaS upgrade progress on the Update Status page. How freaking cool is that Eh!

IaasAutoUpgrade

  • The automated update process is also supported on the distributed deployment model where after the master vRA appliance is successfully updated, all the replica nodes gets updated as well, after that the focus shifts to the IaaS components and the same thing happens where all the related IaaS services gets updated. 
  • The first IaaS server component can take about 30 minutes to finish, so be patient.
  • Also note that The active Manager Service node changes from a manual election to a system decision about which node becomes the fail-over server. The system enables this feature during upgrade

So now that we got that out of the way – Big Sigh!- ,  let’s get started now on the main topic Eh!

Parameterized Blueprints to Enhance Re-usability and Reduce Sprawl​

The new Component Profiles allows us to define both Virtual Machine sizes including ( CPU, Memory and Storage ) and source image attributes that helps the infrastructure architect enable what we refer to as the “T-Shirt Sizing” option for blueprint requests where an entitled user can pick from.

This abstraction using the Component Profiles allows us to efficiently manage blueprints by increasing re-usability while significantly reducing blueprint sprawl and simplifying your catalog offerings.

You can use component profiles to parameterize blueprints. Rather than create a separate small, medium, and large blueprint for a particular deployment type, you can create a single blueprint with a choice of small, medium, or large size virtual machine. Users can select one of these sizes when they deploy the catalog item.

From a governance and control perspective we continue to have the ability to trigger approval policies but now these approval can be based on the user size or the image selection conditions, including overrides.

The component profiles like everything else can be imported and exported using the vRealize Cloud Client.

The available component profile types are Size and Image. When you add component profiles to a machine component, the component profile settings override other settings on the machine component, such as number of CPUs or amount of storage.

Be aware that you cannot define other or additional component profile types other than those two.

To access Component Profiles, select Administration -> Property Dictionary -> Component Profiles 

ComponentProfiles

Component profiles are only available for vSphere machine components where you can use component profiles to define vSphere machine components in a blueprint.

Defining Component Profile Settings

You can define multiple named value sets within the Size and Image component profile types and add one or more of the value sets to machine components in a blueprint. Each value set that you define for the component profile type (Size and Image) contains the following configurable settings:

  • Name that sequesters see when they provision a machine
  • Unique identifier for tenant
  • Description
  • Set of value choices for each option in the values

ValueSet

When you request provisioning from the catalog, you can select from available value set choices for the Size and Image component profiles. When you choose one of the value sets, its corresponding property values are then bound to the request.

Configuring Component Profile Size Settings for Catalog Deployment

  1. Log in to the vRealize Automation console as an administrator with tenant administrator and IaaS administrator access rights
  2. Select Administration -> Property Dictionary -> Component Profiles 
  3. Click the Size in the name column or highlight it and click Edit

ComponentProfiles-Size4. Click the Value Sets tab and define a new value set by clicking New to create a small and a large size deployment value set for example.

Small CP

Small Value Set

Large CP

Now we have two Size Component Profiles as value set

  • Small   ( 1 vCPU, 1GB Mem, 40 GB Storage)
  • Larege ( 2 vCPU, 4GB Mem, 80 GB Storage)

size CP Final

Next would be to Add one or more value sets to the Size component profile by using the Profiles tab on a vSphere machine component as will see next.

Configuring Machine Blueprint by Adding the Size Component Profile to the Blueprint.

  1. Log in to the vRealize Automation console as an infrastructure architect.
  2. Select Design -> Blueprints
  3. Create a new Blueprint or in our case we will be editing an existing CentOS 7 on vSphere – Base Blueprint.

EditBluePrint.jpg

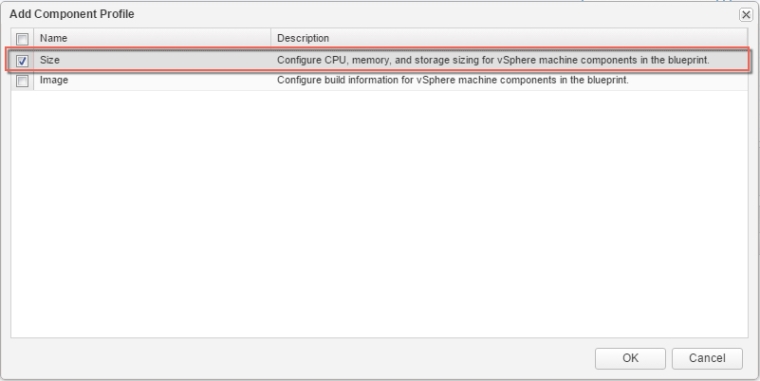
4. Select the Machine Type and click on Profiles  to add the size Component Profile we defined by clicking the +Add  link

ComponentProfiles

5. Once added and listed with the profile tab, select the Size Component Profile and click on Edit Value Sets 

sizeEditValueSets

6. Select the Value Sets you want to associate with the CentOS7 on vSphere – Base Blueprint, here we will select both Small and Large, while setting the Small as the Default and click Ok to configure the size component profile we are configuring for the blueprint with selected Value Sets ( Small and Large )

SizeValueSetsBlueprint

7. Once your done click finish on the blueprint to save the Blueprint parameters we just added, and your ready to request the CentOS7 on vSphere – Base Blueprint with the configured size parameters.

requestCentOs

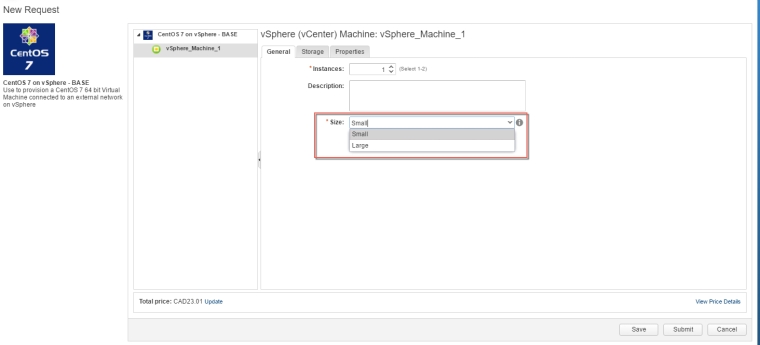
8.  Select the vSphere_Machine within your blueprint deployment you requested and simply select the size of the Machine AKA “T-Shirt Sizing” and submit your request.

blueprintRequest

We can simply repeat the same process for the Image Component Profile where we define Image value set we can present to the requester as an option to choose from. 

Users can select from Linked Clone or Full Clone type images across Windows and Linux type OSs for example .  I will leave that one for you to explore my friends.

imageandSize


.The End. Eh!.

Automation and Orchestration vRA Blueprints vRealize Automation