![]() Continuing on the same theme – Make the Private Cloud Easy – that we mentioned in the pervious blog post vRA 7.3 What’s New – Part 1 , we will highlight the NSX integration Enhancements for just the NSX Endpoint and On-Demand Load balancer that was added in this release. there are a lot more enhancement around the NSX integration that will touch on in other parts of this What’s new blog series but because I want to make each part short and sweet, I am going to just talk about the above mentioned enhancements
Continuing on the same theme – Make the Private Cloud Easy – that we mentioned in the pervious blog post vRA 7.3 What’s New – Part 1 , we will highlight the NSX integration Enhancements for just the NSX Endpoint and On-Demand Load balancer that was added in this release. there are a lot more enhancement around the NSX integration that will touch on in other parts of this What’s new blog series but because I want to make each part short and sweet, I am going to just talk about the above mentioned enhancements
So let’s get started Eh!
NSX Endpoint
First thing first, with the new release of vRA 7.3 you can now create you own independent NSX Endpoint and then associate its NSX settings to an existing vSphere/vCenter endpoint. As you probably know or maybe you don’t, that in the pervious version prior to vRA 7.3, the NSX Manager was add as part of the vSphere/vCenter endpoint creation.
To create a new NSX Endpoint – >Select Infrastructure > Endpoints > Select New > Network and Security > NSX.
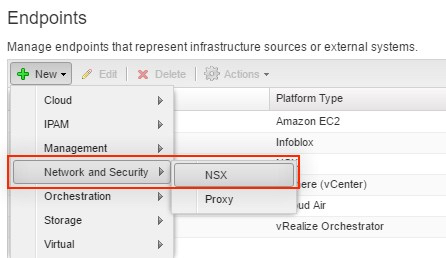
Adding New NSX Endpoint
Now if your like me happen to do an upgrade or perhaps migrated a vSphere/vCenter endpoint that was using an NSX Manager to a vRA 7.3 instance, a new NSX Endpoint is created for you that contains an association between the source vSphere/vCenter endpoint and a new created NSX endpoint.
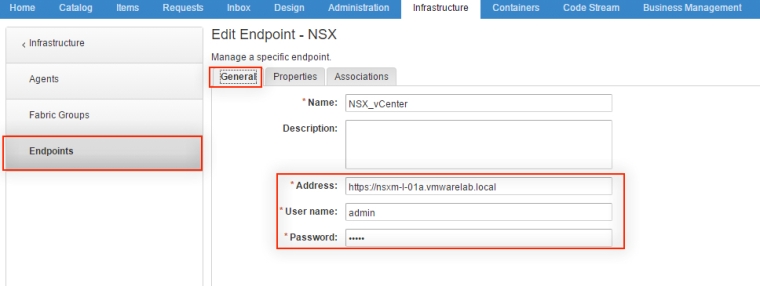
Existing NSX Endpoint

NSX Endpoint vSphere to NSX Association
On-demand Load Balancer Controls
if you worked with vRA and tried to create a blueprint you know that if you have NSX configured for vSphere, that you can drag an NSX on-demand load balancer component onto the design canvas and configure its settings for use with vSphere machine components and container components in the blueprint.
With the new release we made it even better and added many enhancements that allows you now to have full control on how the load balancer can be configured and deployyed on request time when requesting aCentric networking and security based type of an application.
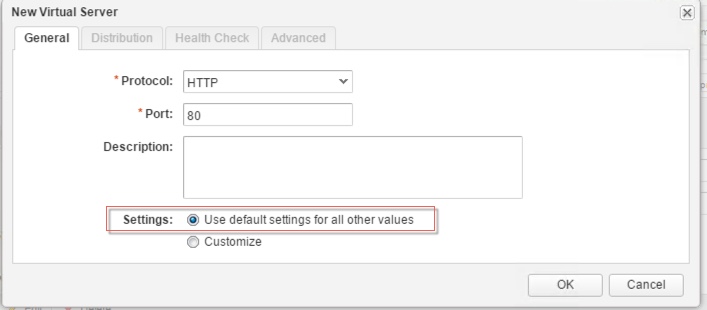
- When you add a load balancer component to a blueprint in the design canvas, you can choose either a default or custom option when creating which is a new feature you couldn’t do before or just like the pervious release, editing your virtual server definitions in the load balancer component.
- The default option allows you to specify the virtual server protocol ( HTTP, HTTPS, TCP, UDP ), port, and description and use defaults for all other settings such as Distribution, Health Check and Advanced settings such as connection limits, etc which therefor are all dimmed and disabled.
3. The custom option allows you to define additional levels of detail for Distribution, Health Check and even more advanced settings that you can configure and define.
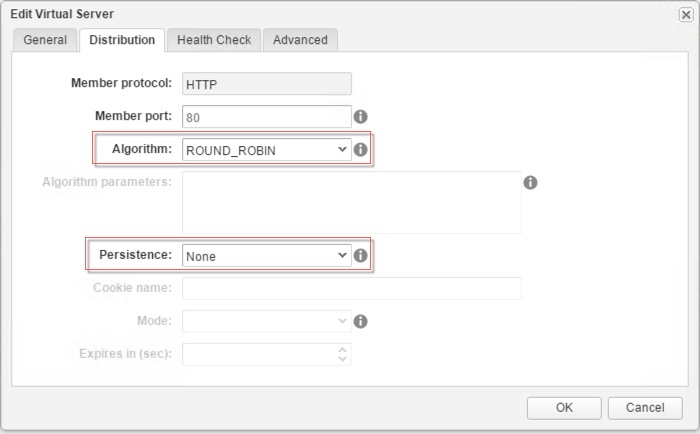
Distribution Tab
In the Distribution tab you can specifies the algorithm balancing method for this pool member.
ROUND_ROBIN: Each server is used in turn according to the weight assigned to it.
IP-HASH: Selects a server based on a hash of the source IP address and the total weight of all the running servers.
LEASTCONN: Distributes client requests to multiple servers based on the number of connections already on the server. New connections are sent to the server with the fewest connections.
URI: The left part of the URI (before the question mark) is hashed and divided by the total weight of the running servers. The result designates which server receives the request. The URI is always directed to the same server as long as no server goes up or down.
HTTPHEADER: The HTTP header name is looked up in each HTTP request. If the header is absent or does not contain a value, the round robin algorithm is applied.
URL: The URL parameter specified in the argument is looked up in the query string of each HTTP GET request. If no value or parameter is found, then a round robin algorithm is applied.
You can also Specifies how persistence tracks and stores session data. Requests are directed to the same pool member for the life of a session or during subsequent sessions.
None : No persistence. Session data is not stored or tracked.
Cookie : Uses a unique cookie to identify the session the first time that a client accesses the site. In subsequent requests, the cookie persists the connection to the appropriate server.
Source IP : Tracks sessions based on the source IP address. When a client requests a connection to a virtual server that supports source address affinity persistence, if the client has previously connected it is returned to the same pool member.
MSRDP :Maintains persistent sessions between Windows clients and servers that are running the Microsoft Remote Desktop Protocol (RDP) service.
SSL Session ID : Uses an NSX-supported HTTPS traffic pattern to store and track sessions
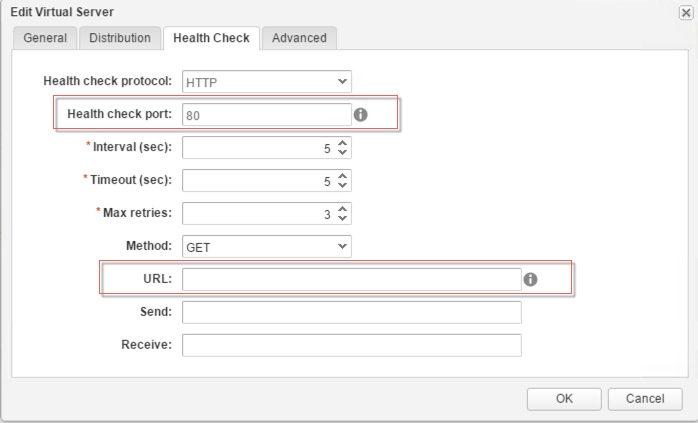
Health Check Tab
The Health Check tab allows you to specify the port number on which the load balancer listens to monitor the health of the virtual server member and the URL is used in the sample request to check a web site’s Health based on the available settings.
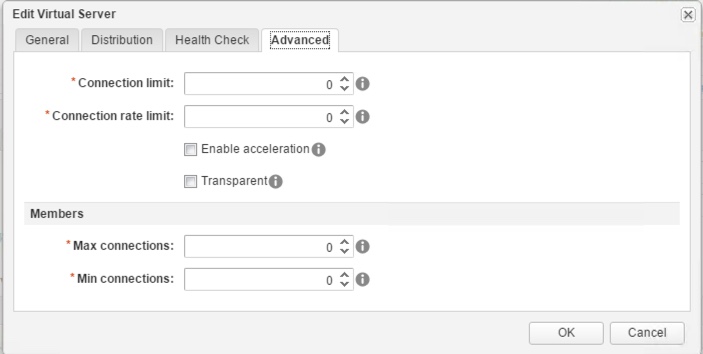
in the advanced tab you further configure the NSX virtual server for things like
Connection limit: The maximum concurrent connections in NSX that the virtual server can process. This setting considers the number of all member connections. ( 0 = no limit )
Connection rate limit: The Maximum number of incoming connection requests in NSX that can be accepted per second. This setting considers the number of all member connections. ( 0 = no limit )
Enable Acceleration: Specifies that each virtual IP uses faster L4 load balancer rather than the L7 load balancer
Transparent: Allow the load balancer pool members to see the IP address of the machines that calling the load balancer. if not selected, the member of the load balancer pool members see the traffic source IP address as the load balancer internal IP address
Max Connections: The maximum number of concurrent connections that a single member can recognize. if the number of incoming requests is higher than this value, requests are queued and then processed in the order which they are received as connections are released ( 0 = no limit )
Min Connections: The minimum number of concurrent connections that a single member must always accept. ( 0 = no minimum)
The End Eh!

One comment