
Content lifecycle management in vRealize Suite Lifecycle Manager provides a way for release managers and content developers to manage software-defined data center (SDDC) content, including capturing, testing, and release to various environments, and source control capabilities through GitLab integration. Content Developers are not allowed to set Release policy on end-points only Release Managers can set policies.
You can use content lifecycle management to dispense with the time-consuming and error-prone manual processes required to manage software-defined content. Supported content includes entities from
-
vRealize Automation 7.2 and later
-
vRealize Orchestrator 7.x and later
-
VMware vSphere 6.0 and later.
-
vRealize Operations Manager 6.6.1+ and later.
-
Source Control server: All latest versions of Gitlab Community Edition and Enterprise Edition.
Content lifecycle management in vRealize Suite Lifecycle Manager is similar to content lifecycle management with the vRealize Code Stream Management Pack for DevOps where VMware announced its end of availability as of April 12th, 2018 ( KB53222 ), but with the following differences:
-
Content lifecycle management is deployed as part of vRealize Suite Lifecycle Manager on a single appliance. It has a new user interface and is tightly integrated with vRealize Suite Lifecycle Manager core services.
-
vRealize Orchestrator is embedded on the appliance to run only content workflows.
-
Updated vRealize Code Stream Pipeline services.
Our focus in this blog is the vSphere Content Endpoint and the type of content we support which is :
|
Type |
Value |
Description |
|---|---|---|
|
vSphere-CustomSpecification |
vSphere vCenter 6.0+ |
Captures guest operating system settings saved in a specification that you can apply when cloning virtual machines or deploying from templates. |
|
vSphere-Template |
vSphere vCenter 6.0 + |
Captures template to deploy virtual machines in the vCenter Server inventory. |
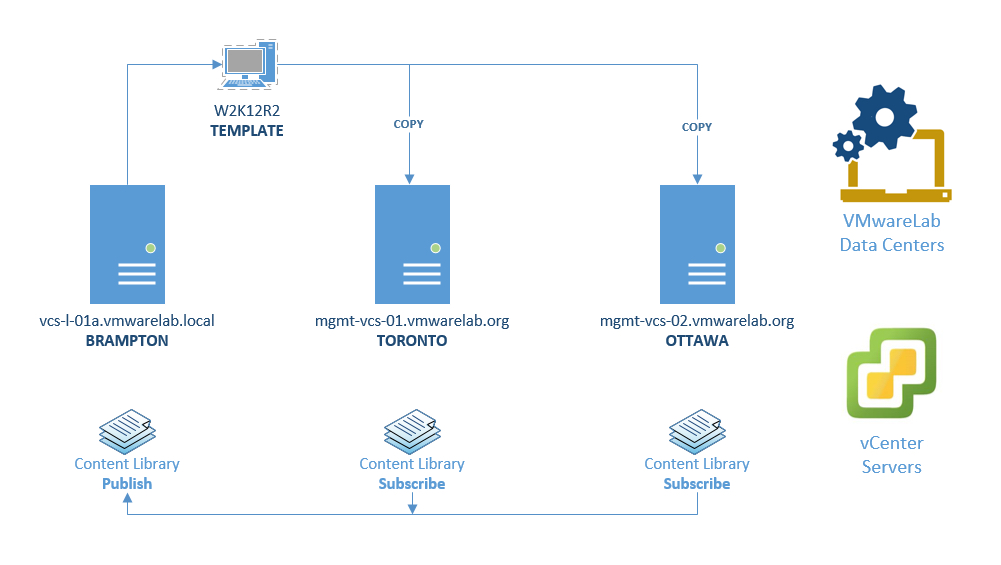
Using vRSLCM 2.0 we will see how we can capture a vSphere Template ( W2K12R2STD64 ) from the VMware vCenter ( vcs-l-01a ) at the BRAMPTON development Data-Center to both VMware vCenters ( mgmt-vcs-01 & mgmt-vcs-02 ) at the TORONTO and OTTAWA production Data-Centers respectively.
Prerequisites
- A pre-created template ready to be captured at the Brampton vCenter.
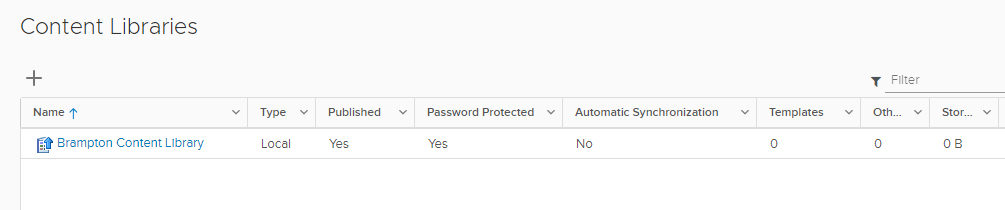
- A Content Library Created and Published at the Brampton vCenter.
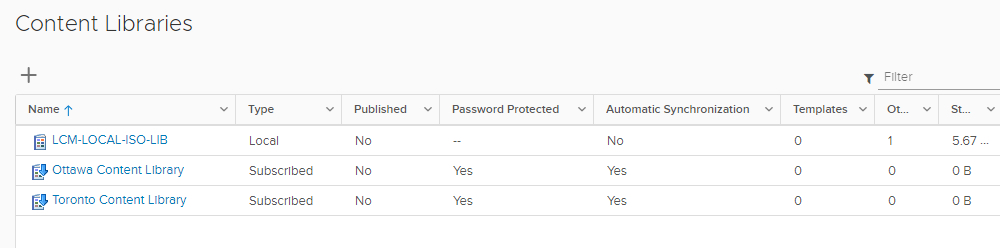
- A Content Library Created by subscribing to the Brampton Content Library for both Toronto and Ottawa vCenters.
- You have your Data Centers and its associated vCenter Server already setup in vRSLCM 2.0
Once you complete the prerequisites we will setup everything in vRSLCM 2.0
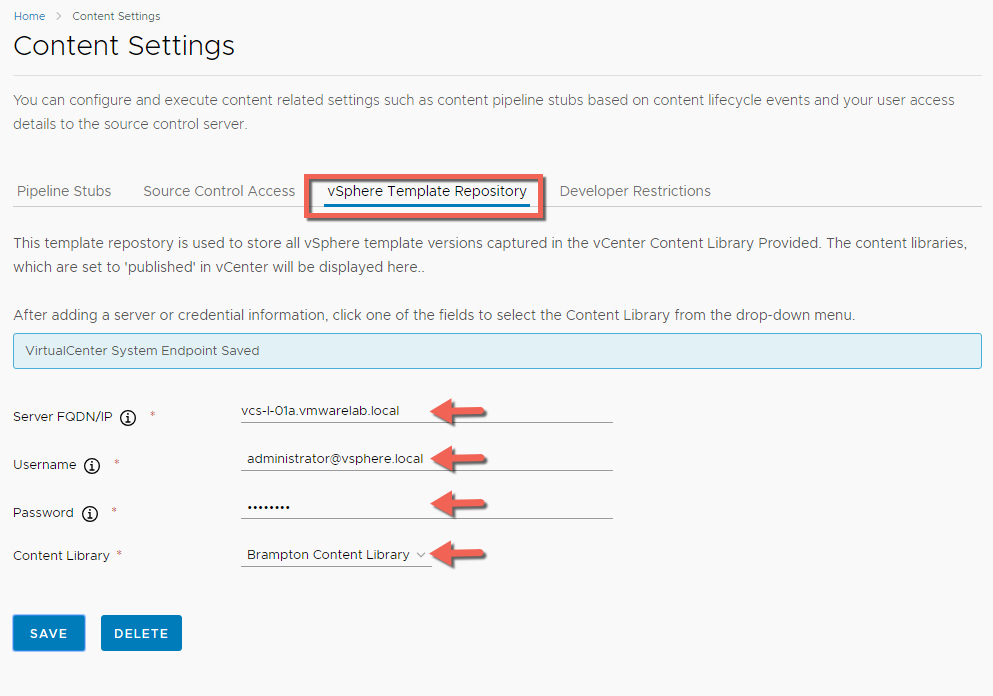
Step 1: Configuring vSphere Template Repository
This template repostory is used to store all vSphere template versions captured in the vCenter Content Library Provided that we created and published. The content library, which we set to ‘published’ in vCenter will be displayed and selected here based on the selected vCenter instance.
A best practice is to have this vCenter instance close to where the templates would typically be captured, and that is the BRAMPTON development vCenter in our scenario and its published Brampton Content Library.
Select Content Management -> Content Settings -> vSphere Template Repository and fill all the required fields.
Step 2: Creating the vCenters Content Endpoints
Here we are going to add a content endpoint to an environment to capture, test, deploy, or check-in a content package but before you can do that you should at least have added an environment vCenter endpoint when you first setup vRSLCM.
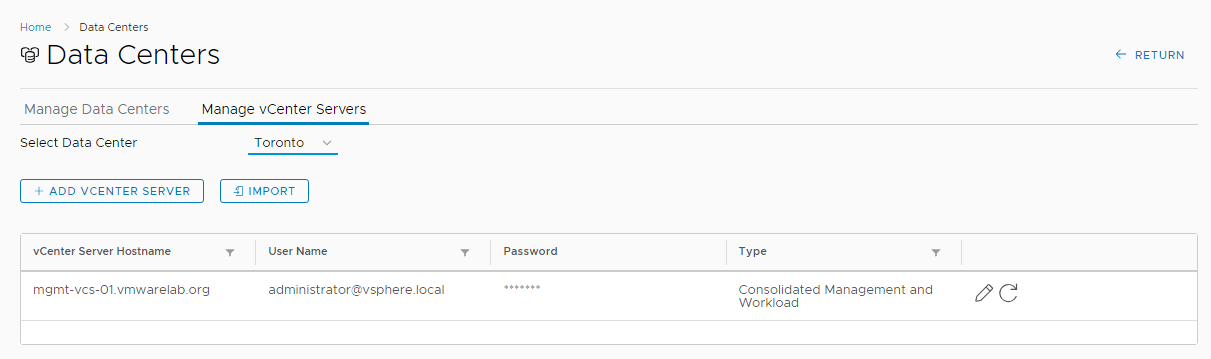
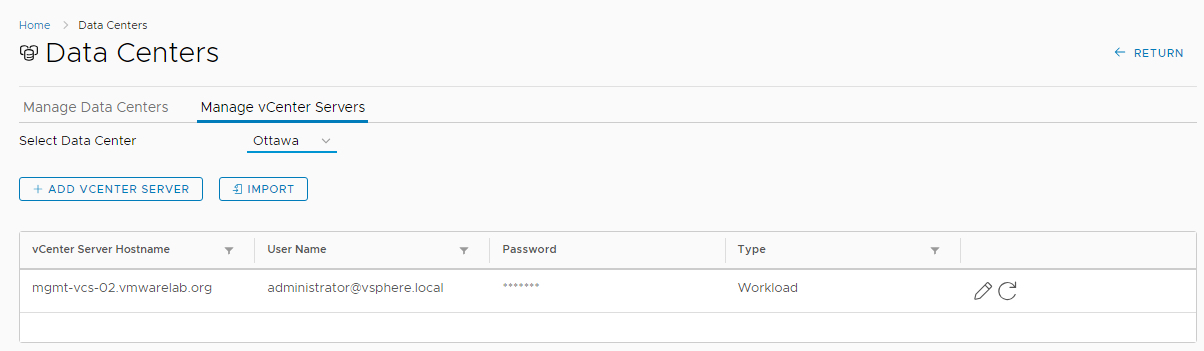
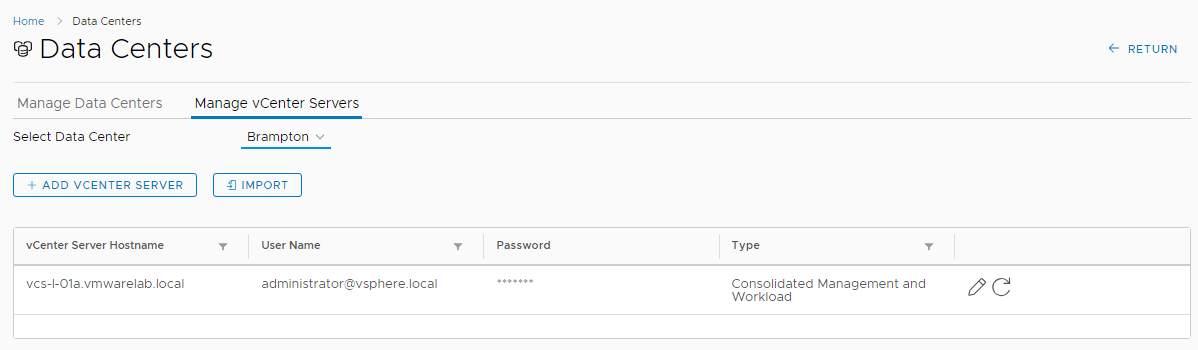
For example in our VMwareLab we have 3 environment vCenter endpoints added under the Data Centers -> Mange vCenter Servers. as you can see we have 3 Data Centres ( Toronto, Ottawa and Brampton ) and each of those data centres have there own vCenter managing the vSphere Environment.
Now lets go ahead and create our vCenters Content endpoints.
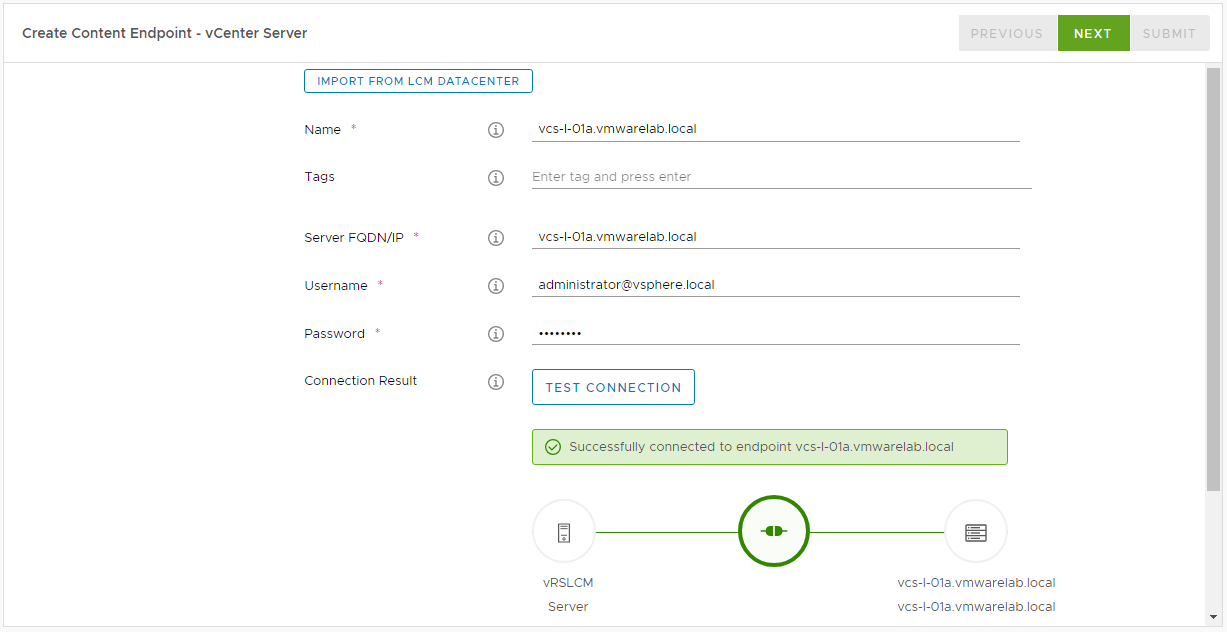
We will be doing these same steps for the 3 vCenter Content Endpoint we are adding but when we hit next we need to set the appropriate polices for the content endpoint we are adding.
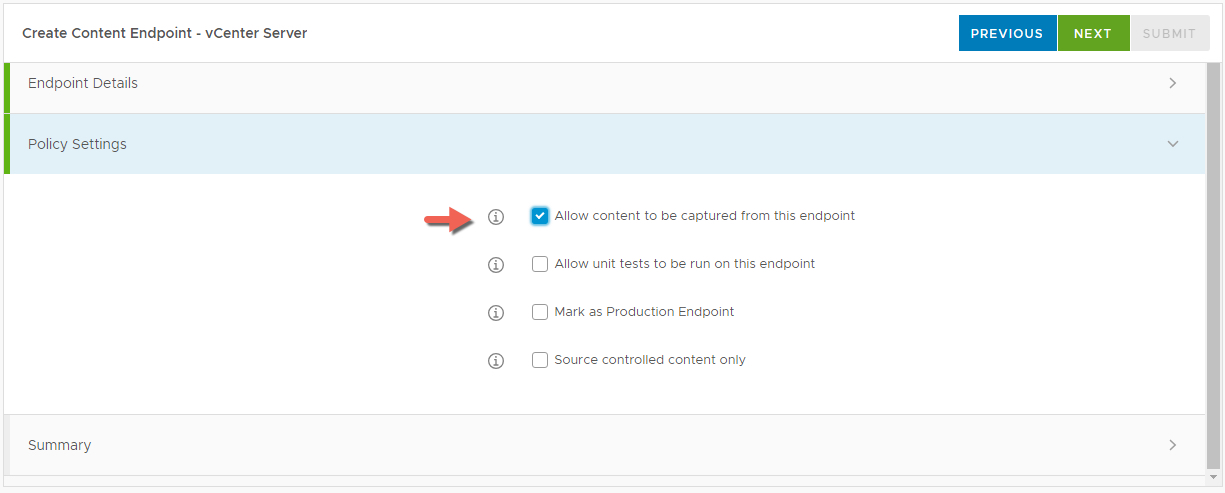
So for the BRAMPTON vCenter Content Endpoint (vcs-l-01a) will need to set the policy to Allow the content to be captured from this endpoint the click NEXT to review the summary and SUBMIT
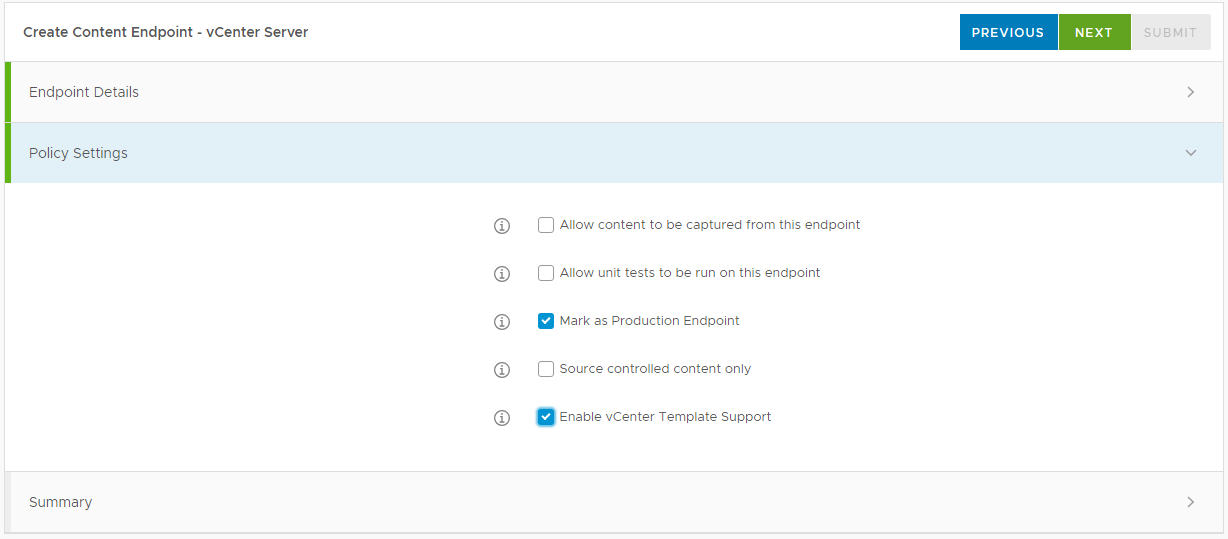
As for the TORONTO vCenter Content Endpoint (mgmt-vcs-01) and OTTAWA vCenter Content Endpoint (mgmt-vcs-02), since these are the destination endpoints where the content/Template will be copied to, we will need to set the policy to Mark as Production Endpoint i.e. Release Endpoint and Enable vCenter Template Support to configure where the template is deployed to, in each vCenter Server.
Repeat this when the adding the vCenter Content Endpoint respectively for both TORONTO and OTTAWA vCenter Servers / Data Centres
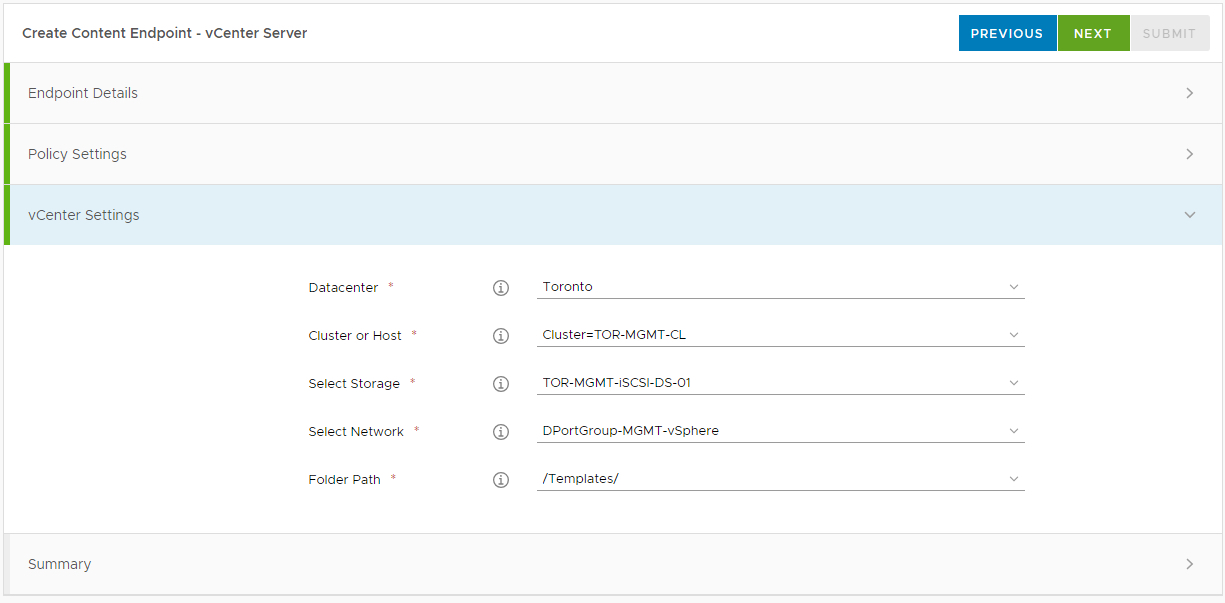
vCenter Server settings can be added to an LCM data center, once vCenter data collection is competed this endpoint is seen when importing from LCM and reduces the time to fill in the form as all the properties have been collected. use the drop down menus to select your vCenter Settings to determine again where the template will be stored when copied.
Once the endpoint is created, it validates if the configuration is correct. It can connect through API and that the configuration of the local subscriber details is setup to point to the publisher as defined in Content Settings/vSphere Template Repository. If there is a problem, then the endpoint is disabled and an error is displayed when you cover of the warning.
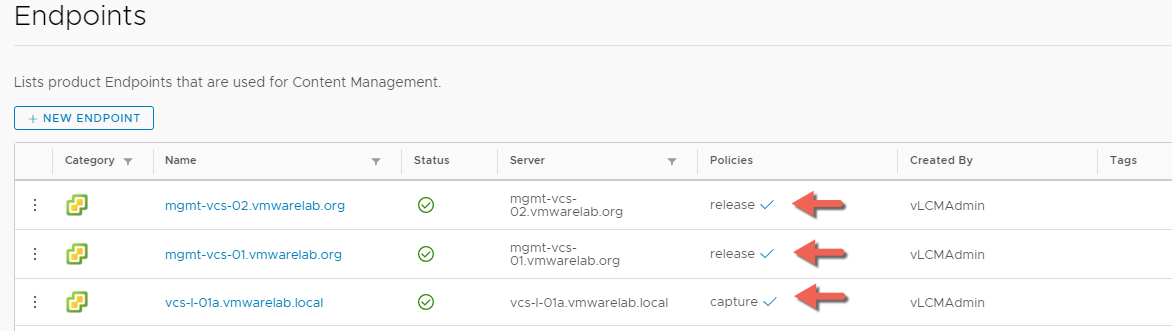
We can see now all 3 vCenter Content Endpoints with the appropriate policies where we will be capturing content from BRAMPTON vCenter ( vcs-l-01a ) and releasing to TORONTO vCenter (mgmt-vcs-01) and OTTAWA vCenter (mgmt-vcs-02).
in our lab we didn’t choose any testing destination but we could have selected one of the destination vCenters as a testing Endpoint where we can test the content before releasing it to production. All we had to do is select the Allow unit tests to be run on this endpoint Policy under the Policy settings when we added the vCenter Content Endpoint.
Step 3: Adding / Releasing Content in vRSLCM 2.0
Content is a collection of files that contains definitions that represent software defined services.
After you add a content endpoint to one or more environments, you can manage the software-defined content that each environment contains. You can use vRealize Suite Lifecycle Manager to perform the following operations on content:
-
Capture content from an endpoint
-
Deploy to test and run unit tests
-
Check-in content
-
Release content to production
For example, a YAML file for a vRealize Automation blueprint or an XML file for a vRealize Orchestrator workflow. Content is linked together so that when you capture a vRealize Automation blueprint, all dependencies are also displayed in the content catalog, and they can each have their own versions. vRealize Suite Lifecycle Manager displays dependency information within each content version.
We have mentioned in this blog that will be applying the capture and release content operations on the vCenter Template (W2K12R2STD64) so we can copy it from the BRAMPTON Development Data-Center to TORONTO AND OTTAWA Production Data-Centres.
so Lets get started now but Navigating to Content Management -> Content and clicking on ADD CONTENT

In the next window we can select which content operation/action we want to select. Lets make sure we select both Capture and Deploy then click PROCEED

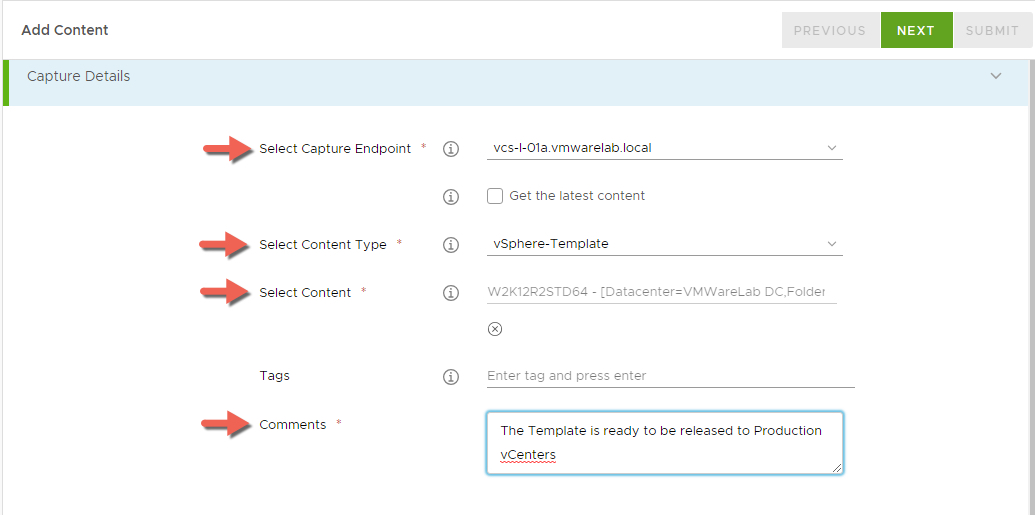
In the Capture Details Window will fill all the mandatory fields :
- Select the Capture Endpoint from the drop down menu. this is going to be our BRAMPTON vCenter (vcs-l-01a.vmwarelab.local)
- Select the Content type as vSphere-Template
- Select the content Template you need to capture, in our scenario its the W2K12R2STD64
- Enter a comment as The Template is ready to released to Production vCenters
Click NEXT to select which endpoints you want to release the content to
- Select All Endpoints which in our case it will the TORONTO (mgmt-vcs-01) and OTTAWA (mgmt-vcs-02) production vCenters and the order of the release where I made sure the release start with the TORONTO vCenter first.
- Enter a release comment such as Releasing W2K12R2STD64 to Production vCenters
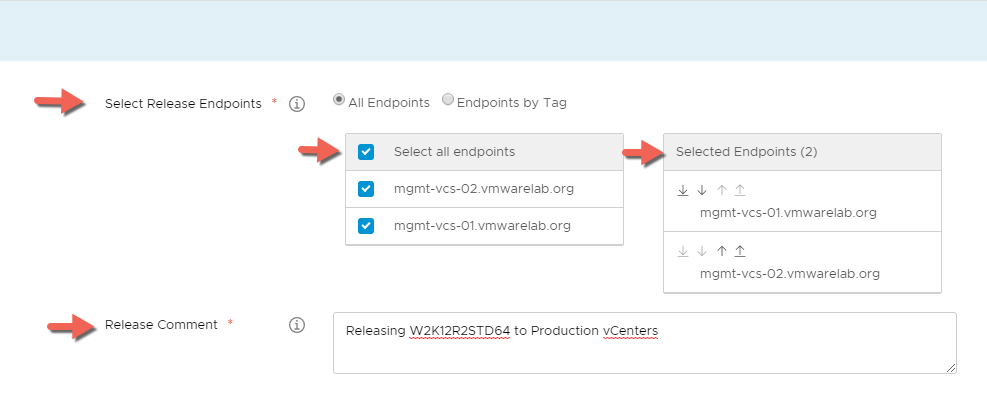
click NEXT and review the Summary. When ready click SUBMIT
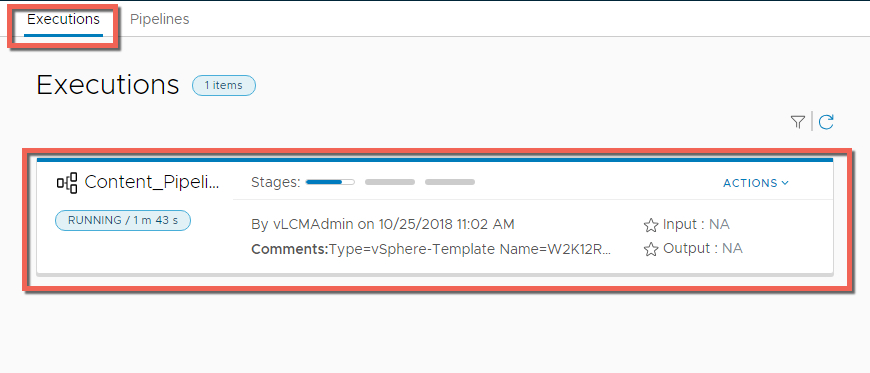
Once you submit this form you can take a look at the Content Pipelines > Executions where you can monitor the progress of the request. Also please note that the request will be queued in the system for processing and may not show immediately.
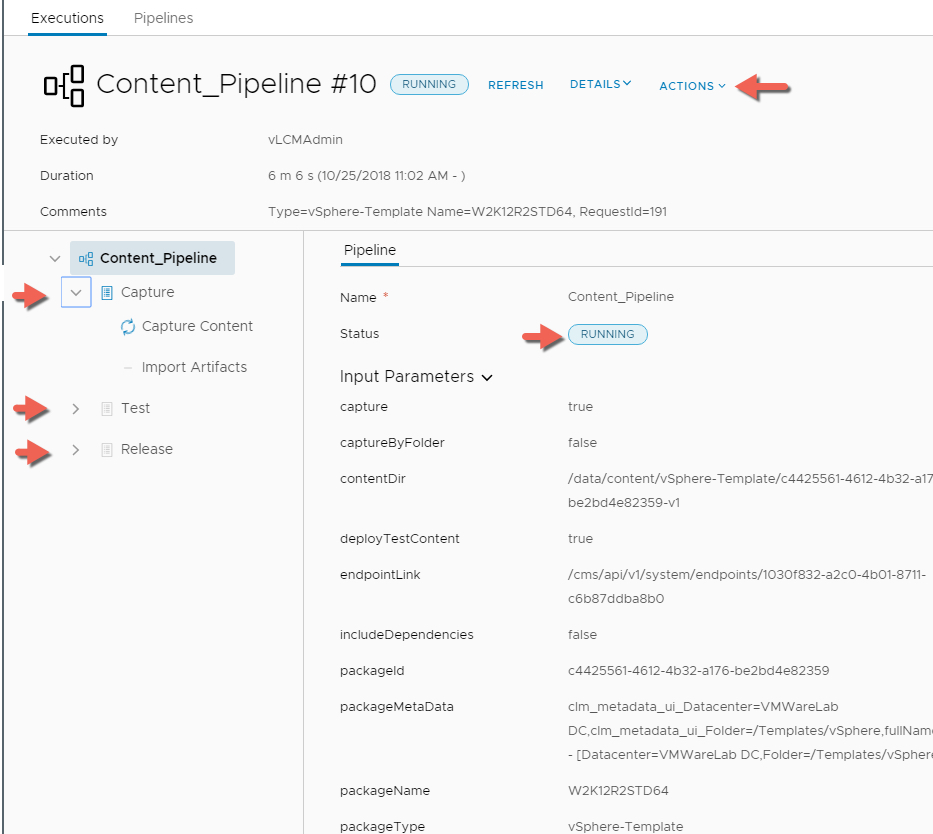
You can click on the Content Pipeline Name or from the ACTIONS menu select View Execution to get more detailed informations like who executed the Content Pipeline and the elapsed Duration so fat or take ACTIONS like canceling or Pausing the Content Pipeline. You will need to REFRESH the page from time to time to see the progress if you stay on the Execution Page.
You can also see each of the Capture, Test or Release stages in action and monitor each stage.
Step 4: Behind The Scenes
If you are wondering whats happening behind the scenes I made a list of the steps that vRSLCM takes when it executes the Content Pipeline for the Captured vSphere template.
Capture Stage
- vRSLCM will Export the selected template as OVF from the BRAMPTON Development vCenter.
- vRSLCM will Create a Library Item in the Brampton Content Library and Upload the Files to the Library item. This is the same Content library that we configured in vRSLCM as the vSphere Template Repository which is used to store all vSphere template versions captured.
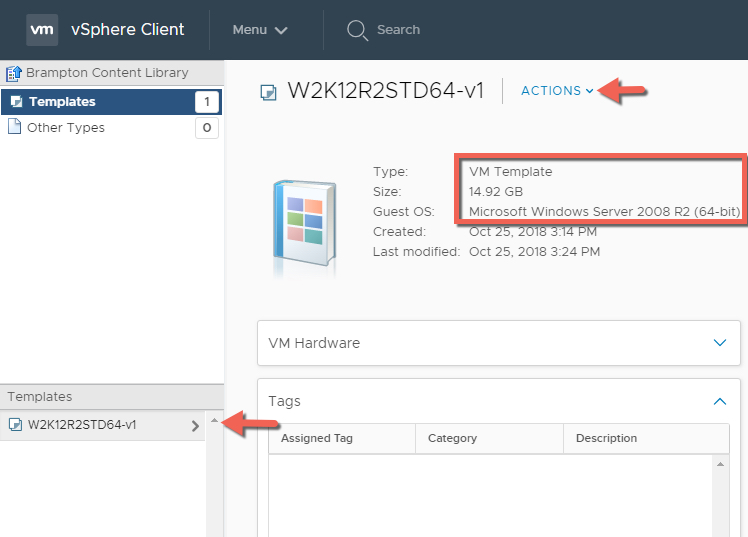
Now that the vSphere template is uploaded fully to the vSphere Template Repository if we look back at the Pipeline we see that Capture and Test ( The Fact its not selected ) are completed and we move on to the final stage and that is the Release Stage.
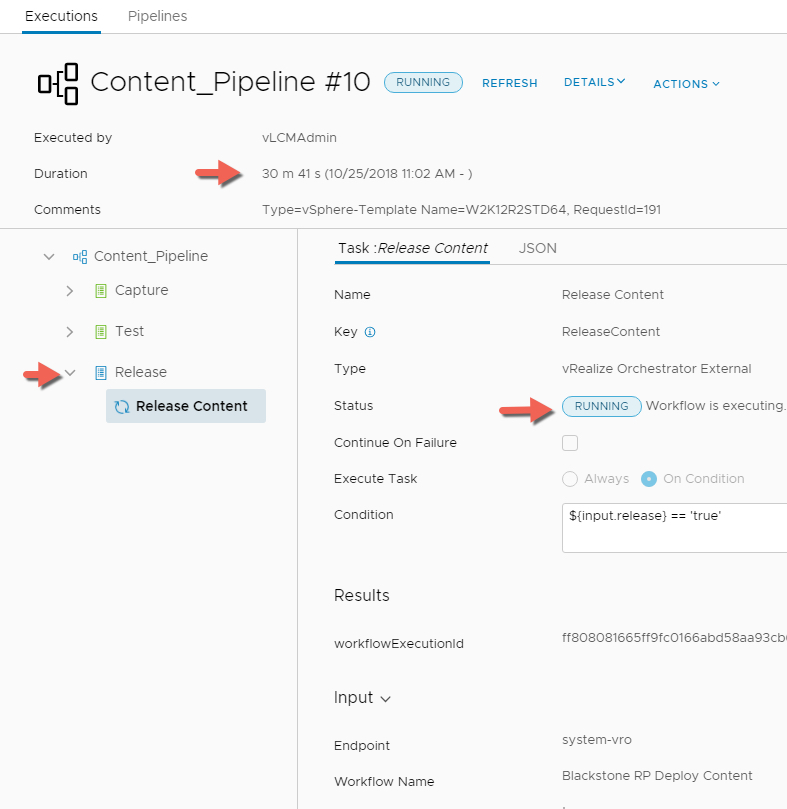
Release Stage
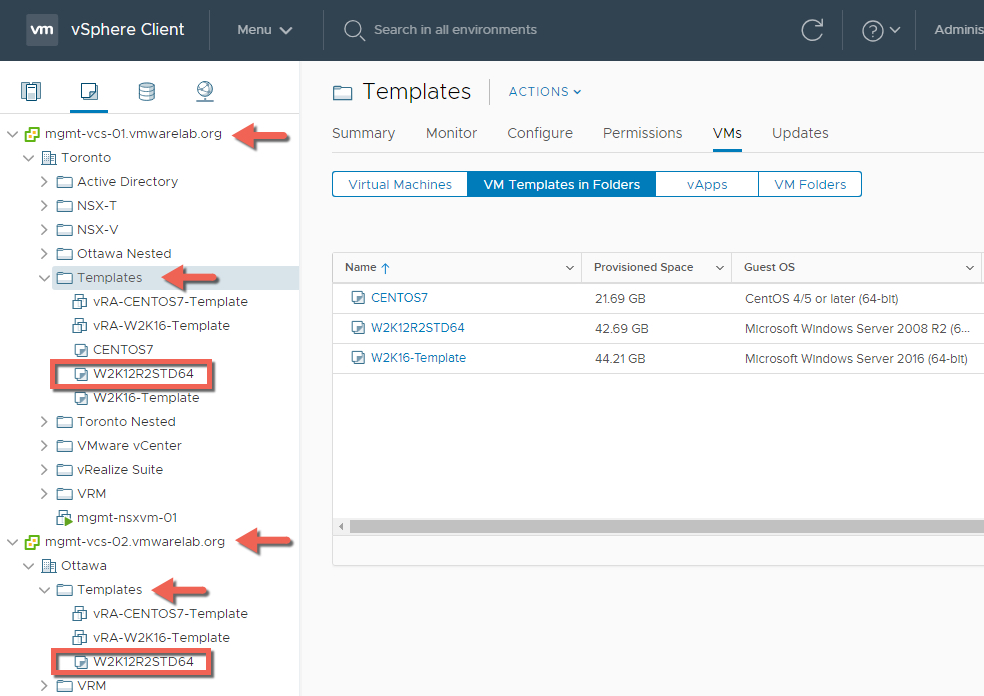
- vRSLCM will Sync the Toronto Content Library first and Sync the Library template item as W2K12R2STD64-v1 and then deploy the OVF package from the content Library to the Toronto Cluster Resource Pool by transferring the image Virtual Machine Template files to one of the Toronto cluster hosts then marking the Virtual Machine as a Template.
- Once completed vRSLCM will repeat the process but this time it will Sync the Ottawa Content Library and deploy the OVF package to the Ottawa Cluster Resource Pool by transferring the image Virtual Machine Template files to one of the Ottawa cluster hosts then marking the Virtual Machine as a Template.
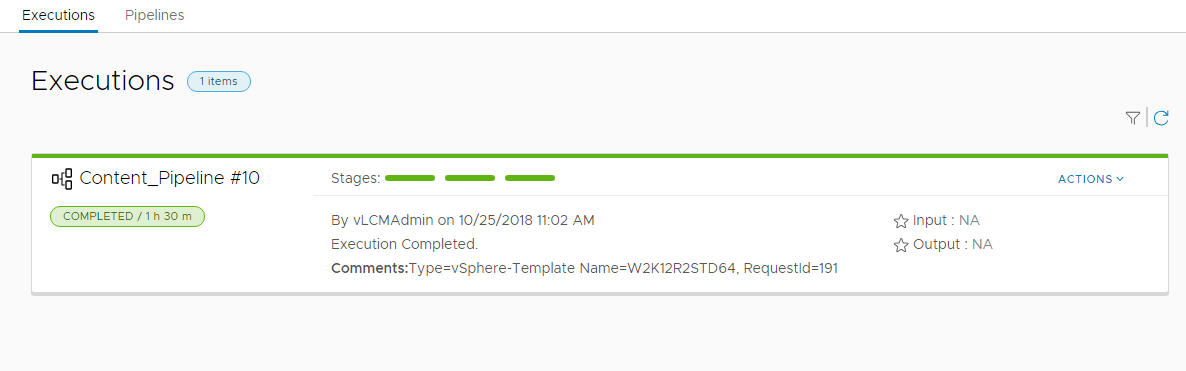
if you go back to VRSLCM and look at the Pipeline execution we find it was completed Successfully and managed to do that in 1h 30m considering I don’t have the fastest storage in my Home Lab.
now we can always go back to the captured content (vSphere-Template) and Capture newer version of the template or re-deploy a specific version that we captured perviously to existing or newer production vCenters.

If you made it this far in the blog, I hope you found it informative and helpful.
Please remember that this is just one type of content were we can manage its content lifecycle, as vRSLCM like we mentioned at the beginning supports different types of content across the vRealize Product Suite.
The End Eh!


Leave a comment