A new VMware vRealize Automation plugin 5.0 was released on November 2nd on the VMware market Place Link for Servicenow that provides an out of the box integration between the Servicenow portal and vRealize Automation 7.5 catalog and governance model. It enables ServiceNow users to deploy virtual machines using vRA 7.5 and perform basic ServiceNow day 2 operations on their CMDB assets.
Update : There is now an updated version of the ITSM plug-in 5.1 that was released right after and currently available on the VMware Market Place Link
Key Features
- Enables ServiceNow to integrate vRealize Automation 7.5 with ServiceNow platform and provide the ability for ServiceNow users to access the vRA catalogs, resources within ServiceNow.
- The integration will allow end users to Request vRA catalog items from ServiceNow portal.
- The plugin will fetch categories, catalog items and resource data from vRA platform and extend ServiceNow functionality to be able to render vRA catalog items into ServiceNow dynamically and manage vRA resources.
- Day2 operation actions performed in ServiceNow CMDB will be updated back to vRA platform by giving API calls to vRA.
- The plug-in supports vSphere, Amazon, Azure, and XaaS virtual machine provisioning, including formless and form based day 2 operations
In addition to all the above generic key Features, the ITSM 5.0 plug-ing includes fixes and new features such as :
- Easier plug-in configuration through service account and Servicenow based RBAC and Entitlements
- Multi-vRA support
- Day 2 operations Enhancements
- vRealize Business field support
- ADFS or SSO setup are not required
- Improve Login process for ServiceNow users with seamless authentication/entitlement model
- Does not require end user access to internal vRA portal
- Fully supported by VMware Global Services Support – GSS
In this blog we will take a look at how to deploy and configure the newly anticipated ITSM 5.0/ 5.1 Plug-in for vRealize Automation 7.5.
Update : Here are the fixes that were provided in the updated ITSM 5.1 plug-in:
- Dynamic dependent drop-down fixes
- Size, Image profile fixes
- Disk fixes for null error
- Token Encryption
- Improved Entitlement Module
- Access control fixes(ACL)
- Duplicate catalog item form section fixes
In addition to this, there is scope change in V5.1 compared to V5.0 to avoid collision with V4.0.
So let’s get started, Eh!
Step 1: Prerequisites
The ITSM 5.0 plugin is targeted for vRealize Automation version 7.5. ITSM plugin interacts with vRealize automation using MID server. MID server is an IaaS component (deployed on prem – in the same network as vRA 7.5) having installed binaries provided by Service Now. For enabling the MID server component – Service now instance should be registered in MID server.
The ITSM 5.0 Plugin is compatible with the following ServiceNow releases (Jakarta, Kingston, London). After registering the vRA instance on Service now portal, data collection needs to be done to fetch all the required vRA contents (like Catalog).
Once the catalog is imported to Service now, a user can place requests from the catalog based on their entitlements.
You will need :
- Download a copy of the ITSM Plugin 5.0 from VMware market place.
- A ServiceNow Instance – Jakarta, Kingston orLondon release.
- A MID Server established and connected to your ServiceNow Instance.
If your looking for how you can do that, please reference my pervious blog on ITSM 3.0 blog

- A vRealize Automation 7.5 instance configured on prem where you have configured and tested one or more blueprint deployments successfully.
Make the plug-in accessible from all application scopes
To do that we need to navigate to Script Includes by using the search from the left navigation menu. Then Selecting System Definition > Script Includes
Once you select the Script Includes, do a search for JSUtil on the right page for the Name field. Once you find the script Open it by clicking on it.

On the Accessible from drop-down, select All Application Scopes then select Update. Ensure that the changes are saved.

Enable Application Access on Tables
You must enable application access to certain tables for the plug-in to work. Repeat the following steps on all the Tables below to modify:
- user_criteria
- sc_category_user_criteria_mtom
- item_option_new
- catalog_script_client
- question_choice
- catalog_ui_policy
- catalog_ui_policy_action
- sc_cat_item_user_criteria_mtom
- sc_req_item
- sc_category
Option 1 : Procedure To Enable Application Access
- Log in to ServiceNow as an administrator.
- Search for System Definition in the filter navigator and click Tables
- Search for each table in the Name filter on the right.

- Click on the Table Label under the Label column that matches the Table Name search you did. All the records are in the Global Application mode, you will need to click the option on the top of screen to edit the record. That is if your were still asked, usually you shouldn’t have to since we enabled Global access from all application scopes in the pervious step.
- Click Application Access.
- Select the can read, can create, can delete, and can update check boxes for each table.
- Click Update and Repeat.

Option 2 : Procedure To Enable Application Access
You may find this way faster to update all the tables listed, please watch the video to do so. You will be adding .list at the end of the table name and using the Filter navigator to search for it
Step 2: Installing the ITSM 5.0 Plug-in
- Log in to the ServiceNow portal as a system administrator.
- Select System Update Sets > Retrieved Update Sets > then select Import Update Set from XML

Click Choose File on the dialog to choose the file to upload, and then select the VMware-vRealize-Automation-Application-ITSM-V5 file > Click Upload.

In the Retrieved Update Sets list, select the VMware vRealize Automation Application ITSM V5.0 update set in the Name column by clicking on it once its in a Loaded State.

Select Preview Update Set to validate the update set before committing it.

A dialog box confirms update set validation.

Click Close and review the errors
In my testing I was using the ServiceNow London Release so I encountered 4 errors as you can see in the screenshot below. From pervious experience I was told many times that these records existed in the instance where the plug-in was developed and thats why we are receiving these error during the validation since these records don’t really exist in our instance.
go ahead and click on Accept Remote Update on each of the errors.

If you are using the ServiceNow Jakarta release and ServiceNow displays the below error message, click Accept remote update as well.
"Could not find a record in sc_homepage_renderer for column homepage_renderer referenced in this update"
Once you have accepted all remote updates click Commit Update Set

A dialog box opens automatically after you click Commit Update Set while the commit action is in progress. When its done click the Close button when it appears to dismiss the dialog. It took 25 minutes to complete so please be patient.

From the left menu, Click Update log
The install is complete when a message appears stating Finished update load from database but you can continue on at this point as long as you can see that the state of the Plug-in Update Set is Committed.
To do that select Retrieved Update Sets in the left menu and verify that the update set has a status of Committed.

* Important Note Only if your deploying the ITSM 5.0 plug-in
After the installing is complete, search for Integration – vRealize Automation > then select Administration > System Properties
On the System Properties page Search for the Name and Change the value of the x_vmw_vmware_vrasp.vrasn.group.assignment_group System Property to > d64ea542db920300435fd001cf961913
This is the sys_id of the group which is for approval of requests within ServiceNow. The value was wrongly captured in the 5.0 final build therefor it was documented to change its value.
* Again this is not needed if your installing the ITSM 5.1 version of the plug-in
Step 3: Users Facts and Setup
- The Plugin configuration can be done by a system administrator like I m doing in this blog or by a user with x_vmw_vmware_vrasp.vrealize_automation_catalog_admin privileges.
- You will need to Add the role x_vmw_vmware_vrasp.vra_user in ServiceNow for all users that must access vRealize Automation, to enable those users to see the vRealize Automation User Portal module which will we will cover later in the blog, including admin,catalog admin, and end user
- RBAC in ITSM 5.0 is independent from vRealize Automation RBAC.
- Login and Authentication rules do not require validation from vRealize Automation side. All roles and entitlements are based on the ServiceNow model.
- Approvals can be generated if the users have the x_vmw_vmware_vrasp.vrealize_automation_catalog_admin role and are a member of the vRealizeAutomation-ApprovalManagersGroup group in ServiceNow.
- The plug-in admin role x_vmw_vmware_vrasp.vrealize_automation_catalog_admin must contain the “catalog_admin”, “itil” and “agent_admin” roles out of the box in order to see and configure the Mid Server module from the left pane.
- The Plugin end users role x_vmw_vmware_vrasp.vra_user must have the “itil” role out of the box.
For my testing purposes and based on the information I just mentioned I granted all the roles to the System Administrator. Of course if your doing this in production you would be selective in terms who have access to these roles.
In Filter Navigator search for System Security > Users and Groups > Users and edit the System Administrator role membership so it includes :

Step 4: Update the vRealize Automation Workflow for Requested Items
The system admin can configure the vRA Workflow for Requested Item using the workflow editor. At a minimum, you must assign the approval group that contains your approvers. When users request vRealize Automation catalog items, this workflow runs, and approvals are sent to the approvers within the approval group before the request is submitted to vRealize Automation.
By default the vRealizaAutomation-ApprovalManagersGroup group is set as an approving group in the workflow. You can change the approval group by the procedure below.
The approval group must contain the x_vmw_vmware_vrasp.vrealize_automation_catalog_admin role.
Follow the steps below if you want to use your own approval group and add it to the vRealize Automation workflow.
- Search for Workflow Editor in the ServiceNow navigation pane and click it.
- Search for vRA Workflow for Requested Item and open it.
- Click the menu button and select Checkout.
- Double-click the Approval group stage in the workflow.
- Click the Edit Groups button.
- Search the list of groups and make the appropriate selections.
- Lock your selection by clicking the Lock icon.
- Click Update.
- Click the menu button and select Publish.
Again for my testing I edited the existing default group vRealizaAutomation-ApprovalManagersGroup so it has the x_vmw_vmware_vrasp.vrealize_automation_catalog_admin role and added the System Administrator as a member by searching in the Filter Navigator for System Security > Users and Groups > Groups and editing the group roles and membership accordingly.


Step 5: Set up the Integration User
You must set up a vRealize Automation integration user. ServiceNow requires this user to import catalog items, categories, request statuses, and resources from vRealize Automation. In order to import items, the integration users must be a business group manager within the business groups that you want ServiceNow to manage. The integration user does not require a role within ServiceNow.
- Log in to vRealize Automation as a business group manager.
- Edit your business groups and assign the integration user as a business group manager.
In our case here I have a business group in vRA 7.5 called Cloud Administrators and I have their AD security group listed as a member of the Group Manager Role.

For our testing will be using the CloudAdmin user which is a member of the Cloud Administrators Group.
Step 6: Register a vRealize Automation Instance in Service Now
With ITSM 5.0 you can register multiple vRealize Automation instances and use catalog items from all of them in one ServiceNow portal.
Note : All requests from ServiceNow for a specific vRealize Automation instance are placed in the name of user registered under the Register vRA module.
Procedure To Register a vRealize Automation Instance
- Log in to Service Now as a plug-in admin.
- Navigate to and click the Register vRAs tab under Integration – vRealize Automation.
- Click New.

- Enter the details of your vRealize Automation instance and click Save

- That takes you back to the Register vRAs menu where you see vRA instance you just configured.
- We need now to Import services and catalog items from the vRealize Automation instance to Service Now, so lets click on the instance.

- Click Import Services and Catalog Items and monitor the import

- You can refresh the page with completed items by clicking List controls in the top left corner of the page and selecting Refresh list until there are no records to display before you move on. .
- Next will repeat the process by clicking on the Register vRAs > Our vRA instance but this time we will Import and reconcile CMDB from your vRealize Automation instance to Service Now.

- Again you can refresh the page with completed items by clicking List controls in the top left corner of the page and selecting Refresh list until there are no records to display before you move on.

Remember that you can always add more vRA Instances or update/ delete your current ones.
Update : Once you’re done, there are some scheduled imports that needs to run before you start using the plug-i. If you don’t run them manually, the scheduled imports will run at there interval time setting but then you will have to wait until they all run.
To speed things up you need to execute the schedule imports in the right order :
- Log in to Service Now as a plug-in admin.
- Navigate to and click the Register vRAs tab under Integration – vRealize Automation.
- Click on the Scheduled Imports
- Run each of the imports in sequence starting with 1 by clicking into each of the scheduled imports and clicking on Execute No, until you run them all.
- Verify that there are no records within the Scheduled Imports Queue before starting the next Import.
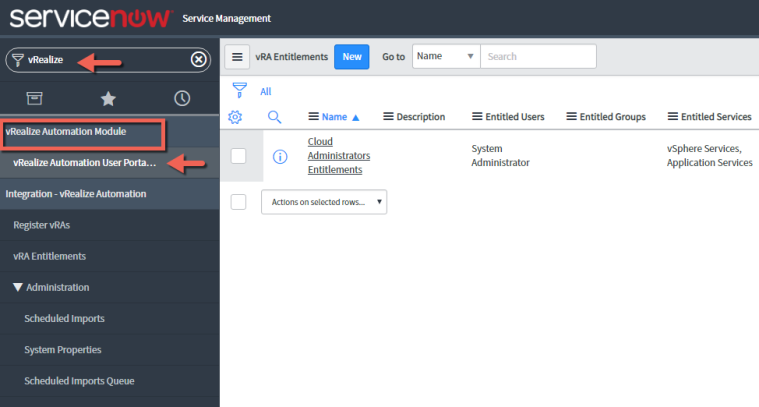
Step 7: Create ServiceNow Entitlement
Here we are going to assign access for services, items, and actions by entitling users and groups in ServiceNow regardless how they are entitled in vRealize Automation.
These Entitlements in the vRealize Automation plug-in for ServiceNow are based on ServiceNow plug-in implementation and are unrelated to vRealize Automation entitlements at all.
Procedure To Create New Entitlements
- Navigate to and click the vRA Entitlements tab under Integration – vRealize Automation.
- Click New.

- Enter a name and description for the entitlements.
- Select the user or group to entitle.
- Select the services, items, and actions you want to entitle.
Update : In my case I have created a user called Scott Smith and granted him the x_vmw_vmware_vrasp.vra_user and the Itil Role. These are the minimum roles for a service now user who needs to access the vRealize Automation Portal in Service Now.
I also selected the vsphere Services Category and one of the items in it ( CentOS7.5 – ServiceNow Testing ) Bluepint and some of the supported Actions
You can click on the search icon to see a full list of services, items, or actions and you can unlock the pad lock to edit your selection for each such section and use the pad lock to lock it down.
Important Note : Not all the actions are supported even though its available in the UI and based on the documentation, Here is what is really supported :
- Deployment Actions : Destroy and Expire
- Item Actions : Suspend, Power On, Power Off, Shutdown and Expire
- Click Submit when your done . As you can see I didn’t select any Services but I selected one basic vRA Blueprint that I wanted to Entitle my user Scott Smith to.

Step 8: Request a Catalog Item
You can request a catalog item from the vRealize Automation user portal. Depending on your vRealize Automation plug-in configuration you might have identical catalog items from different vRealize Automation instances. For environments with multiple vRealize Automation instances, select from which instance you want to request the catalog item.
Procedure to Request a Catalog Item
- Login to ServiceNow Portal as Scott.Smith
- Navigate to and click the vRealize Automation User Portal tab under vRealize Automation Module that will open a new tab where you can access the portal
- In the vRealize Automation user portal, click Catalog Items.
- Select the vRealize Automation instance, from which you want to request a catalog item

- Select a category and click Request on the catalog item.

- Enter the details of your request if any and click Submit.

- You are redirected to the Activities tab where you will see its awaiting approval

- You can click on the Request to find more details like the Stage or the State of the request . Once approved by the Approval group where the System Administrator happen to be a member in our case here.
- For the Approvers to approve any of the requests they also can also go to the vRealize Automation Portal in ServiceNow and click on the Activities Tab > Approvals, find and click on the request that is Awaiting Approval and Approve or Reject the request.

- Once Approved, our user Scott Smith can see that its approved in his own portal Under the Activities Tab > Requests

- On the vRealize Automation side of things we can see that the request Blueprint is being provisioned

- The ServiceNow user can continue to track the machine request status through the Activities Tab until the request is complete and closed in ServiceNow.

- If your user is entitled, you can make changes to your deployments and virtual machines after they have been created.
- Your user must have the specific entitlement that corresponds to the action you want to make. From the Actions tab you can power on, restart, expire, destroy, power off your deployment, and more.

Hope you found the blog around the new ITSM 5.0 Plug-in beneficial if you have made it this far. This was a quick introduction around the plug-in installation and configuration, of course there will be more things that need testing as I continue to use the Plug-in. Thank you for your time and until next time.
The End Eh!

Great post Maher, ITSM 5.0 is looking good.
LikeLiked by 1 person
great blog, very useful. THANKS A LOT
LikeLike
Great blog as always! Really helpful!
LikeLike
can anyone tell where we need to create the integration user mentioned in point 5 either in service now or in VRA.
LikeLike
The integration user is a vRA user with Role Privileges that gives the account access to the blueprints that you need to expose in Service Now.
LikeLike
The integration user is a vRA user with the required permissions and blueprint entitlement s that you use when your registering a vRA instance within the ITSM plug-in in service now
LikeLike
Hi Maher,
Good post, just one thing in my case the Business groups have not been populated in the Request form.
Any ideas ?
Thanks
LikeLike
Hi Irfan, i m assuming you are installing the ITSM 5.1 plug-in. usually for the business group to show up, there are two scheduled jobs that needs to run for the menu to populate if you don’t run them manually the first time then they will run at there interval setting time. so now if you already did the two imports within the vRA registration (Register vRAs ) switch to scheduled imports under the integration -vRealize Automation menu and simply execute import BusinessGroups schedule
LikeLike