VMware’s cloud automation services are a set of cloud services that leverage the award-winning vRealize Automation on-premises offering. These services make it easy and efficient for developers to build and deploy applications. The cloud automation services consist of VMware Cloud Assembly, VMware Service Broker, and VMware Code Stream. Together, these services streamline application delivery, enable cloud flexibility and choice, and control risks. Additionally, these services facilitate collaboration between traditionally siloed groups helping further with accelerating business innovation.
- VMware Cloud Assembly: Developers want the same experience of automating deployment and consumption of infrastructure and applications in private and hybrid clouds as they adopt public clouds. Cloud Assembly delivers unified provisioning across all clouds through declarative Infrastructure as Code, including AWS, Azure, and VMware Cloud on AWS. With Cloud Assembly, IT and cloud operations teams can orchestrate and expedite infrastructure and application delivery in line with DevOps principles, improving the overall developer experience, developers get an experience equivalent to provisioning resources from native public clouds.
- VMware Service Broker: Service Broker provides simple, self-service access to multi-cloud infrastructure and application resources from a single catalog, without requiring disparate tools. With Service Broker, operations teams can more effectively govern resource access, and use and enforce security, deployment and business policies across multi-cloud environments.
- VMware Code Stream: Enterprise development teams are creating and iterating on applications faster than ever, but this work is often delivered using a combination of manual scripting and a mix of delivery tools. This creates challenges with delivery speed, visibility, and troubleshooting for code releases. Code Stream automates the code and application release process with a comprehensive set of capabilities for application deployment, testing, and troubleshooting. It features integrations with popular developer tools and supports VMware-based private clouds, VMware Cloud on AWS and native public clouds. With Code Stream enterprises get code and applications out faster and reduce the time it takes to correct issues when they arise.
In part 1 of 2 of this blog post we will explore CAS and how to initially set it up and configure it starting with a new assigned Cloud Organization registered with the above mentioned Cloud Automation Services.
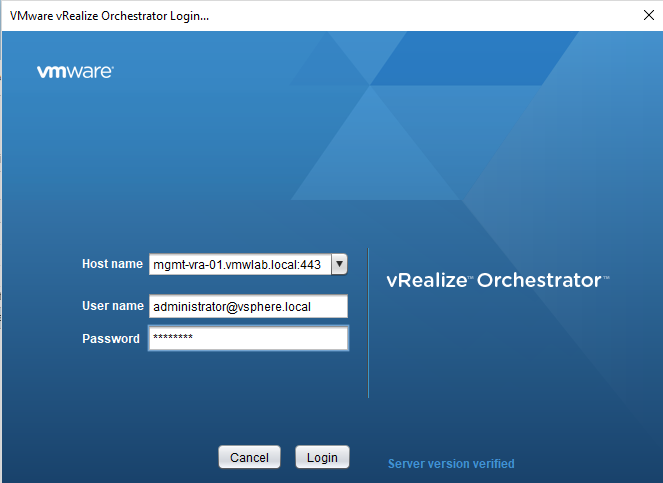
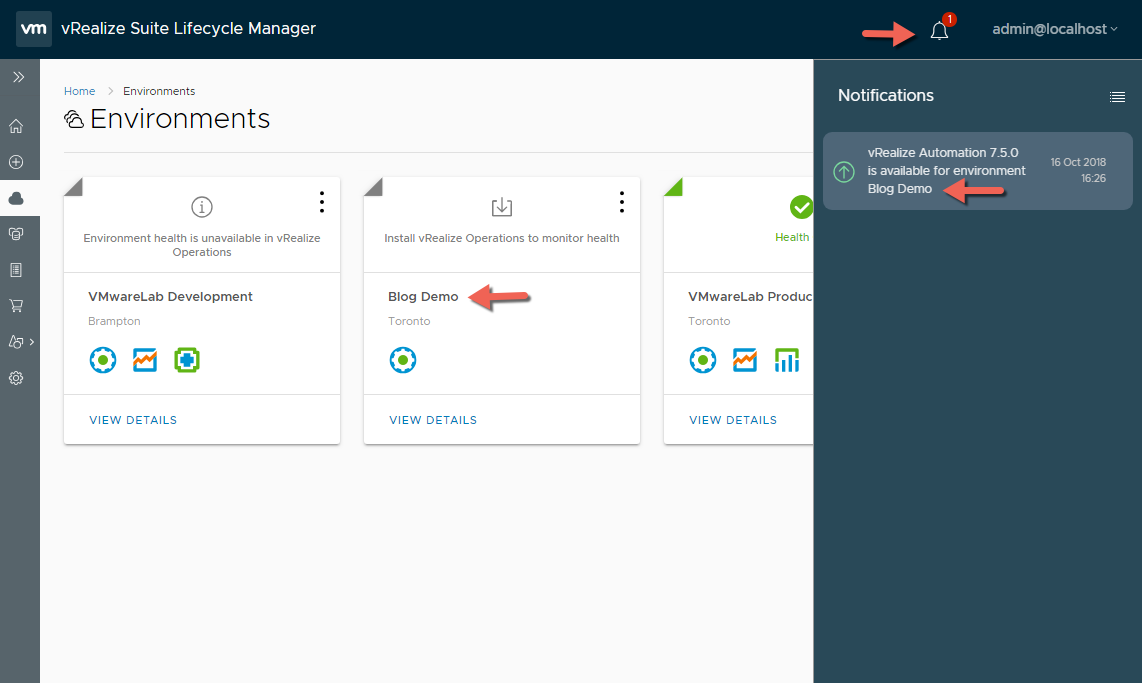
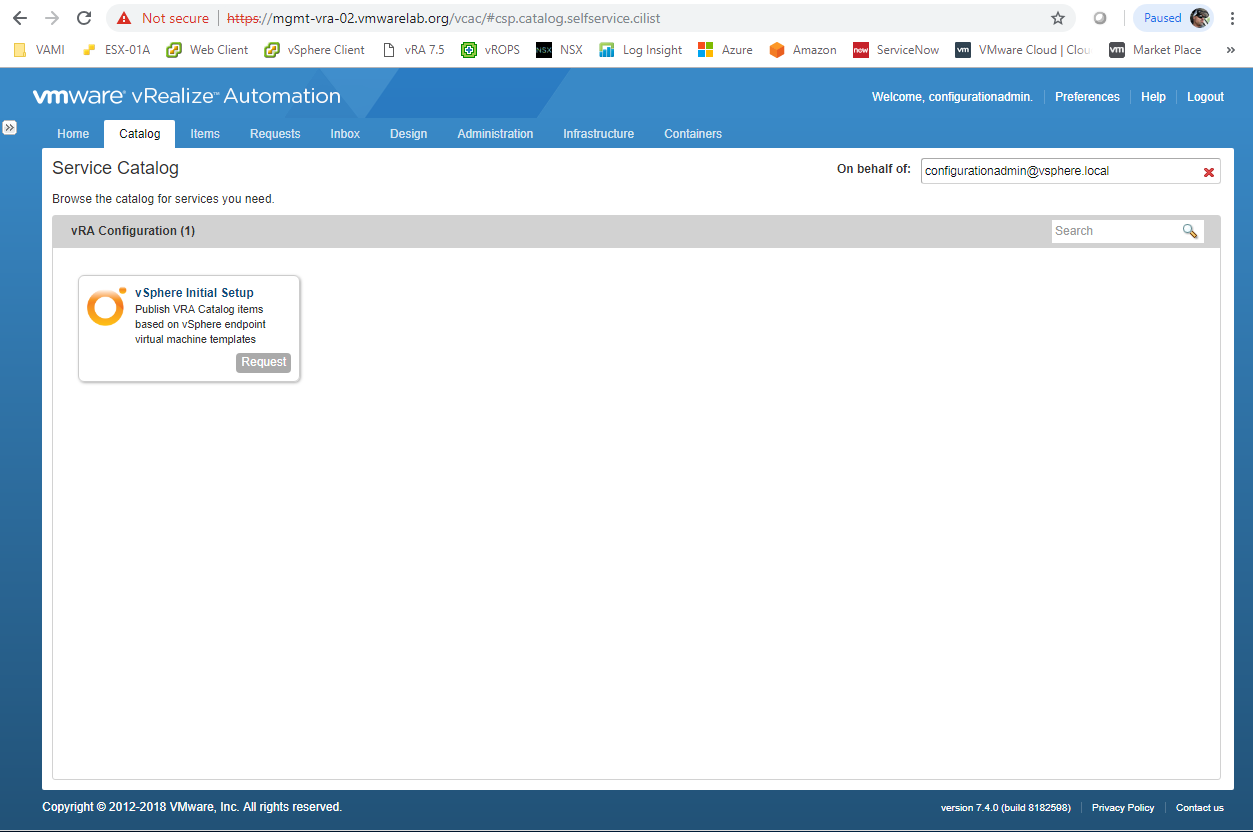
You can access VMware Cloud Services by visiting https://cloud.vmware.com/ then clicking on the Log In menu option to use the services.
Once you sign in with your credentials you will have access to the Console Menu option which will take you in to access the Cloud Automation Services we mentioned above.
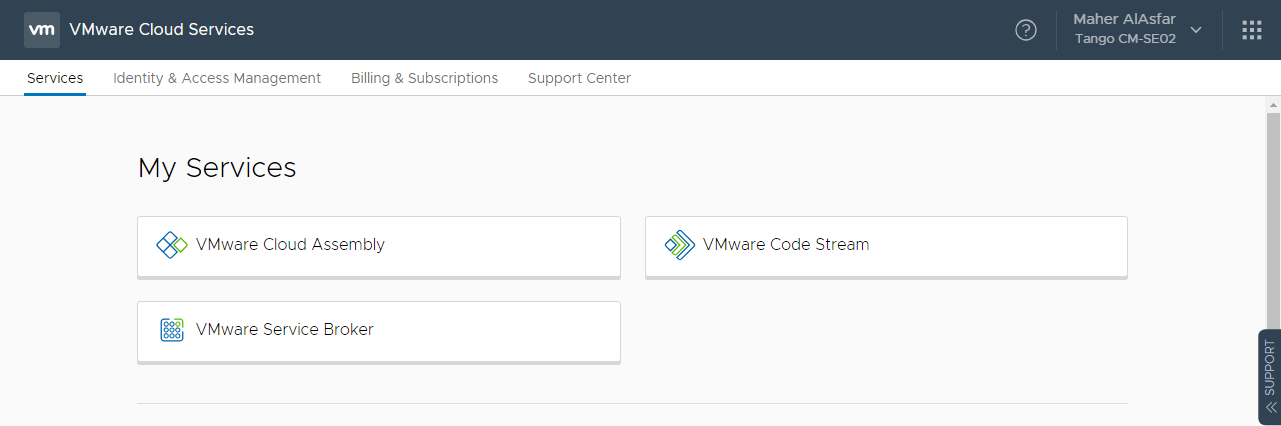
Most of the work we will be doing will be initially in VMware Cloud Assembly then we will be able to extend the work to the other two services, VMware Service Broker and the VMware Code Stream respectively.
In this setup we will be leveraging the following environments :
- VMware SDDC Cloud ( Home Lab ) as my Production Environment.
- AWS EC2 Cloud as my Development Environment.
- Azure Cloud as my Testing Environment.
So let’s get started, Eh!
VMware Cloud Assembly
VMware Cloud Assembly is an infrastructure as code automation solution designed to expedite infrastructure consumption and application delivery in line with DevOps principles, through an intuitive symmetrical dual interface ( Code or Draw ) that supports declarative, intent-based application infrastructure provisioning, blueprint design and lifecycle management across multiple clouds such as VMware SDDC, Amazon Web Services, VMware Cloud on AWS and Azure as a minimum on GA date.
The infrastructure as code approach streamlines infrastructure consumption by enabling blueprint parameterization, iteration on blueprint development and easy version control through native controls or supported version control systems. The SaaS form factor enables VMware to keep the platform up to date, allowing operations teams to focus on higher value activities, such as business systems reliability and performance.
Our intent here to use Cloud Assembly to provision new projects to public clouds that we can then bring on-prem when they are ready to go to production for example. My goal here really is to show you how we can create an agnostic blueprint ( WordPress Application ) that the user can deploy from Cloud Assembly Directly or request it from the Service Broker ( Catalog ) and selecting which environment ( Dev, Test, Prod ) you want to deploy the application to.
And to do that we need to configure a few things to create our deployment stack and start deploying blueprints
- Create our Cloud Accounts.
- Create Cloud Zones.
- Create one or more Projects.
- Create Flavor mapping.
- Create Image mapping
- Create and deploy blueprints.
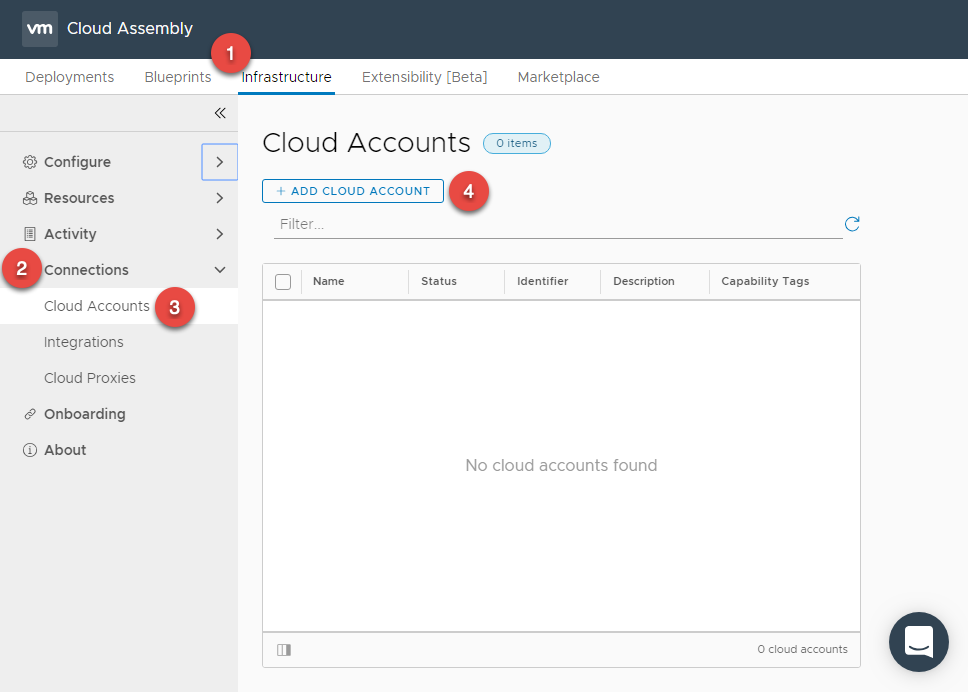
Cloud Accounts
Cloud accounts allow you to bring your public cloud and on-prem data centers under CAS management.
In Cloud Assembly, navigate to Infrastructure > Connections > Cloud Accounts > ADD CLOUD ACCOUNT
We will configure our 3 Account Types / Environments here :
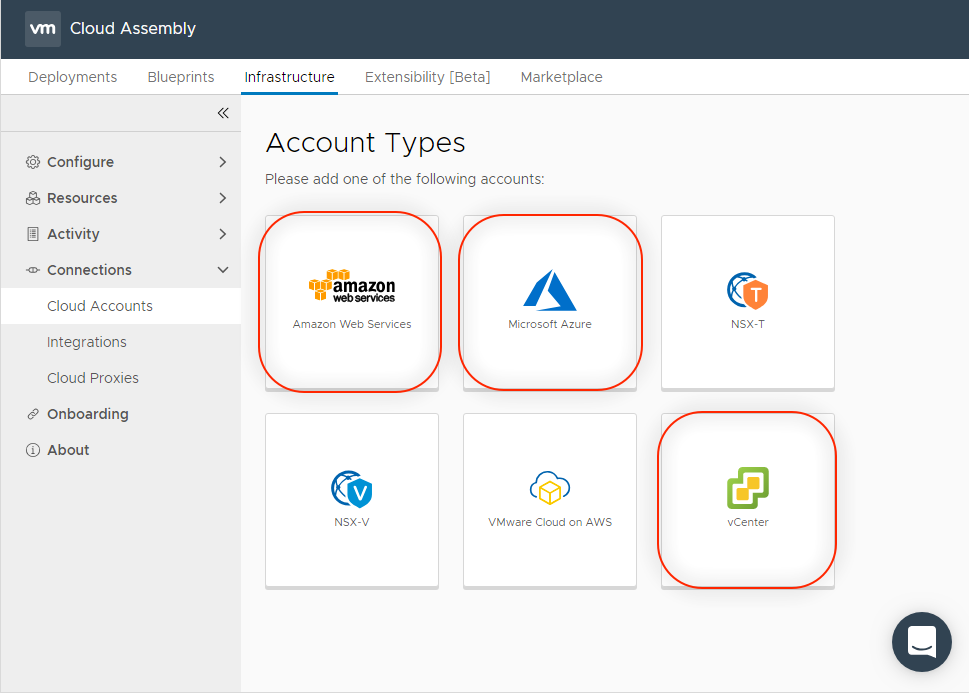
vCenter Account Type
Prerequisites Checklist
- You have at least one collector / Cloud Proxy VM installed.
- You have the vCenter IP address/FQDN.
- You have the vCenter user name and password.
Note that a collector VM can typically support 10,000 VMs
Installing Cloud Proxy
- Click Add Cloud Account
- Select vCenter as the account type. When you don’t have any previous Cloud Proxies setup, you will be presented with the steps needed to install one.
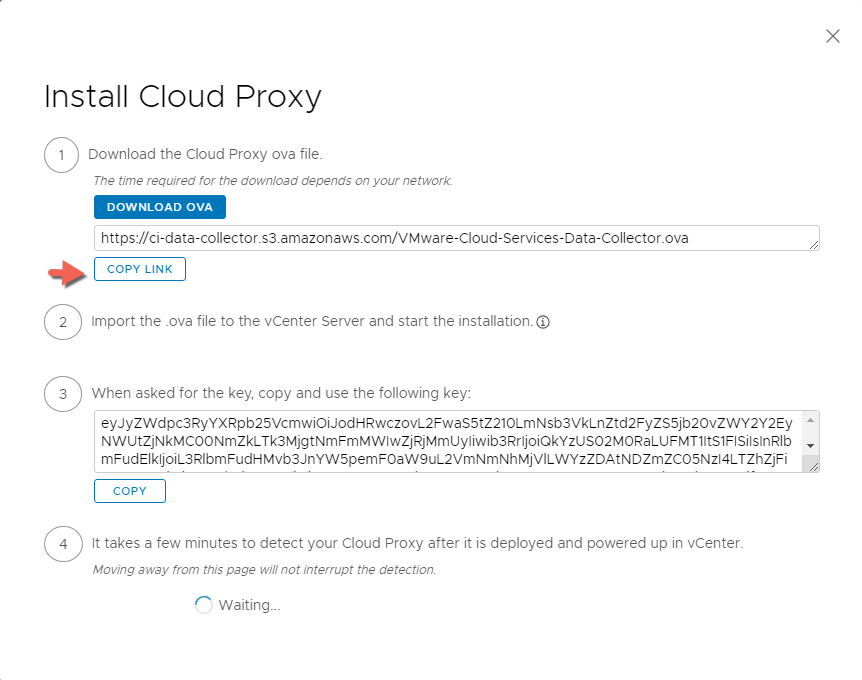
- Download the Cloud Proxy ova file to deploy it in vCenter OR
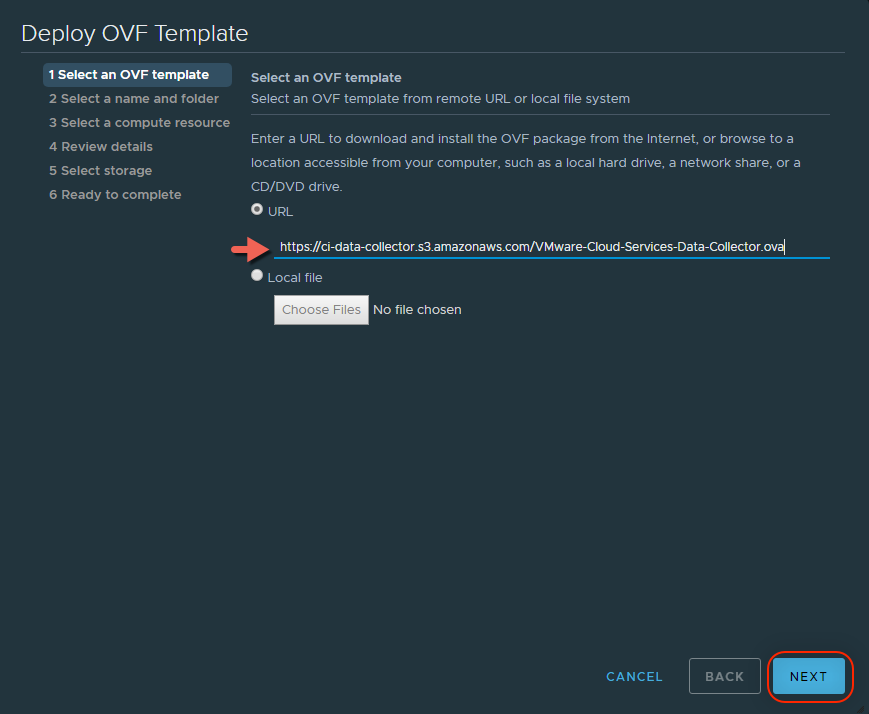
- Copy the OVA link to directly deploy it in vCenter without having to download it first.
- Import the .ova file to the vCenter Server and start the installation following the standard steps provided by the OVF Deployment Wizard.
- Once you get to the Customize Template section within the OVF Deployment Wizard we will provide the following properties:
- CAS One Time Key (OTK)
- Root User name and password
- Remote Data Collector / Cloud Proxy Display Name in CAS
- Network Proxy Settings ( Optional )
- Networking Properties
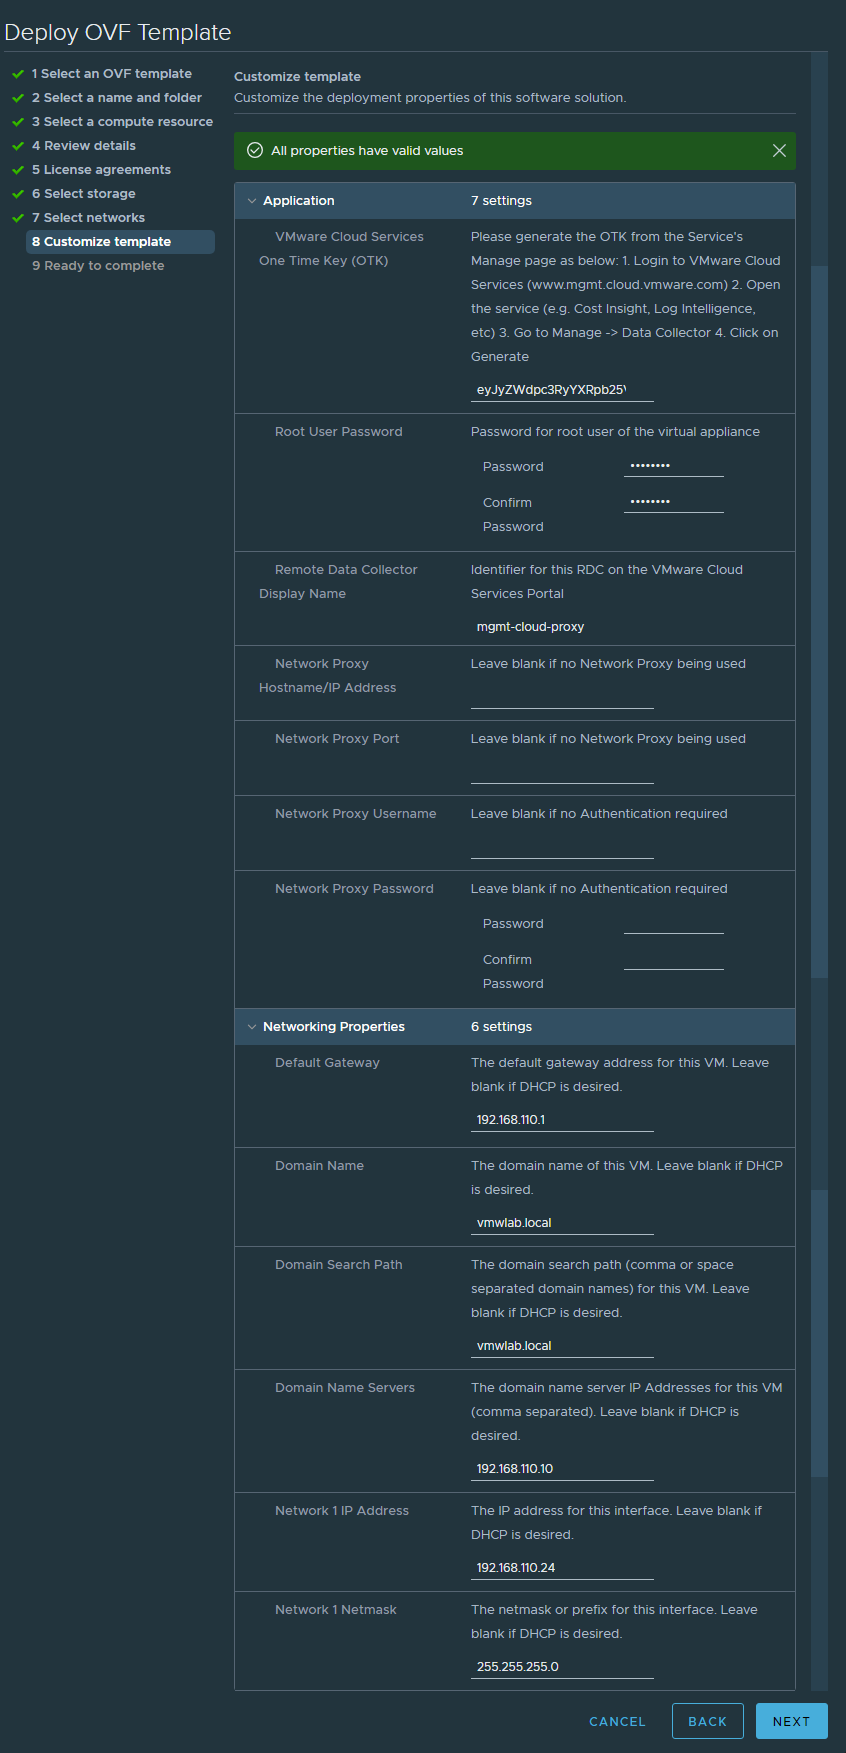
- Click Next and Finish to deploy the cloud proxy. it takes a few minutes to detect your Cloud Proxy after it is deployed and powered up in vCenter.
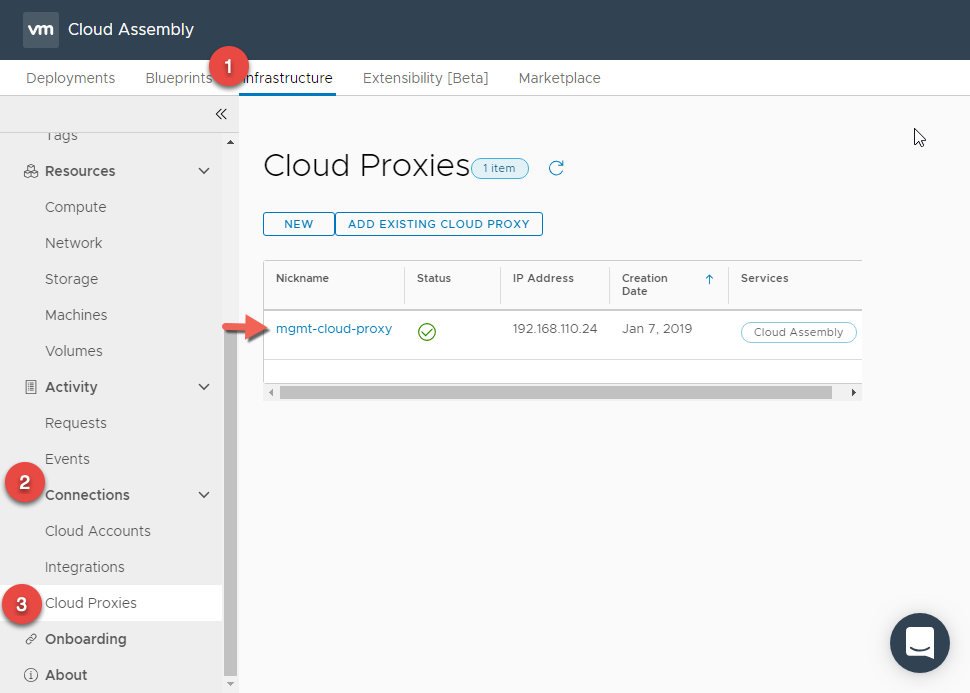
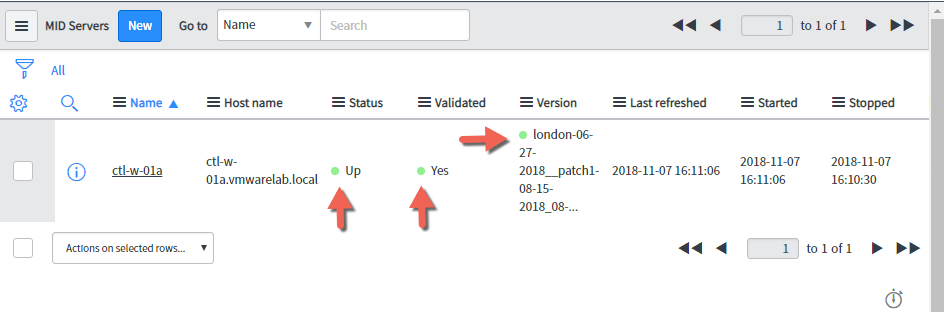
- To verify the detection of the Cloud Proxy is complete navigate to Infrastructure > Connections > Cloud Proxies and verify its listed with a good status.
- Navigate again to Infrastructure > Connections > Cloud Accounts > ADD CLOUD ACCOUNT
- Click Add Cloud Account
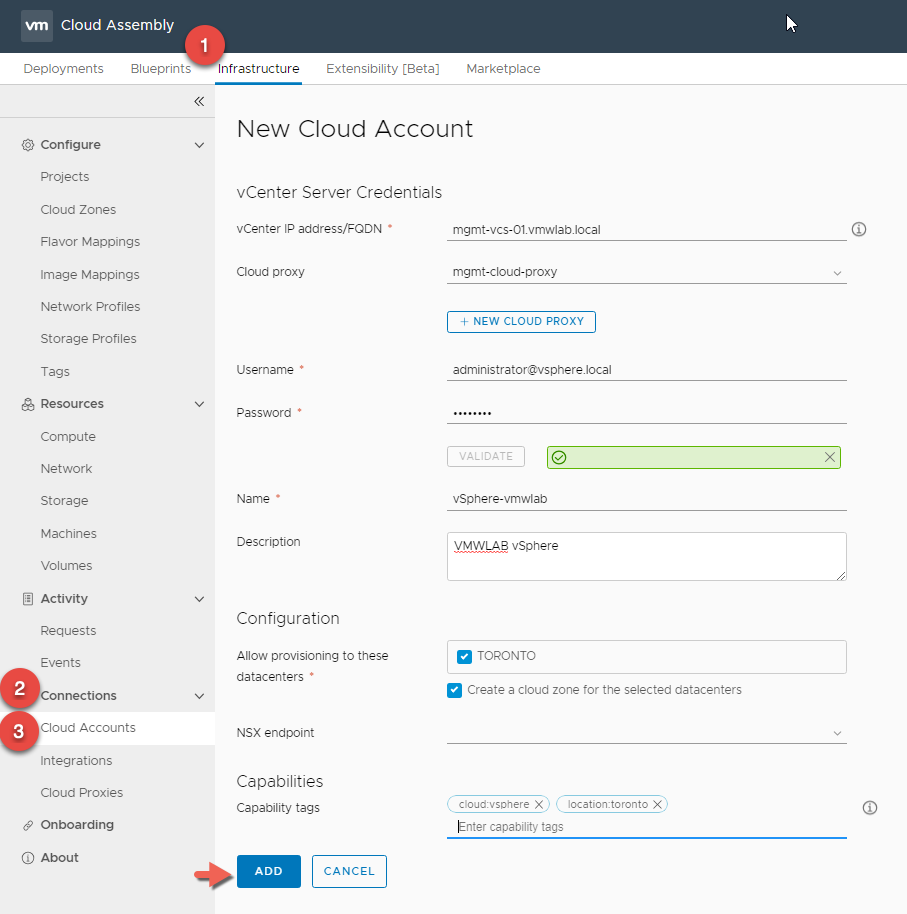
- Select vCenter as the account type. Now that we setup a Cloud Proxy, you will be able fill all the requirement including the Cloud Proxy we just deployed.
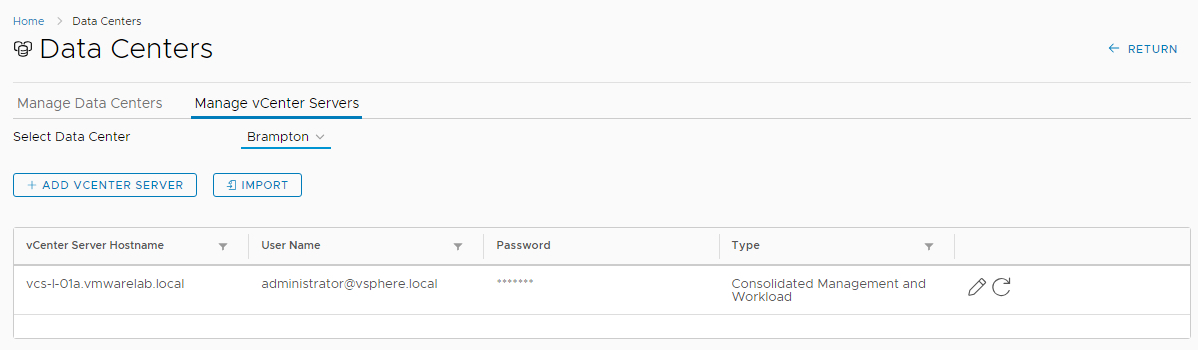
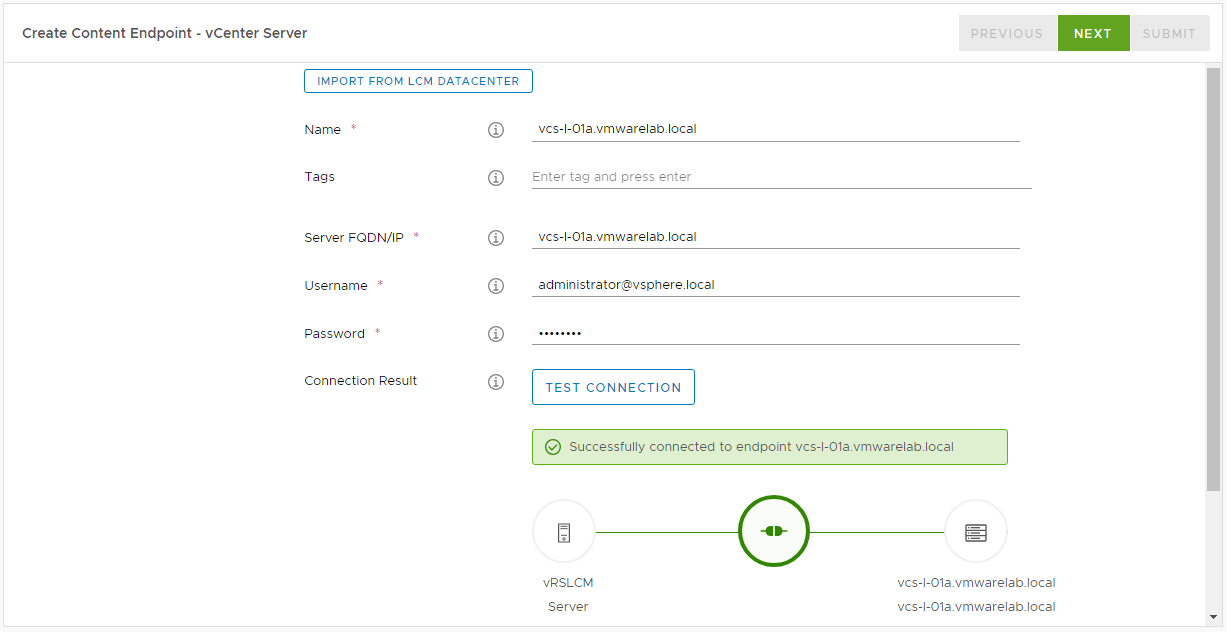
- Enter the vCenter user name and password and hit VALIDATE.
- Provide a Name and a description for the Cloud Account.
- In the Configuration Section select which DataCenters you want to allow provisioning to
- Allow to create a Cloud Zone for the Selected Datacenters by checking the check box, this will automatically create the Cloud Zone for us so we don’t have to later.
- Add Capability Tags as required, this will be used for placement decisions as we will see later in the blog post.
- Click ADD when Completed.
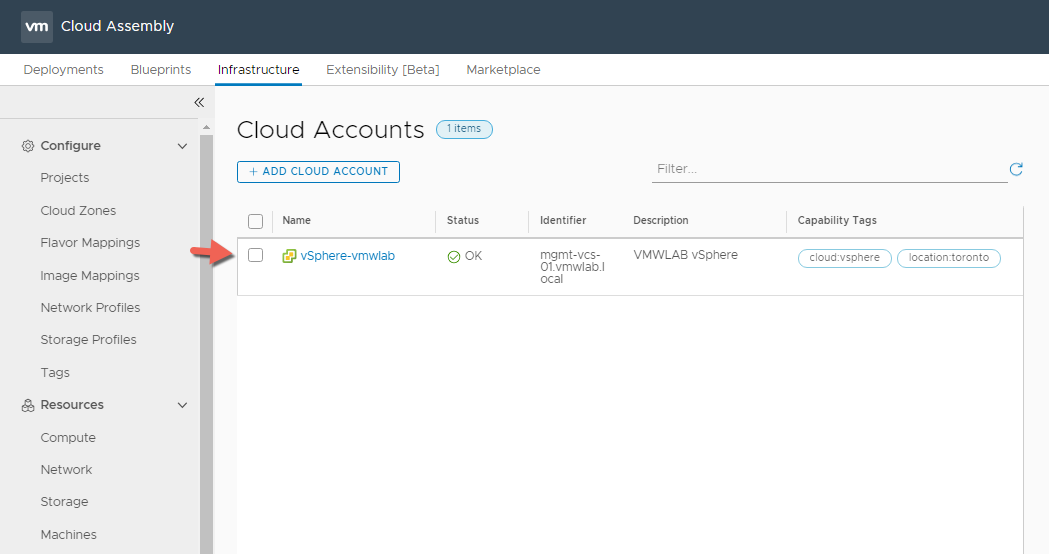
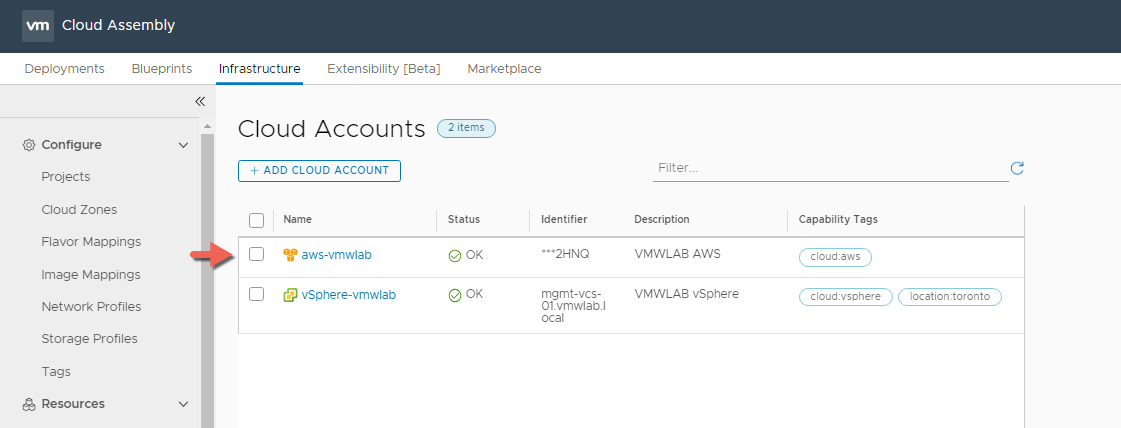
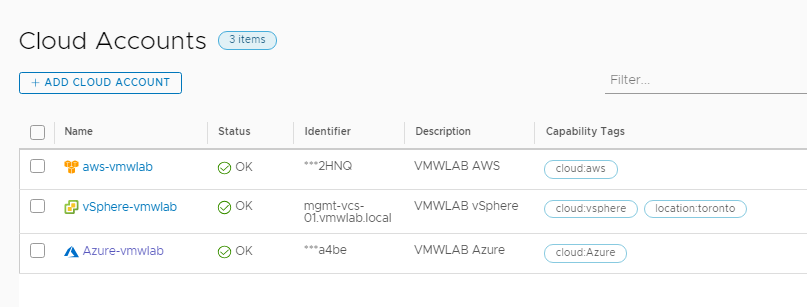
- Once added you should see the cloud account listed with OK Status
Amazon Web Services Account Type
Prerequisites Checklist
- Access Key ID
- Secret Access Key
- Navigate again to Infrastructure > Connections > Cloud Accounts > ADD CLOUD ACCOUNT
- Click Add Cloud Account
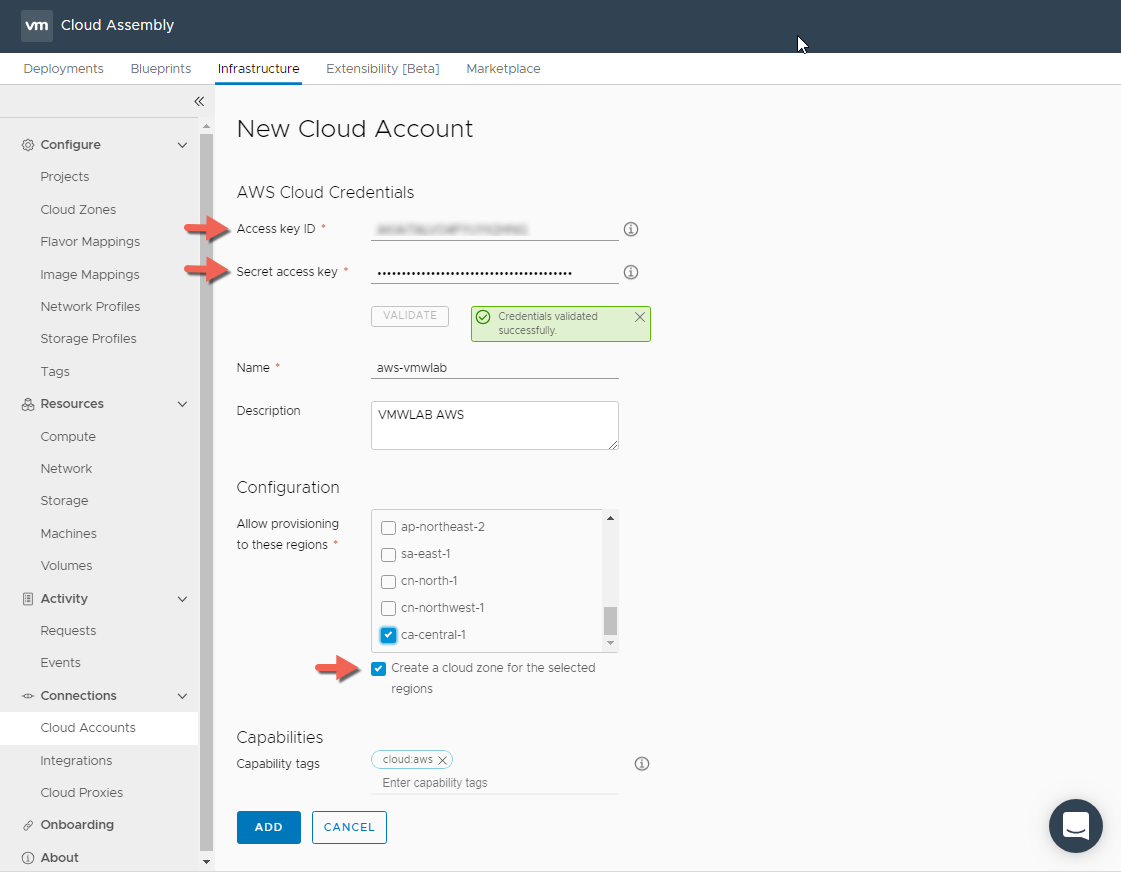
- Select AWS Web Services as the account type.
- Provide the Access Key ID and Secret Access Key and Click VALIDATE
- Provide a Name and a description for the Cloud Account.
- In the Configuration Section select which Regions you want to allow provisioning to.
- Allow to create a Cloud Zone for the Selected Region by checking the check box, this will automatically create the Cloud Zone for us so we don’t have to later.
- Add Capability Tags as required, this will be used for placement decisions as we will see later in the blog post.
- Click ADD when Completed.
- Once added you should see the cloud account listed with OK Status
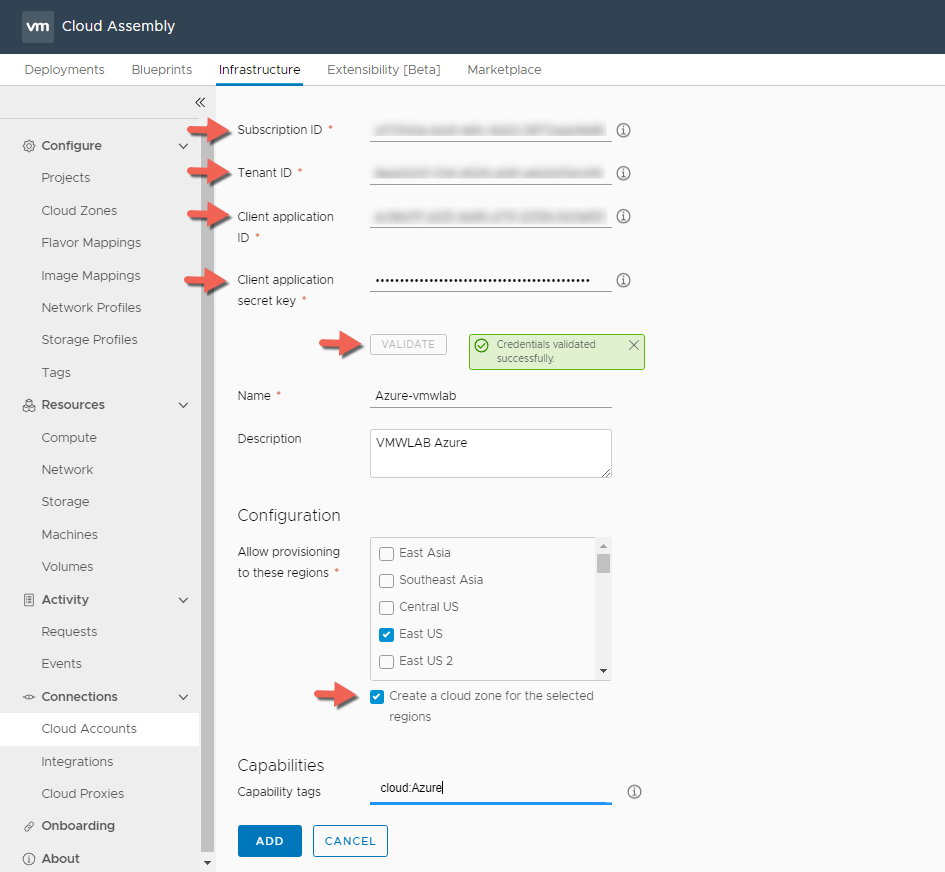
Azure Account Type
Prerequisites Checklist
- Subscription ID
- Tenant ID
- Client Application ID
- Client Application Secret Key
Note: If you want to know how get these IDs, this is very similar to how we currently setup up vRealize Automation Azure endpoint and there are plenty of blogs you can reference such as my personal favourite by Jon Schulman
- Navigate again to Infrastructure > Connections > Cloud Accounts > ADD CLOUD ACCOUNT
- Click Add Cloud Account
- Select Azure as the account type.
- Provide the IDs required and Click VALIDATE
- Provide a Name and a description for the Cloud Account.
- In the Configuration Section select which Regions you want to allow provisioning to.
- Allow to create a Cloud Zone for the Selected Region by checking the check box, this will automatically create the Cloud Zone for us so we don’t have to later.
- Add Capability Tags as required, this will be used for placement decisions as we will see later in the blog post.
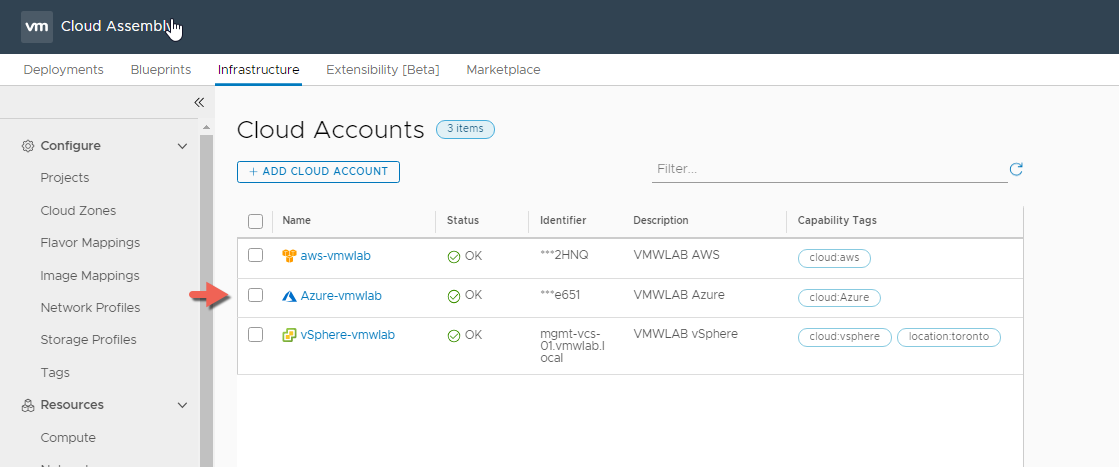
- Click ADD when Completed.
- Once added you should see the cloud account listed with OK Status
Cloud Zones
Cloud zones associate compute resources with projects and account/regions to form the basis of deployable virtual machines. In addition, they enable you to define capabilities that Cloud Assembly matches with blueprint constraints to define where and how resources are configured for deployments.
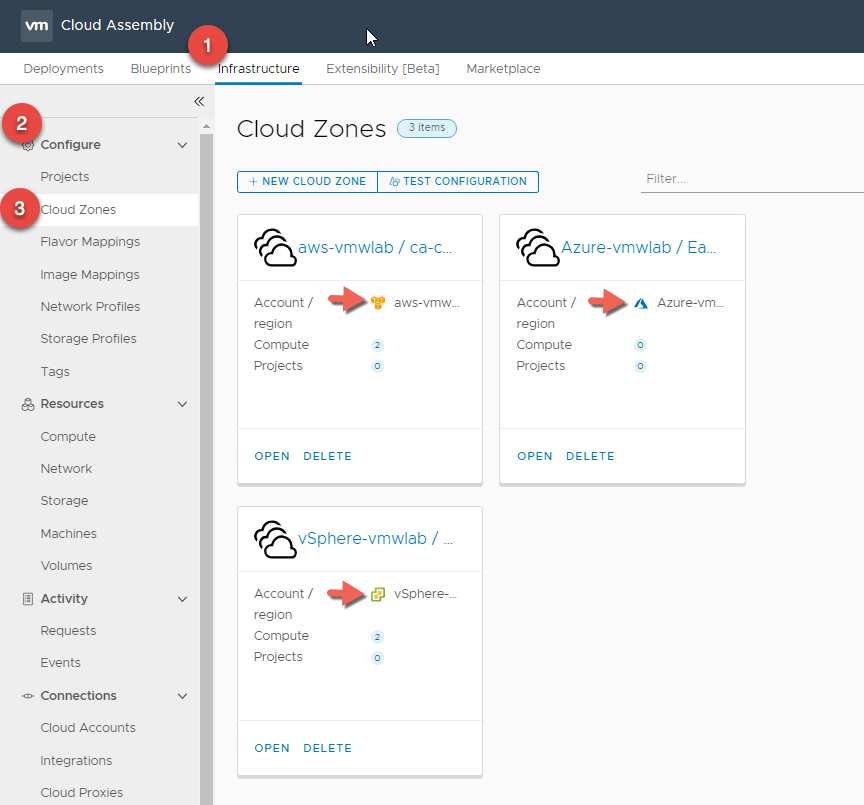
Now remember that we checked the check box to create a cloud zone for the selected Datacenter/Region where we want to provision to for each of the cloud account types we have created. (vSphere, AWS and Azure )
Navigate to Infrastructure > Configure > Cloud Zones to list the pre-created Cloud Zones or to create new ones if you decide for example to add new Datacetners / Regions to provision machines to.
You don’t need to create any cloud zones if you selected the option to automatically create zones when you added your cloud accounts, we will customize the cloud zones in this section of the blog.
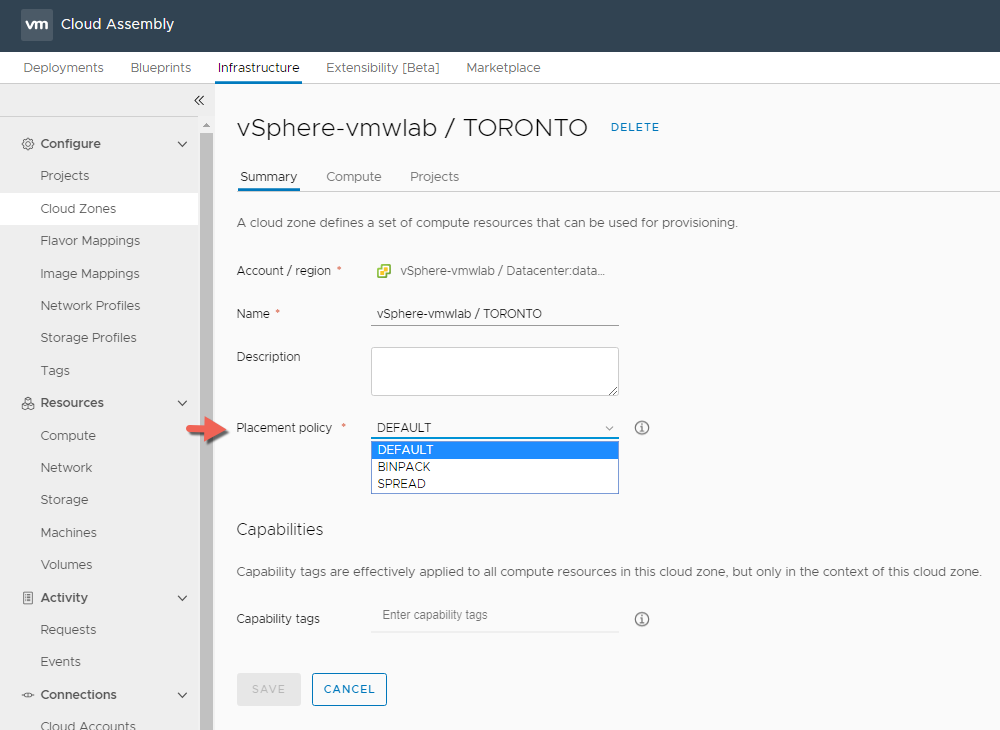
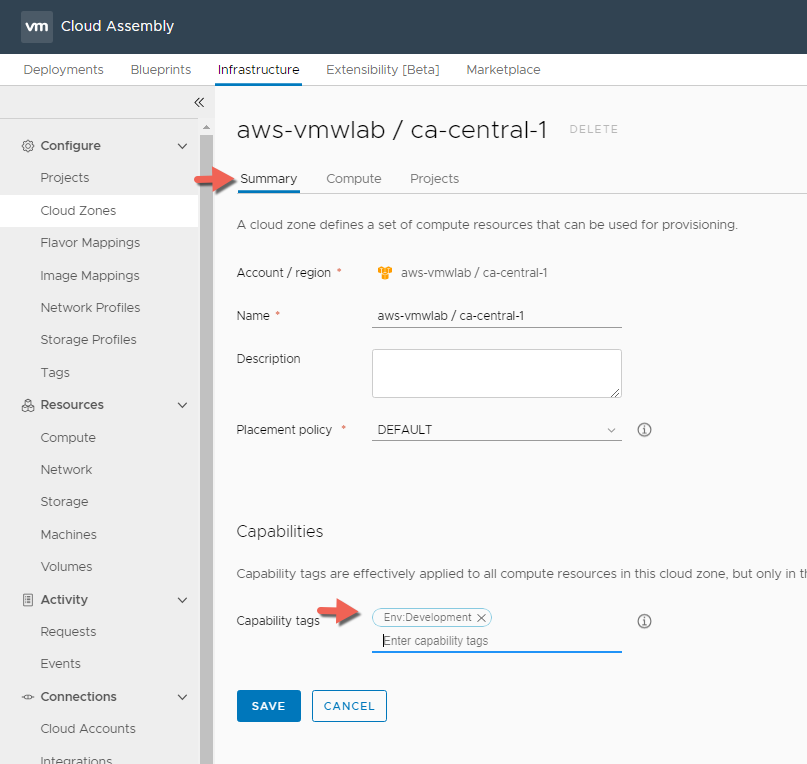
Within each of the cloud zone > Summary Tab you can select a Placement Policy that defines how provisioned resources are distributed among hosts in this cloud zone. By default resources are placed on random hosts but:
One of the following strategies can be optionally applied:
- BINPACK – Will place computes on the most loaded host that still has enough resources to run the given compute.
- SPREAD – Will attempt to spread computes evenly across hosts.
For the purpose of the blog we will leave the Placement Policy as DEFAULT for all the Cloud Zones.
You saw me mention the use of Capability tags and so far we have created tags on the Cloud Account type level.
When it comes to Tagging Strategy you must carefully plan and implement an appropriate tagging strategy based on your organization’s IT structure and goals to maximize Cloud Assembly functionality and minimize potential confusion.
Tags are a critical component of Cloud Assembly that drive the placement of deployments through matching of capabilities and constraints. You must understand and implement tags effectively to make optimal use of Cloud Assembly. you also need to create an outline of your strategy and make it available to all users with privileges to create or edit tags.
For best practices for Tagging and Tagging Implementation, I would recommend spending few minutes first reading the documentation on What Are Tags.
vSphere Cloud Zone
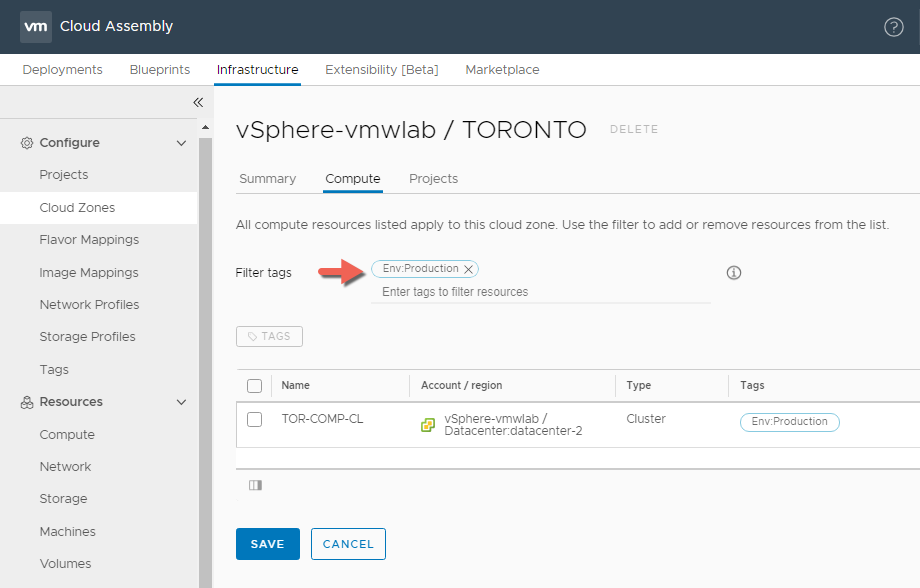
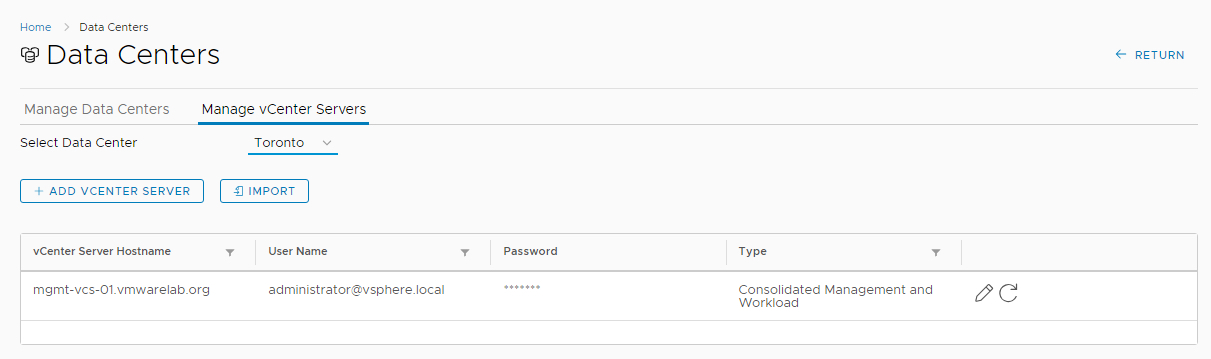
Like we mentioned already a cloud zone defines a set of compute resources that can be used for provisioning. In our Toronto Datacenter we have two clusters TOR-COMP-CL and TOR-MGMT-CL out of which we only want to use the TOR-COMP-CL for provisioning.
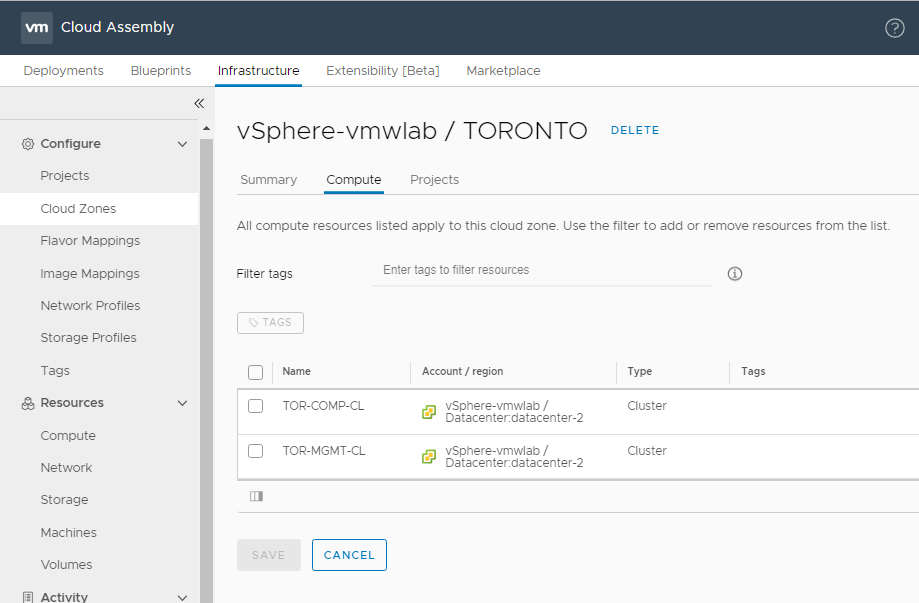
Within the vSphere Cloud Zone and under the Compute tab we have what we call Filter Tags which we will use to remove or filter out the TOR-MGMT-CL from the cloud zone compute resource list since its our management cluster and it will not participate in being used as a resource we can provision workloads to.
At the beginning of the blog we mentioned that will be using our vSphere environment for our Production workloads so will we need to add a capability tag that we can use later in our blueprints as a constrain if we want to target our compute production cluster.
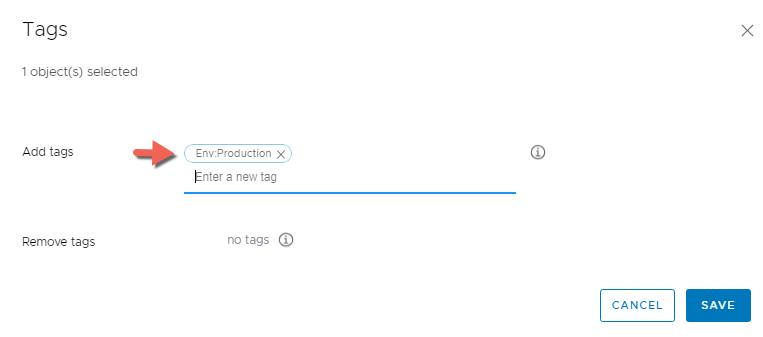
To do that we will first select the TOR-COMP-CL > Click TAGS, Type Env:Production and hit enter to form the tag then click Save
Now we can also use the Env:Production tag to filter out the compute resource TOR-MGMT-CL by using the tag as a Filter Tag and list only those compute clusters that has the same tag, also like I mentioned I don’t want the TOR-MGMT-CL cluster to be part of the vSphere Cloud Zone at all.
Now you may ask but why would you want to do that if you can simply use the Env:Production tag to target the TOR-COMP-CL cluster . What a great question I might say?
Its all about planning, where if for example I added another production cluster within the same Datacenter in the future, I can then simply tag it with the same tag then leverage a higher level tag like the one we setup on the vCenter Account Type which we also could have setup on the Cloud Zone level within the Summary Tab to target all the vSphere production clusters. That cloud account tag was Cloud:vSphere which will allow me to target all my production clusters
Again you really don’t have to do that as I m just trying to prove a point here, as this can be done in many different ways.
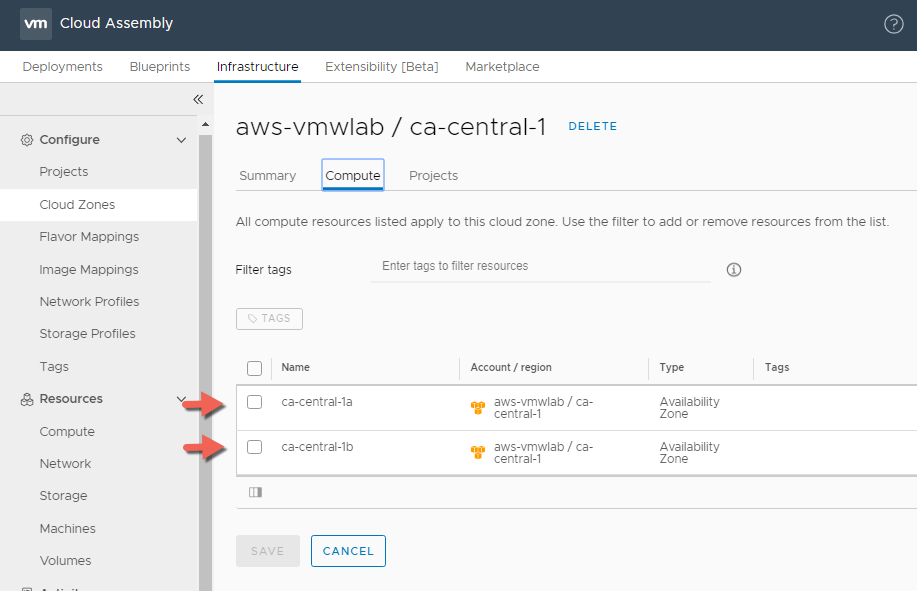
AWS Cloud Zone
When we added the AWS cloud Account we selected the CA-Central-1 Region as the region we want to provision our development workload to. As you can see in the Screen shot below the AWS cloud Zone has two compute resources / availability zones that I can target for my Development workloads.
Since I am okay utilizing all the AWS compute resources listed within the cloud zone I can place my Env:Development capability tab on the cloud zone level within the Summary Tab instead of placing it on the compute level like we did previously with the vSphere cloud zone. Click SAVE when your done.
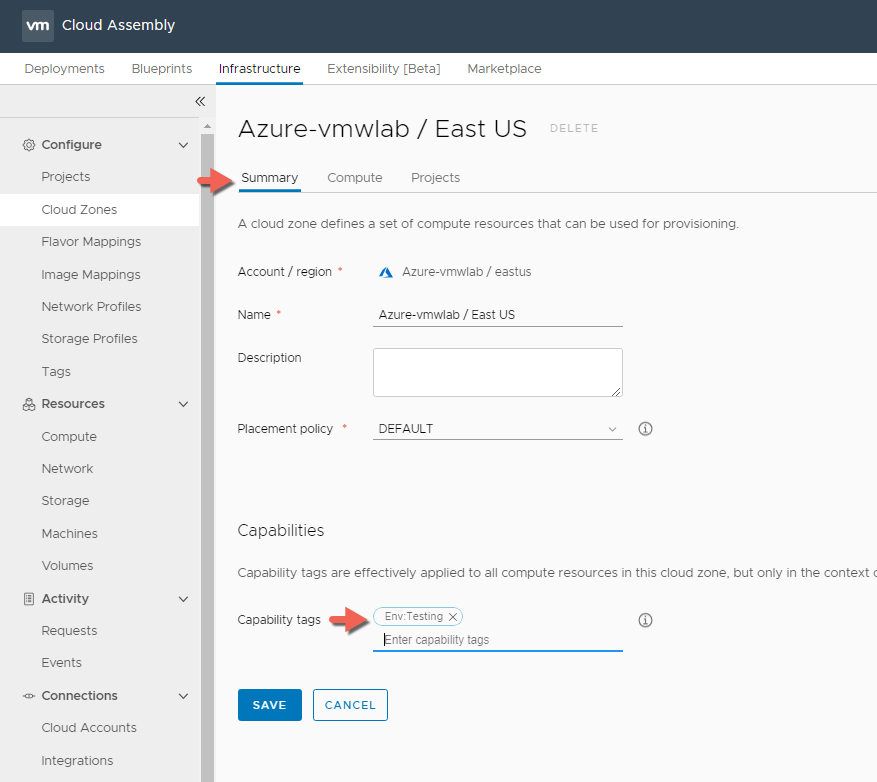
Azure Cloud Zone
For Azure when we created the Azure Account we selected the EAST US as the region we want to provision our test workload to. As you can see in the Screen shot below the Azure cloud Zone has one compute resources / availability zones that I can target for my Testing workloads.
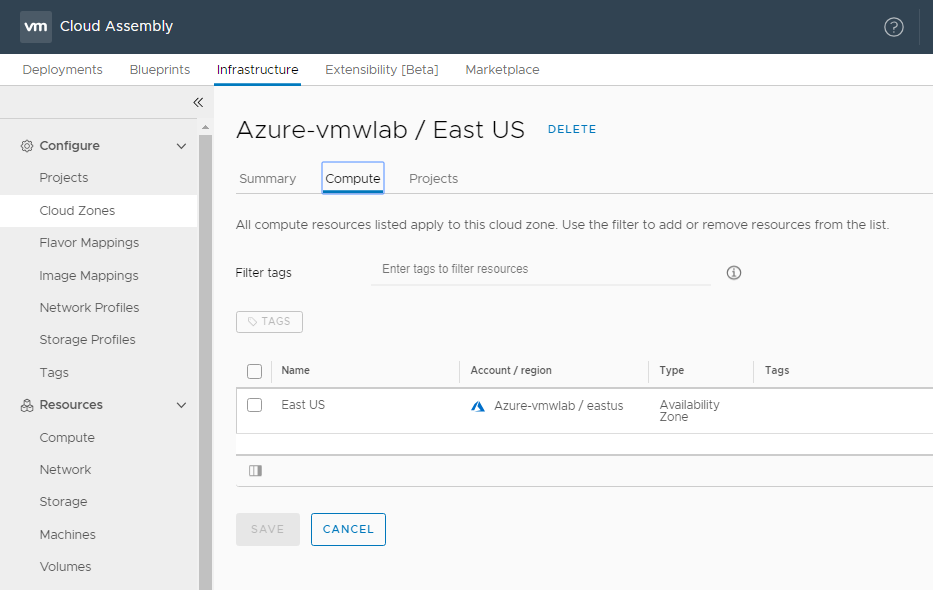
Just like the AWS Cloud Zone I can place my Env:Testing capability tag on the cloud zone level within the Summary Tab. Click SAVE when your done.
So in summary we have added 3 different cloud account types, selected the Datacenter / Regions we want to provision workloads to and created there respective Cloud Zones and added capability tags on the Cloud Account Level , Cloud Zone level and Cloud Zone Compute level as we see fit, that we can leverage later as constraints when we create/design our blueprints.
Flavor Mapping
Cloud vendors use flavors, or instance types, to express standard deployment sizings such as small or large for compute resources. when we create a blueprint, you need to pick a flavor.
Flavor mappings are of course regional settings. This becomes critical in public cloud endpoints where sizes are dictated by a phrase like T2.Micro in AWS as opposed to fixed sizing details like in vCenter that might equate to a specific number of CPUs or GBs of Memory.
We will define three flavor mapping ( Small, Medium, Large ) across vSphere, AWS and Azure.
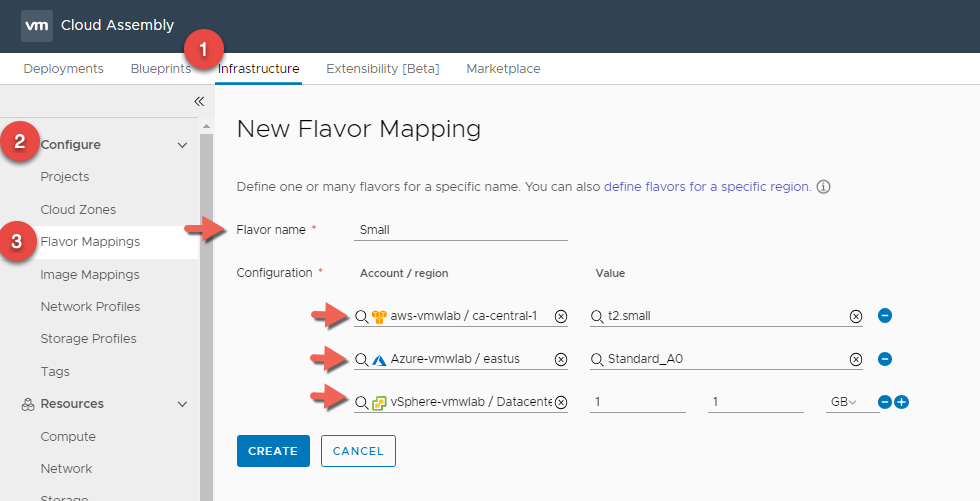
Small Flavor Mapping
- In Cloud Assembly, navigate to Infrastructure > Configure > Flavor Mappings
- Click + NEW FLAVOR MAPPING
- Enter Flavor Name : Small
- Click on Search for regions and create a Small Flavor Mapping for all 3 Clouds
- Click CREATE
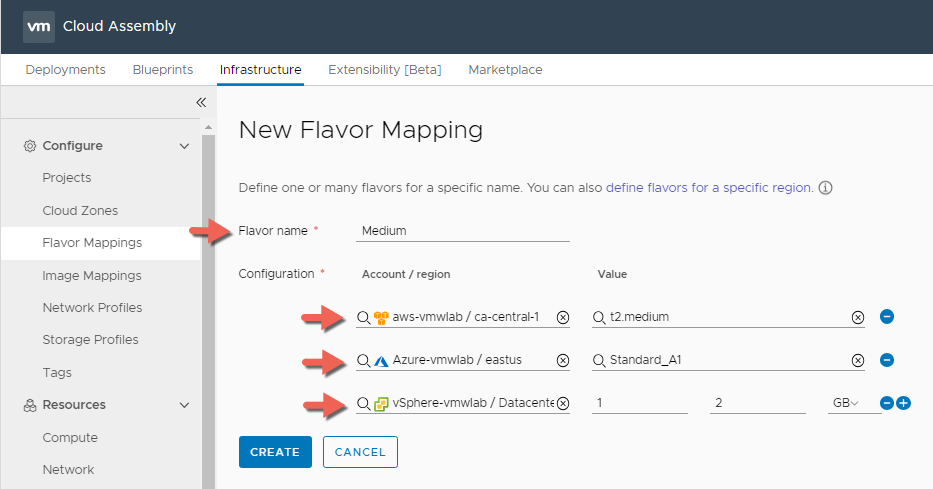
Medium Flavor Mapping
- In Cloud Assembly, navigate to Infrastructure > Configure > Flavor Mappings
- Click + NEW FLAVOR MAPPING
- Enter Flavor Name : Medium
- Click on Search for regions and create a Medium Flavor Mapping for all 3 Clouds
- Click CREATE
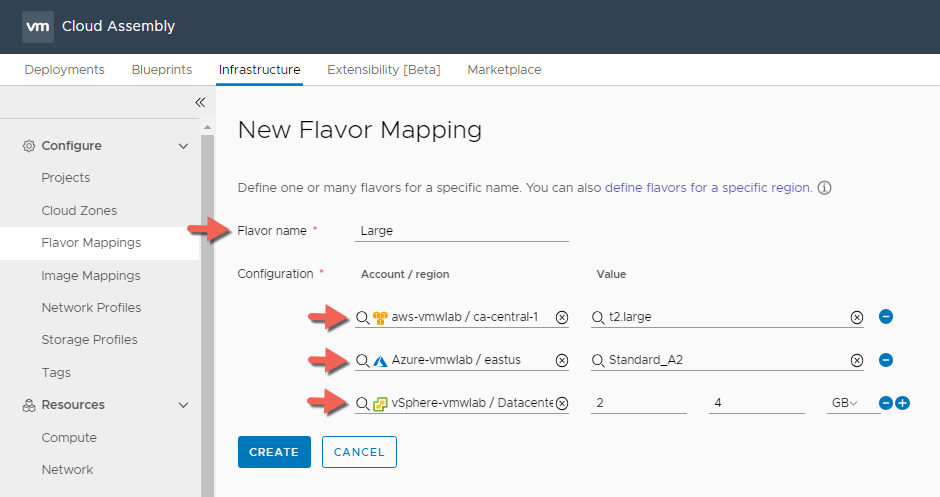
Large Flavor Mapping
- In Cloud Assembly, navigate to Infrastructure > Configure > Flavor Mappings
- Click + NEW FLAVOR MAPPING
- Enter Flavor Name : Large
- Click on Search for regions and create a Large Flavor Mapping for all 3 Clouds
- Click CREATE
Once completed you should have 3 Flavor Mappings ( Small, Medium, Large ) for the 3 cloud platforms ( vSphere, AWS, Azure )
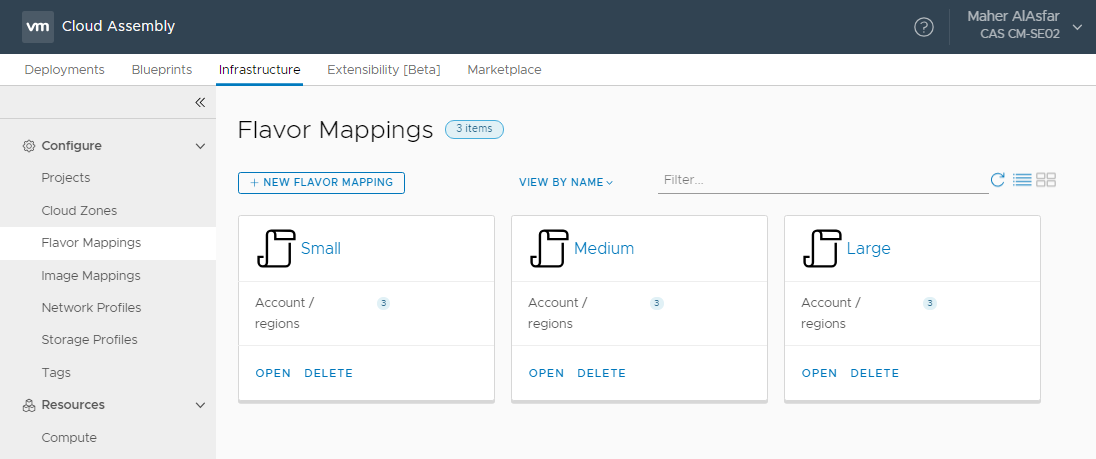
Image Mapping
Cloud vendors use images to configure a VM based on OS Settings, such as an ubuntu-16 configuration. When you build a blueprint, you pick an image that fits your needs.
An image mapping associates a defined image name with a machine template. You can create one or more image names and map to a metadata file that contain pre-defined value sets. For example, an image might map to an OVA file that contains pre-populated cost or region specifications to import into the blueprint. Image mappings again are regional settings.
we will define three image mapping ( CentOS7, Ubuntu, Windows 2016 ) across vSphere, AWS and Azure.
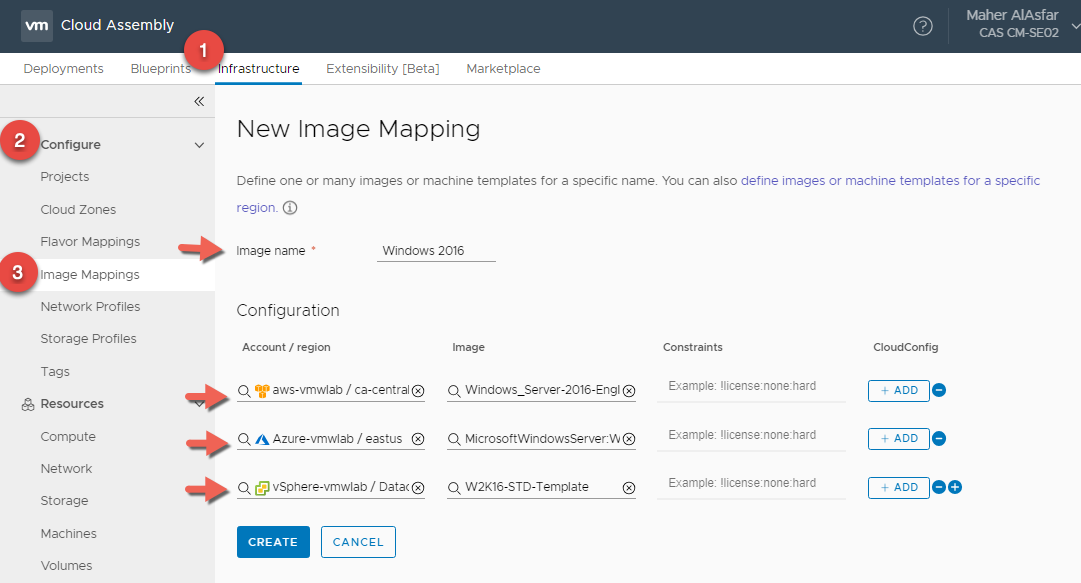
Windows 2016 Image Mapping
- In Cloud Assembly, navigate to Infrastructure > Configure > Image Mappings
- Click + NEW IMAGE MAPPING
- Enter Flavor Name : Windows 2016
- Click on Search for regions and for images to create a Windows 2016 Image Mapping for all 3 Clouds
- Click CREATE
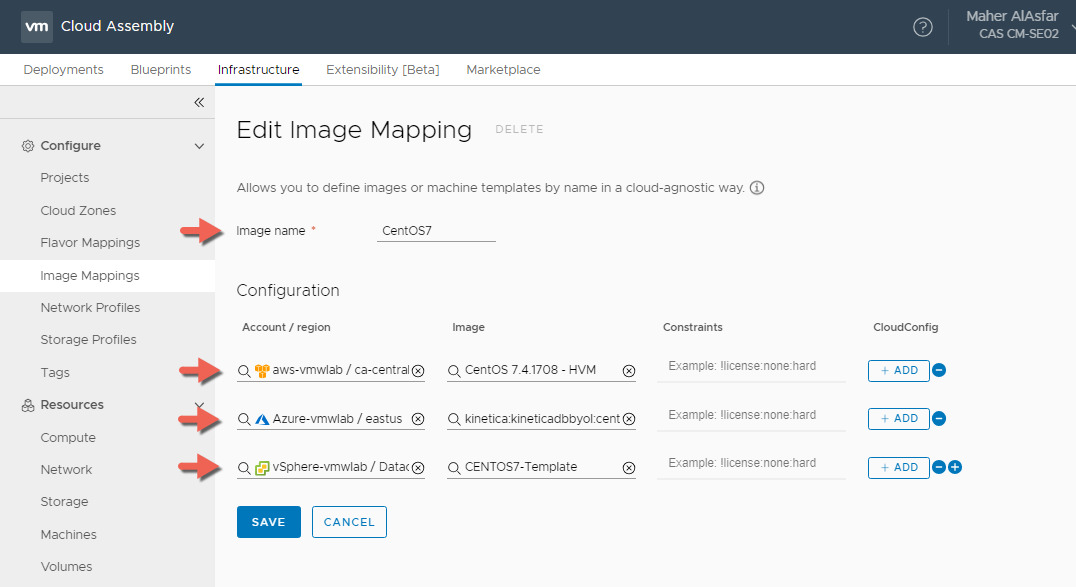
CentOS7 Image Mapping
- In Cloud Assembly, navigate to Infrastructure > Configure > Image Mappings
- Click + NEW IMAGE MAPPING
- Enter Flavor Name : CentOS7
- Click on Search for regions and for images to create a CentOS7 Image Mapping for all 3 Clouds
- Click CREATE
Ubuntu Image Mapping
- In Cloud Assembly, navigate to Infrastructure > Configure > Image Mappings
- Click + NEW IMAGE MAPPING
- Enter Flavor Name : Ubuntu
- Click on Search for regions and for images to create a Ububtu Image Mapping for all 3 Clouds
- Click CREATE

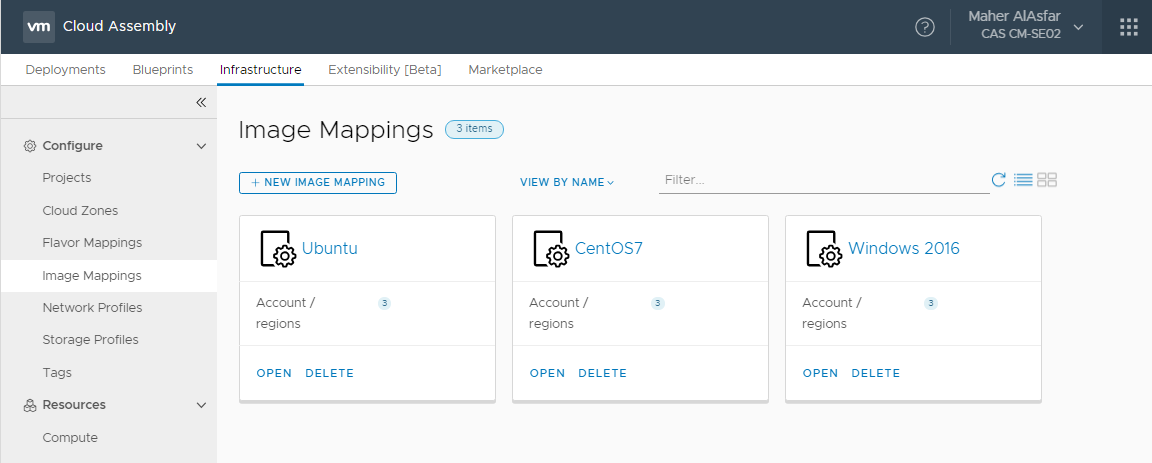
Once completed you should have 3 Image Mappings ( Ubuntu, CentOS7, Windows 2016 ) for the 3 cloud platforms ( vSphere, AWS, Azure ).
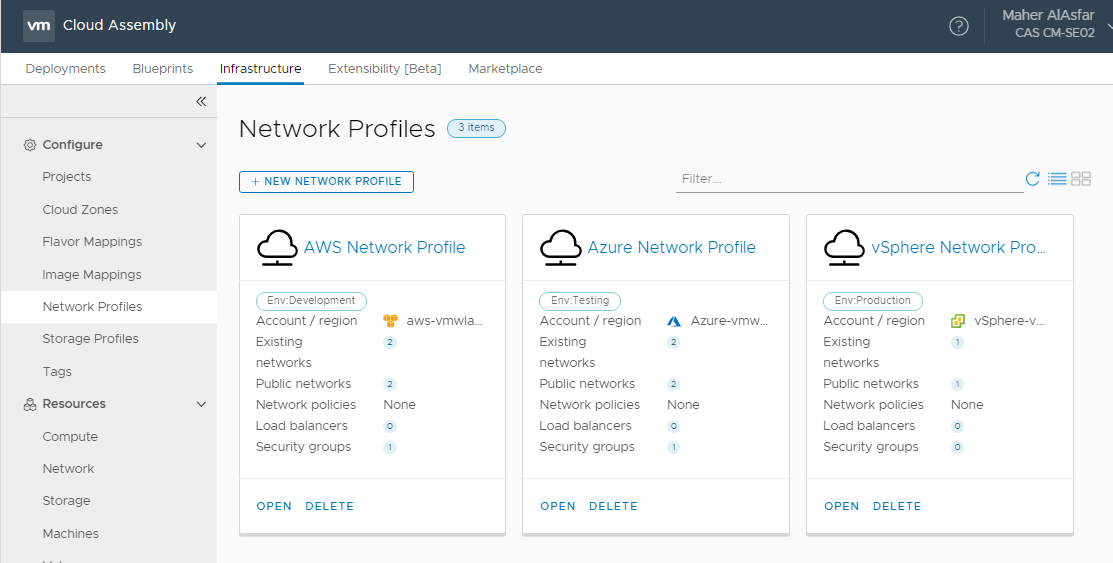
Network Profiles
A network profile defines a group of networks and network settings that are available for a cloud account in a particular region or datacenter. A network profile defines the networking options and capabilities that are made available to deployed machines, based on the network tags in the network component YAML in a blueprint.
You typically define network profiles to support a target deployment environment, for example a small test environment where an existing network has outbound access only or a large load-balanced production environment that needs a set of security policies. Think of a network profile as a collection of workload-specific network characteristics.
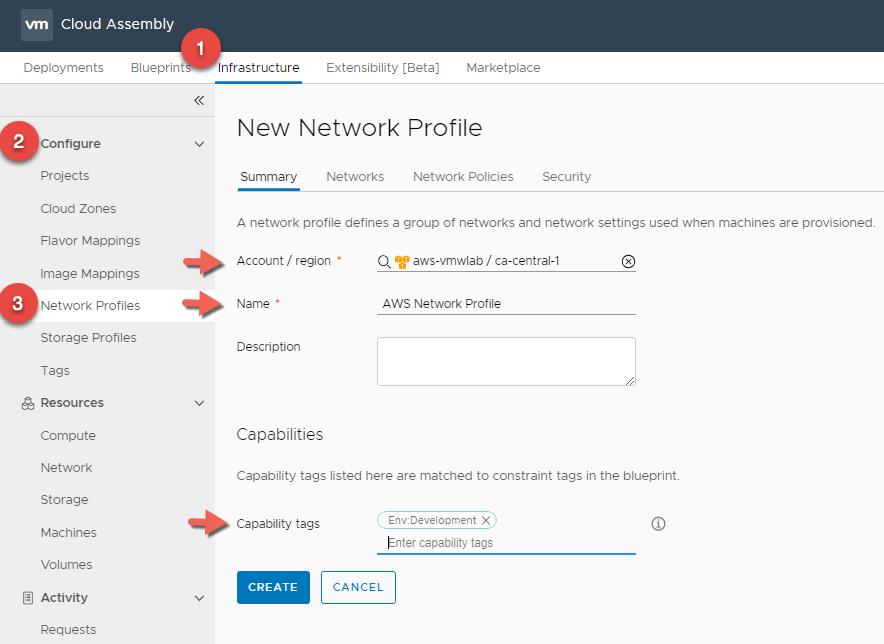
AWS Network Profile
- In Cloud Assembly, navigate to Infrastructure > Configure > Network Profiles
- Click + NEW NETWORK PROFILE
- In the Summary tab, For Account / Region click Search for regions and select your AWS Region.
- Enter a Network Profile Name : AWS Network Profile
- Enter a Capability Tag : Env:Development This is again because we are using AWS as our development environment.
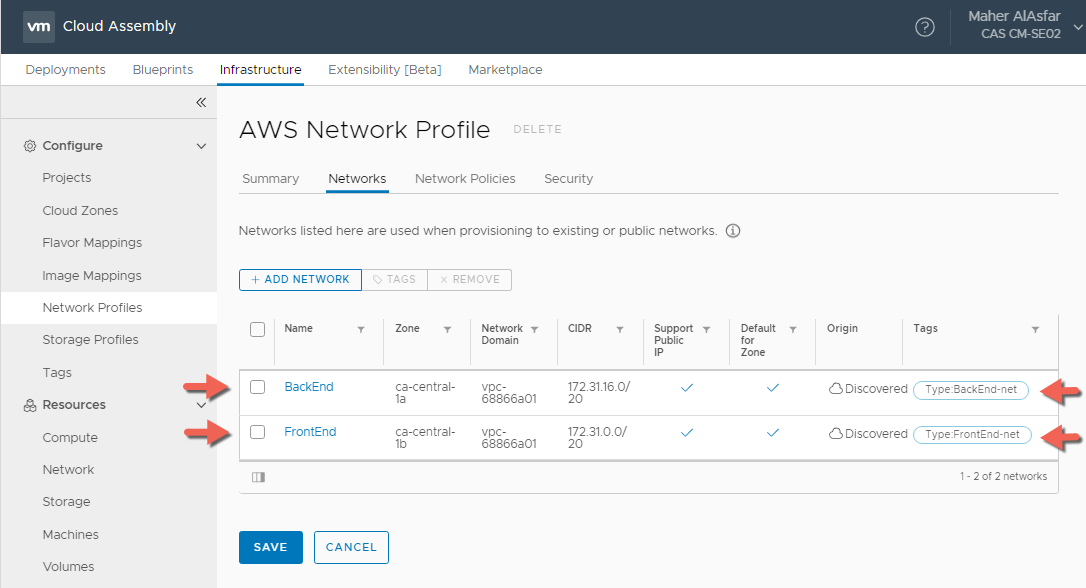
- In the Networks Tab, Select + ADD NETWORK and select the discovered network or networks to use when provisioning a VM.
- Select the added Network and assign a capability tag, for example here I setup Type:BackEnd-net and Type:FrontEnd-net as tags where both networks support Public IPs.
- In the Security tab, I have added the default Security group that enables RDP and SSH Inbound and all communications Outbound within the selected VPC in the CA-Central-1a and CA-Central-1b zones.
- Click CREATE
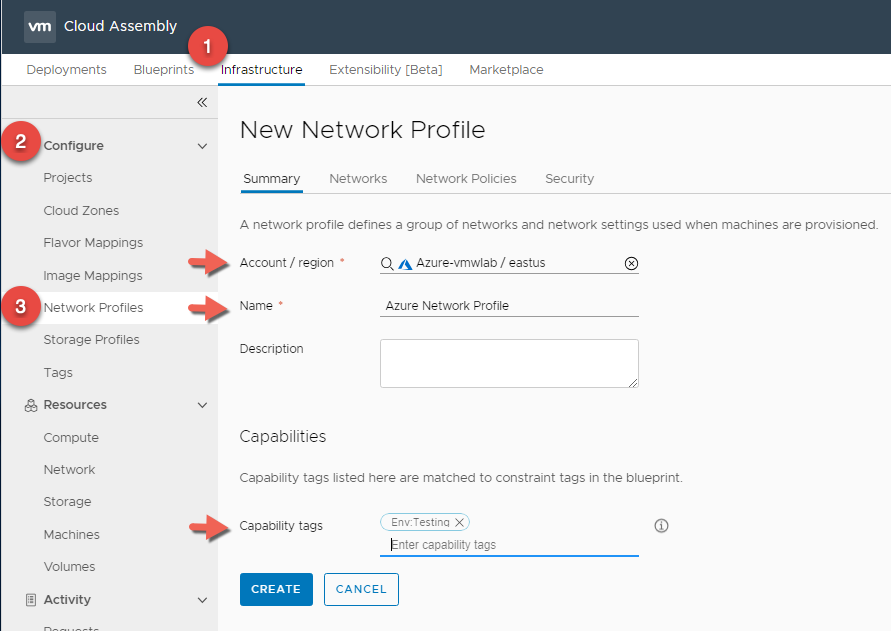
Azure Network Profile
- In Cloud Assembly, navigate to Infrastructure > Configure > Network Profiles
- Click + NEW NETWORK PROFILE
- In the Summary tab, For Account / Region click Search for regions and select your Azure Region.
- Enter a Network Profile Name : Azure Network Profile
- Enter a Capability Tag : Env:Testing This is again because we are using Azure as our Testing environment.
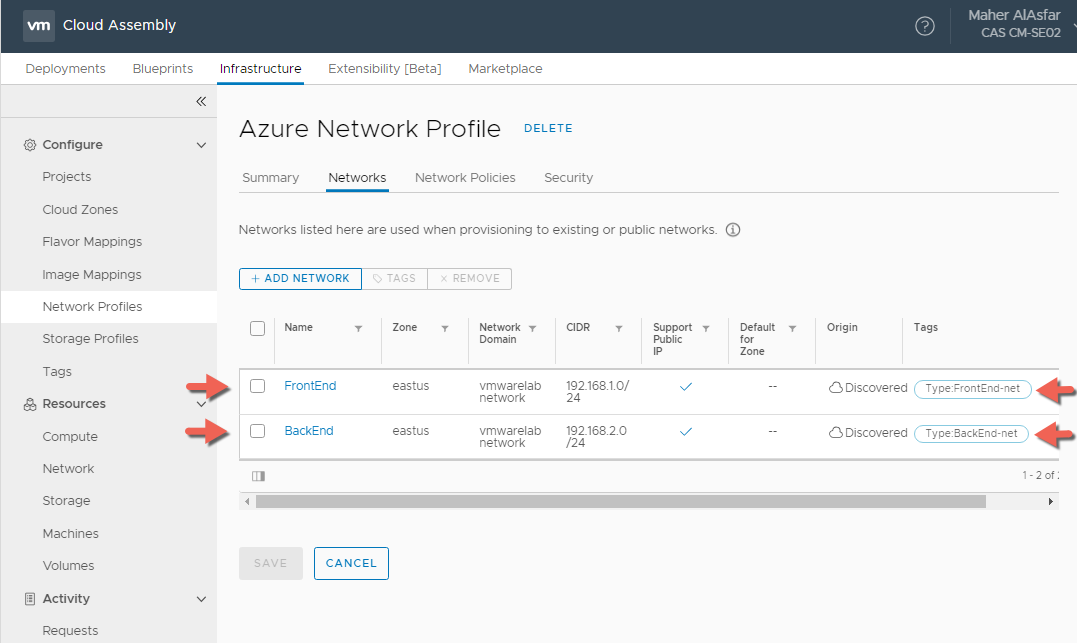
- In the Networks Tab, Select + ADD NETWORK and select the discovered network or networks to use when provisioning a VM.
- Select the added Networks and assign a capability tag, for example here I setup Type:BackEnd-net and Type:FrontEnd-net as tags where both networks support Public IPs.
- In the Security tab, I have added the vmwarelabnetworksecurity Security group that enables RDP and SSH Inbound and all communications Outbound within the selected Network Domain in the East US Zone.
- Click CREATE
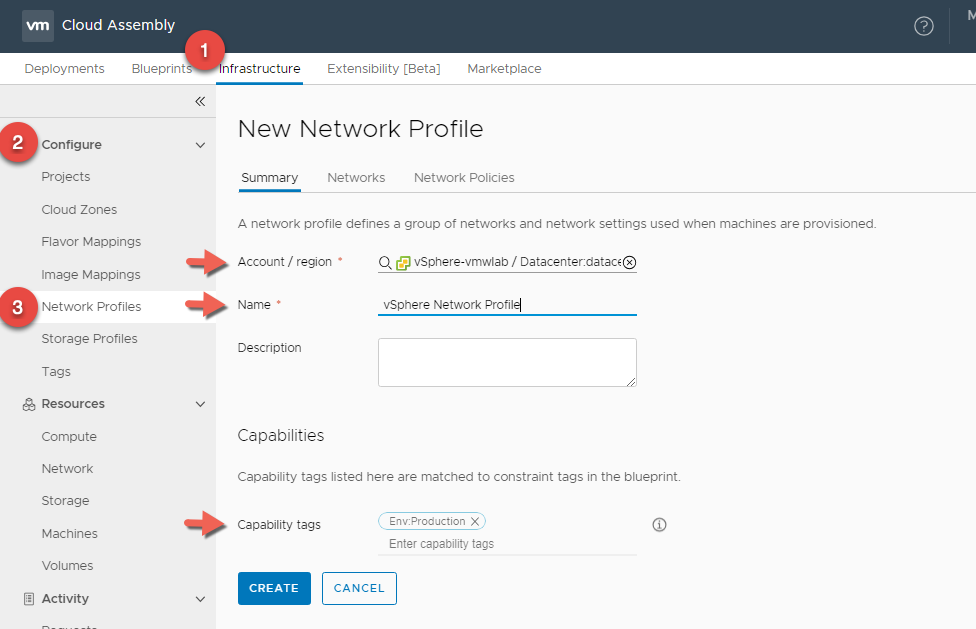
vSphere Network Profile
- In Cloud Assembly, navigate to Infrastructure > Configure > Network Profiles
- Click + NEW NETWORK PROFILE
- In the Summary tab, For Account / Region click Search for regions and select your vSphere Datacenter.
- Enter a Network Profile Name : vSphere Network Profile
- Enter a Capability Tag : Env:Production This is again because we are using vSphere as our Production environment.
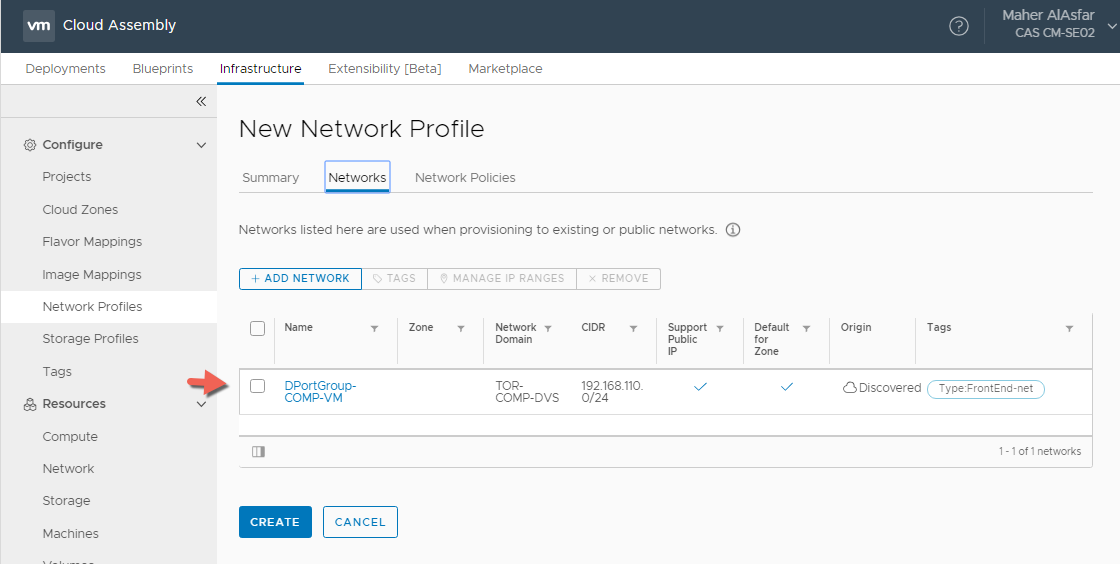
- In the Networks Tab, Select + ADD NETWORK and select the discovered network or networks to use when provisioning a VM.
- Select the added Networks and assign a capability tag, for example here I setup Type:FrontEnd-net as a tag where the network support Public IPs. Since this is vSphere, this means that the network can access internet and not necessarily have an actual public IP like in AWS or Azure.
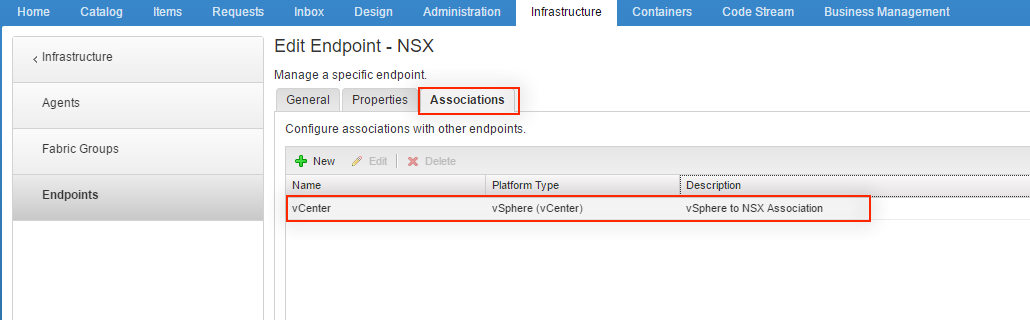
- The reason there is no Security tab in Network Profile for vSphere at this point is because we have not setup any NSX account types associated with the vCenter cloud account type.
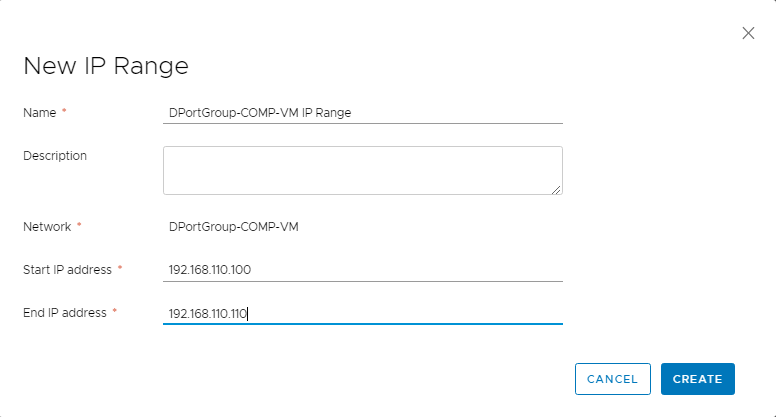
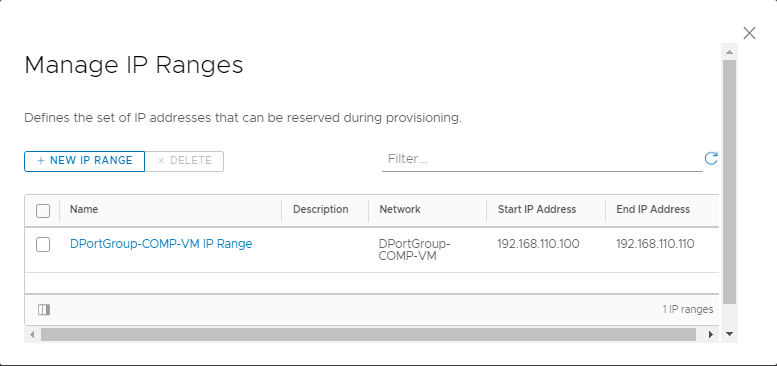
- Select the network and click on MANAGE IP RANGES > + NEW IP RANGE to define the set of IP addresses that can be reserved during provisioning.
Once completed you should have 3 Network Profiles for the 3 cloud platforms ( vSphere, AWS, Azure ).
Storage Profiles
A storage profile is a cloud-specific set of storage policies that let the cloud administrator define storage for a cloud account region. Storage polices include disk customization, and a means to identifying the type of storage by applying capability tags. Tags are then matched against blueprint constraints to create the desired storage at provisioning time.
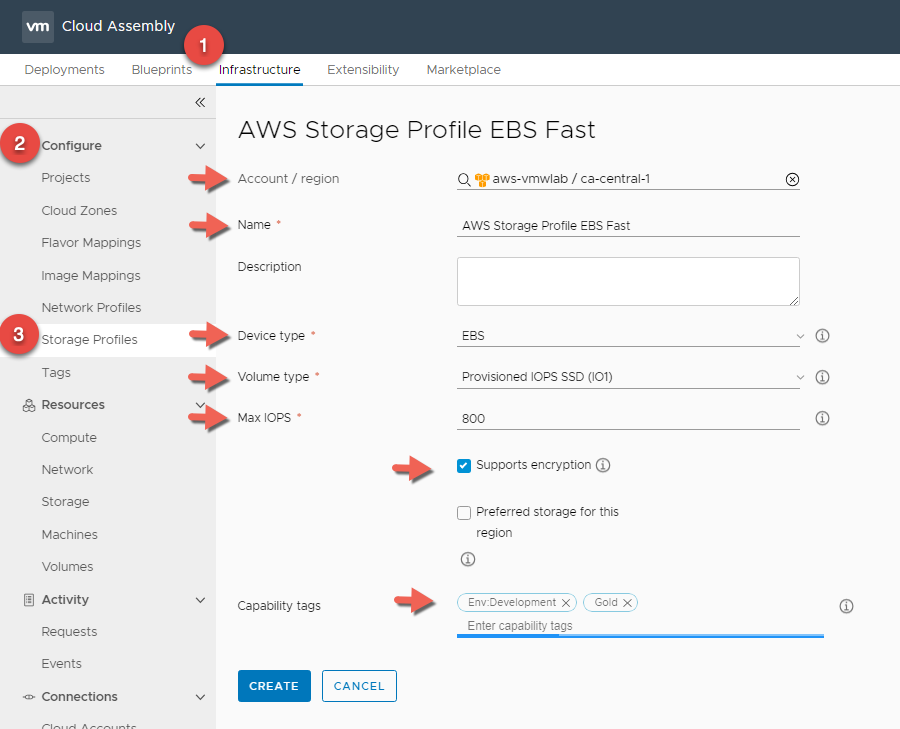
AWS Storage Profile
EBS Fast Storage
- In Cloud Assembly, navigate to Infrastructure > Configure > Storage Profiles
- Click + NEW NETWORK PROFILE
- For Account / Region click Search for regions and select your AWS Region.
- Enter a Storage Profile Name : AWS Storage Profile EBS Fast
- Enter Device Type : EBS
- Enter Volume Type : Provisioned IOPS SSD (IO1)
- Enter Max IOPS : 800 and Select Support Encryption
- Enter a Capability Tag : Env:Development and Gold This is again because we are using AWS as our development environment and leveraging the fastest Disks
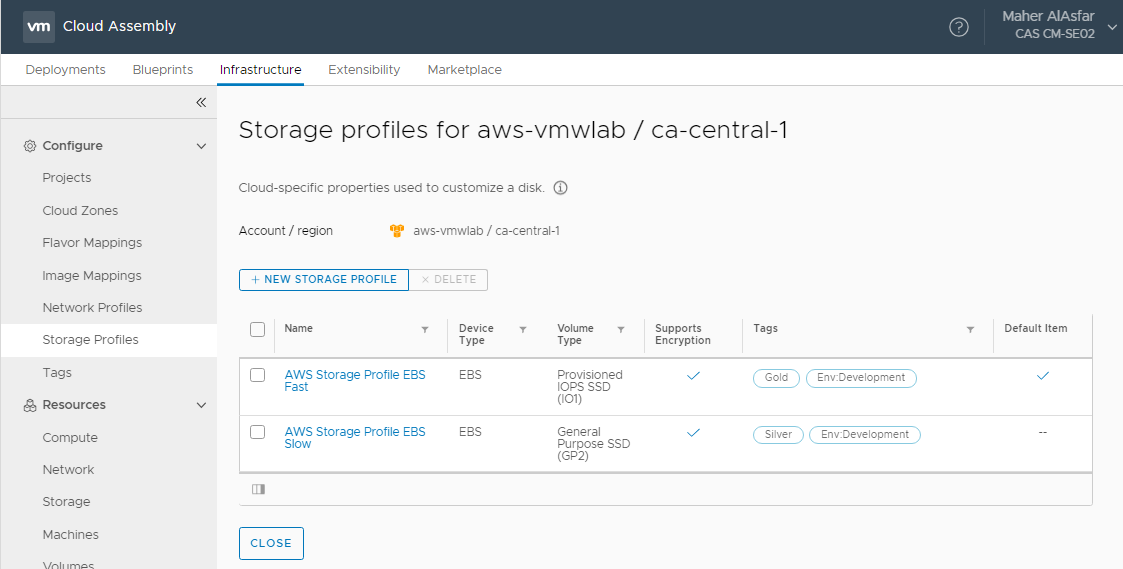
Storage profiles are being grouped by Cloud Accounts. Now that we created the first storage profile for AWS, we will add additional profiles for the storage types we want to support such as a Slow Storage.
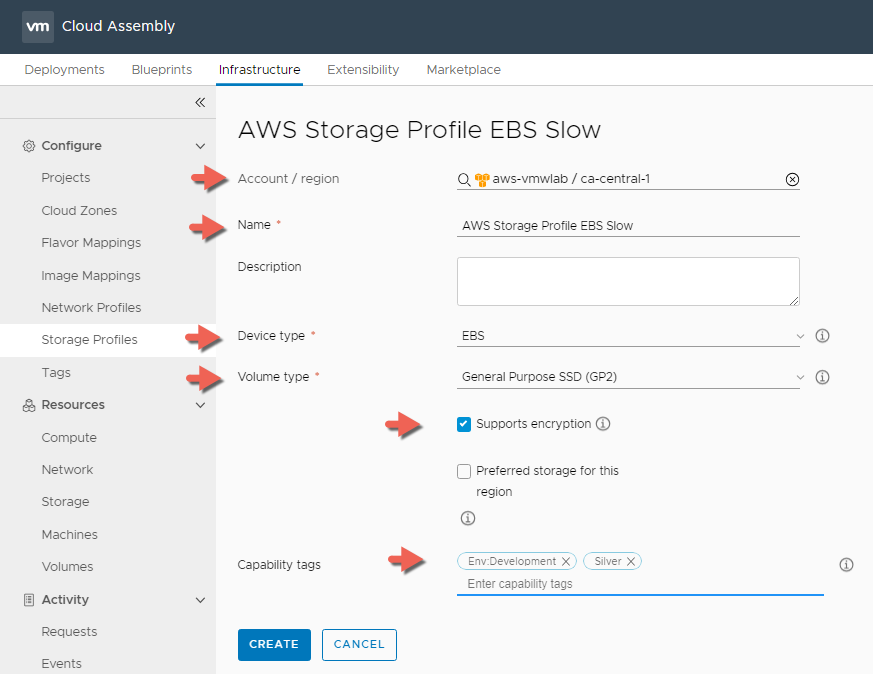
EBS Slow Storage
- In Cloud Assembly, navigate to Infrastructure > Configure > Storage Profiles
- Click + NEW NETWORK PROFILE
- For Account / Region click Search for regions and select your AWS Region.
- Enter a Storage Profile Name : AWS Storage Profile EBS Slow
- Enter Device Type : EBS
- Enter Volume Type : General Purpose SSD (GP2)
- Select Support Encryption
- Enter a Capability Tag : Env:Development and Silver This is again because we are using AWS as our development environment and leveraging the Slower Disks
Once completed will end up with two EBS Storage Profiles for AWS
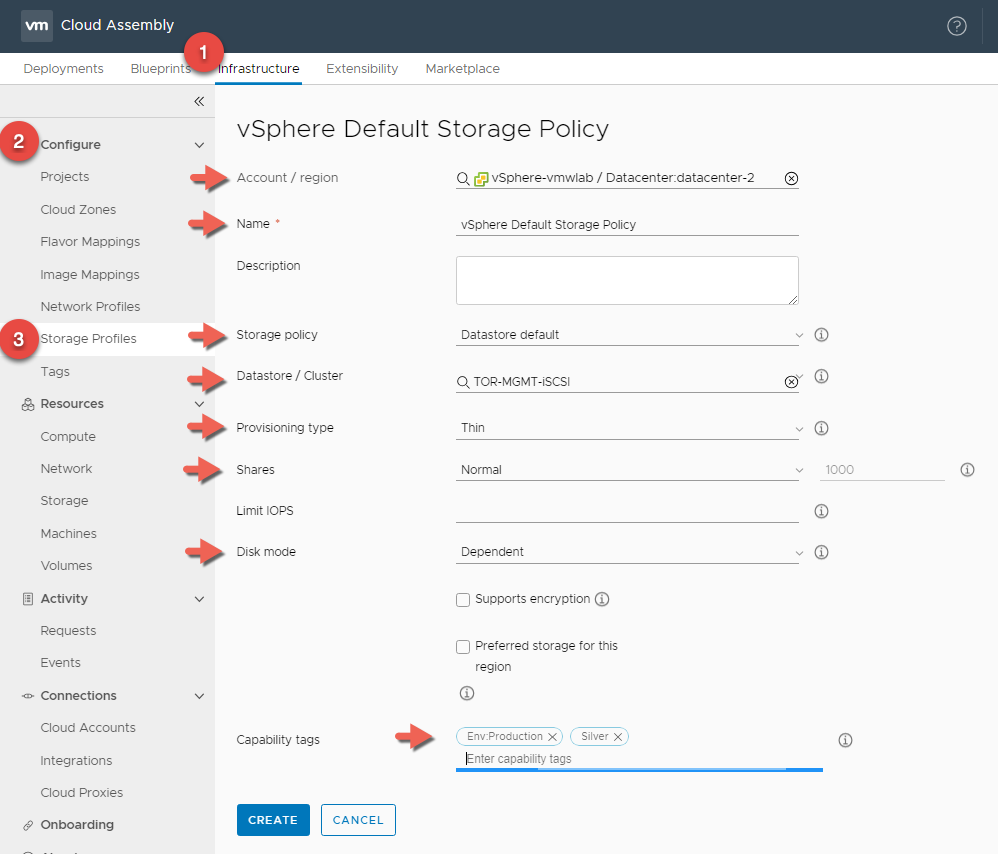
vSphere Storage Profile
- In Cloud Assembly, navigate to Infrastructure > Configure > Storage Profiles
- Click + NEW NETWORK PROFILE
- For Account / Region click Search for regions and select your vSphere Datacenter
- Enter a Storage Profile Name : vSphere Default Storage Profile
- Select Storage Policy : Datastore Default
- Enter a Capability Tag : Env:Production and Silver This is again because we are using vSphere as our production environment and leveraging the default Disk.
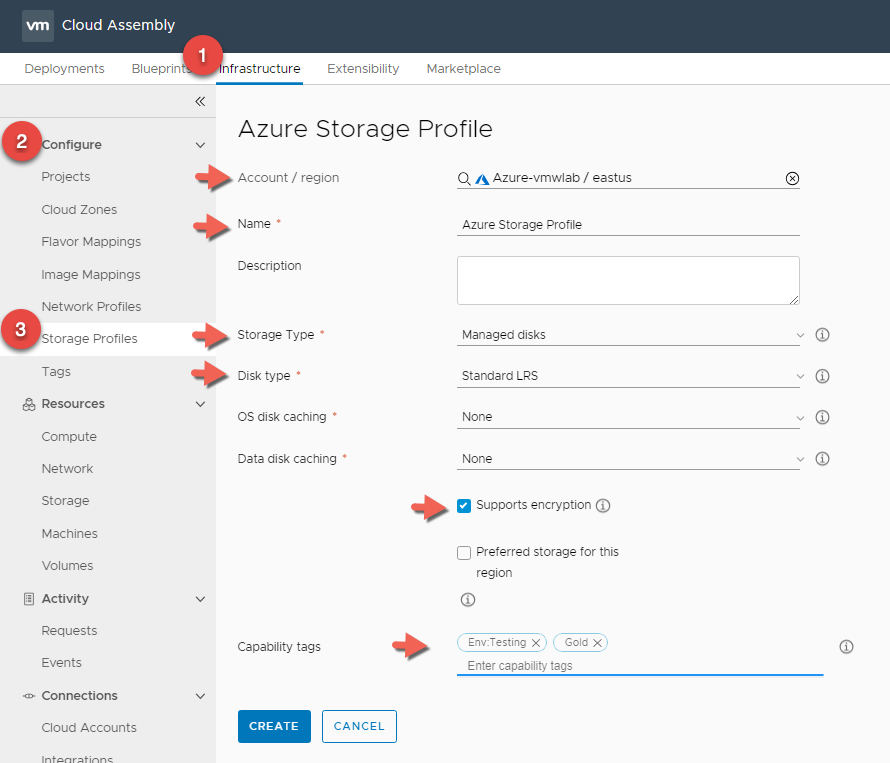
Azure Storage Profile
- In Cloud Assembly, navigate to Infrastructure > Configure > Storage Profiles
- Click + NEW NETWORK PROFILE
- For Account / Region click Search for regions and select your Azure Region
- Enter a Storage Profile Name : Azure Storage Profile
- Select Storage Type : Managed Disks
- Select Disk Type : Standard LRS
- Select OS and Data disk caching : None
- Select Supports encryption.
- Enter a Capability Tag : Env:Testing and Gold This is again because we are using Azure as our testing environment and leveraging the HDD backed Disks.
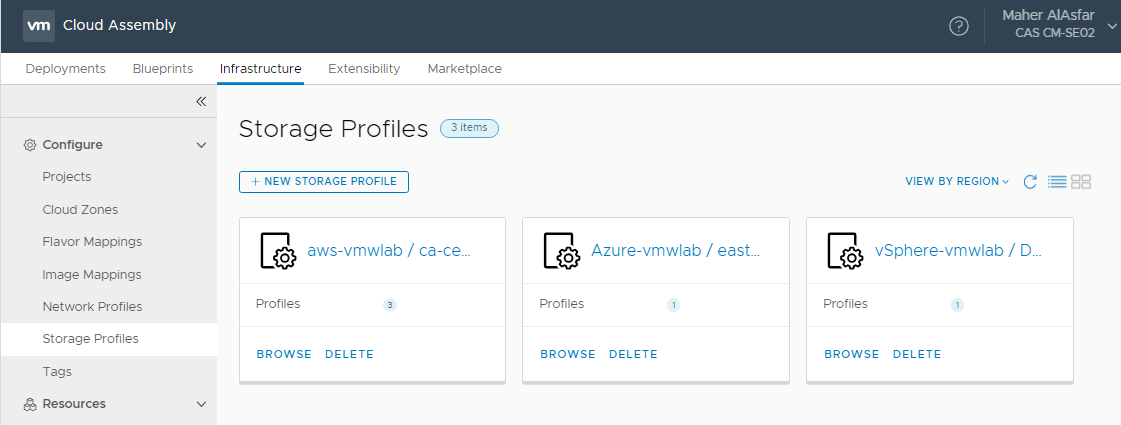
Once completed you should have 3 Storage Profiles for the 3 cloud platforms ( vSphere, AWS, Azure ).
Create A Project
Projects control who has access to Cloud Assembly blueprints and where the blueprints are deployed within the project. You use projects to organize and govern what your users can do and where they can deploy blueprints in your cloud infrastructure.
Cloud administrators setup projects, adding the required users and cloud zones. Anyone who creates and deploys blueprints must be a member of a least one project.
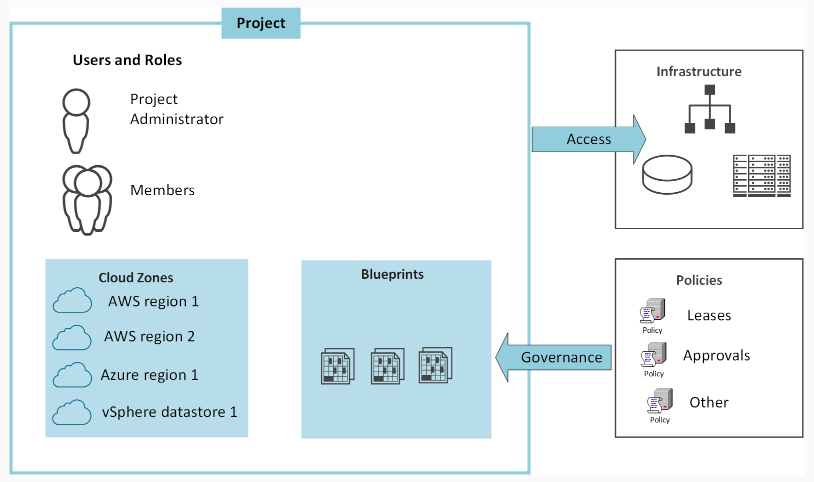
As you can see, projects are simply groups that link users to cloud resources, controlling who can use what resource. Users become project members.
To deploy a blueprint , the deploying user must be a member of a project and the project must have one ore more cloud zones that support the development goals of the members. When the blueprint is deployed, the resource requirements defined in the blueprint as evaluated against the available zones and the blueprint is deployed to the cloud zone that supports those requirements.
How Can You Use Projects
You use projects in the way that best suits your users development goals.
- Create a single project for a development team
- The project includes a project administrator, the development team members, and all cloud zones that support the team workflow from development to testing to staging to production. the cloud zone capability tags we setup earlier target the zones where the blueprints are deployed.
- Create multiple projects for a development team.
- The project members might consist of all the same users or the membership might vary by role. For example, developer members for the development project, developers and testers for the testing and staging project, and lead developers for the production project.
Enough Talking lets go ahead and create a PROJECT
- In Cloud Assembly, navigate to Infrastructure > Configure > Projects
- Click + NEW PROJECT
- Enter the following details for your prject
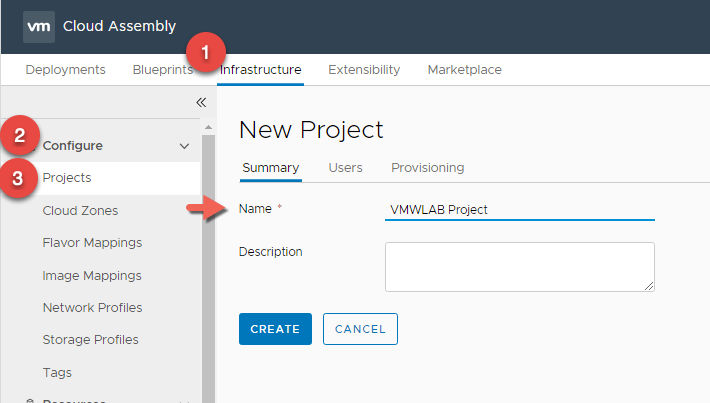
-
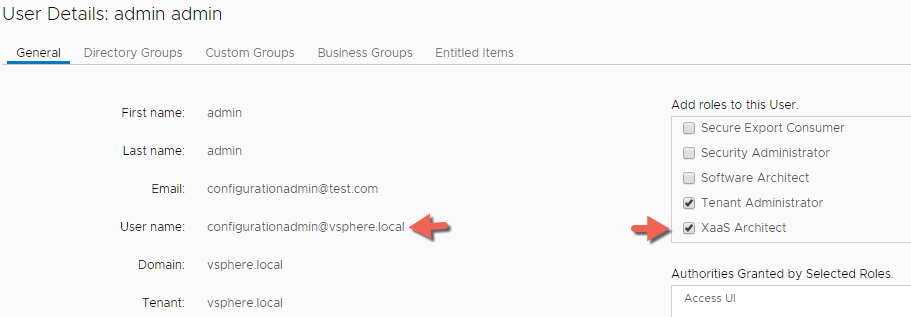
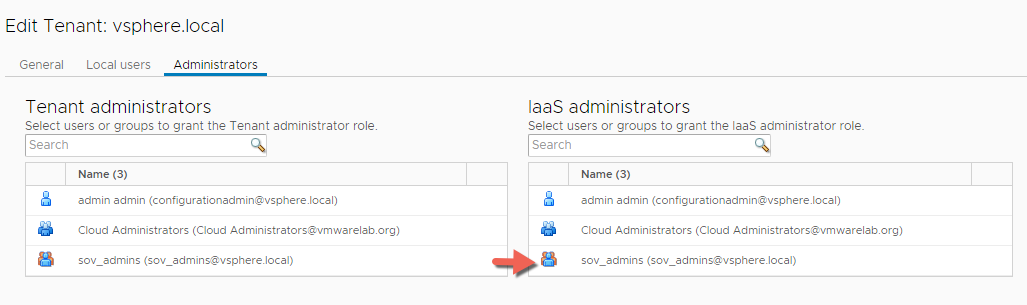
- Under Users, Click + ADD USERS. Here I m adding my self as an Administrator and clicking ADD
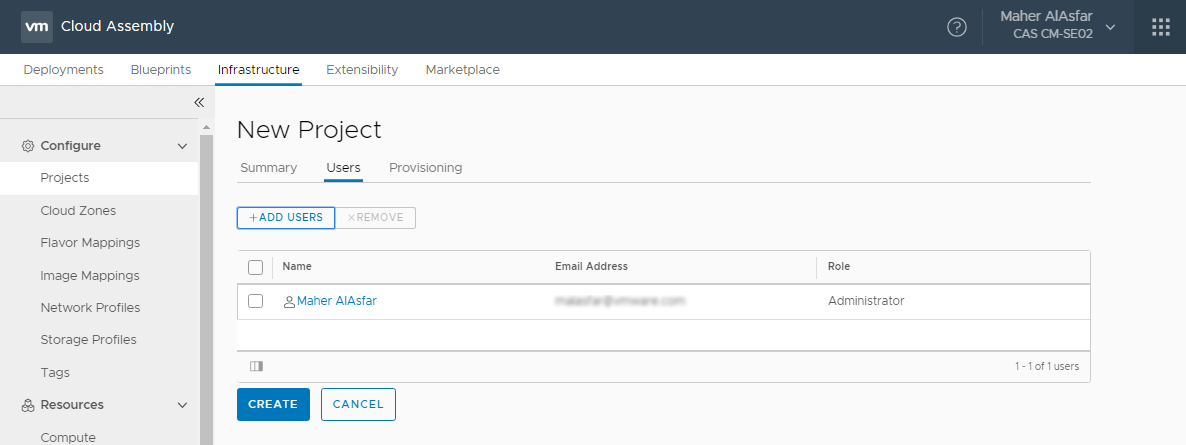
-
- Under the Provisioning tab > Cloud Zones add all the cloud zones we have created and give them a priority number.
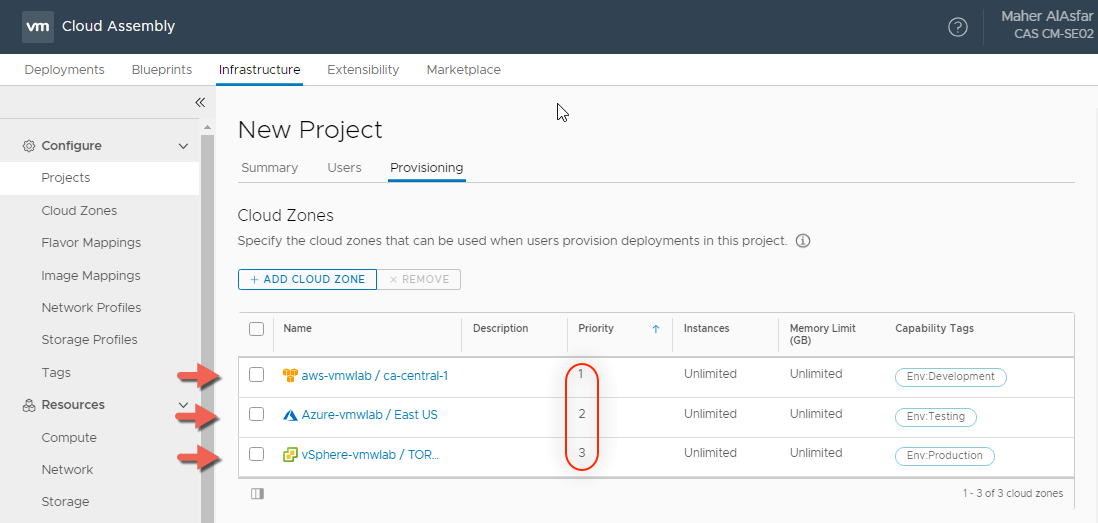
Notice the Priority numbers we defined for each Cloud Zone when we added them, this mean if no capability tags were defined in a blueprint everything should go to AWS first, Azure second and vSphere Third.
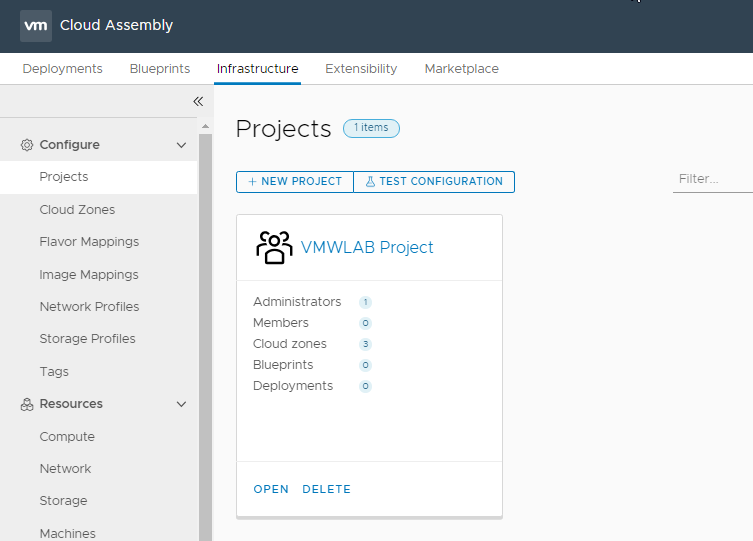
Once completed you should see all the projects you created.
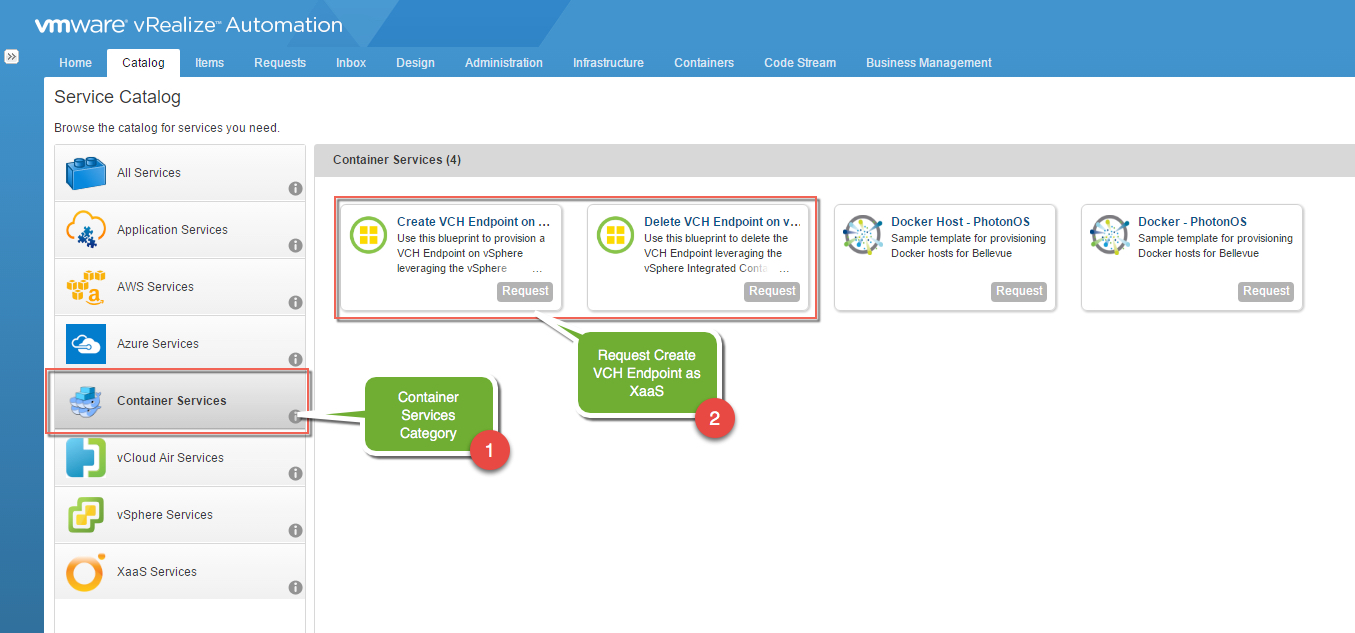
Blueprinting
The Market place within Cloud Automation Services is a great way to quickly get started with blueprinting in Cloud Assembly. Not only do we provide several popular applications for deployment via Cloud Assembly, these blueprints also serve as example content you can learn from for how to complete complex tasks in Cloud Assembly YAML interface.
In order to get started with the market place we nee to first bind a My VMware Account
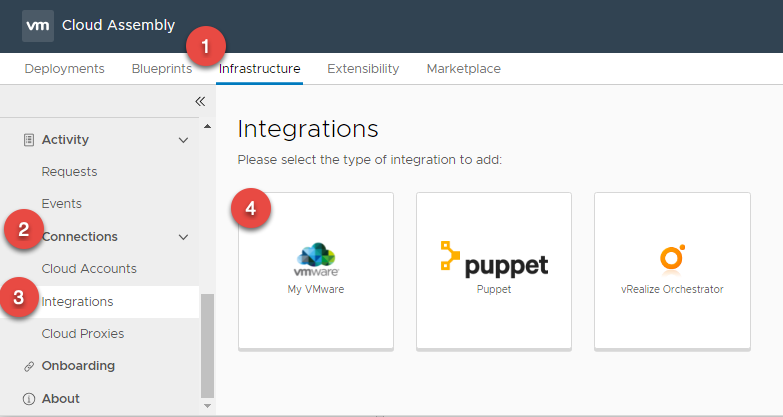
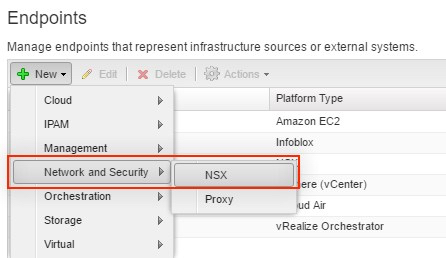
- In Cloud Assembly, navigate to Infrastructure > Connections > Integrations
- Click + ADD INTEGRATION
- Select My VMware
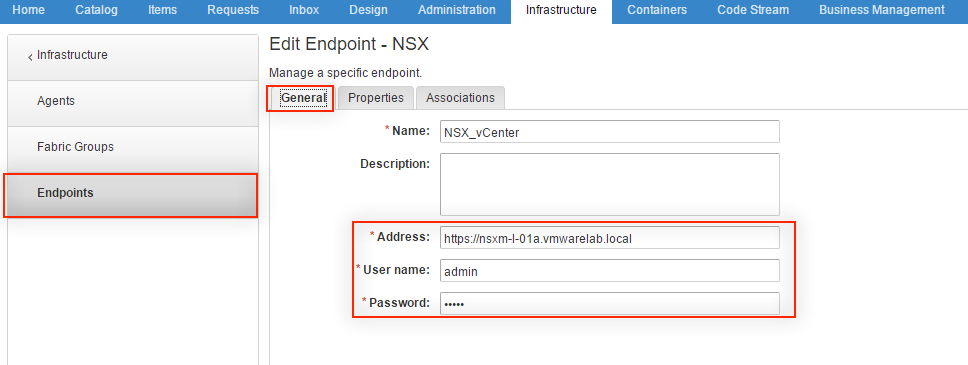
- Enter your username and password and Click VALIDATE
- Provide a name
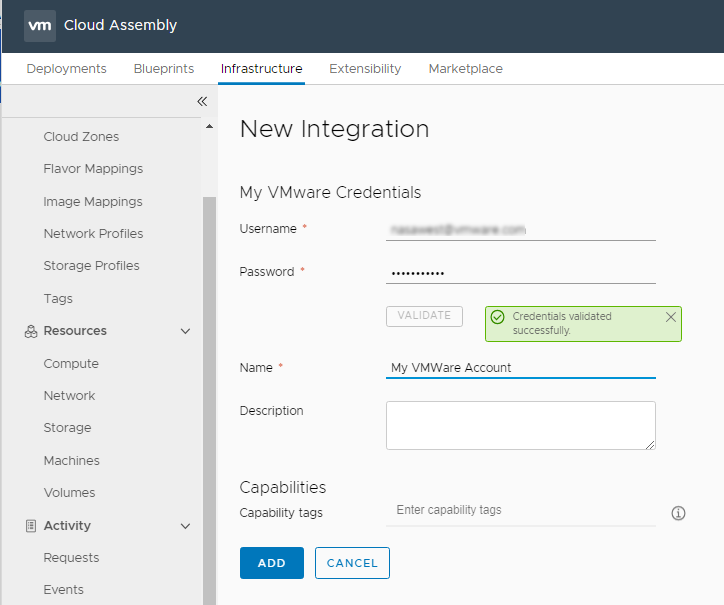
- Click ADD
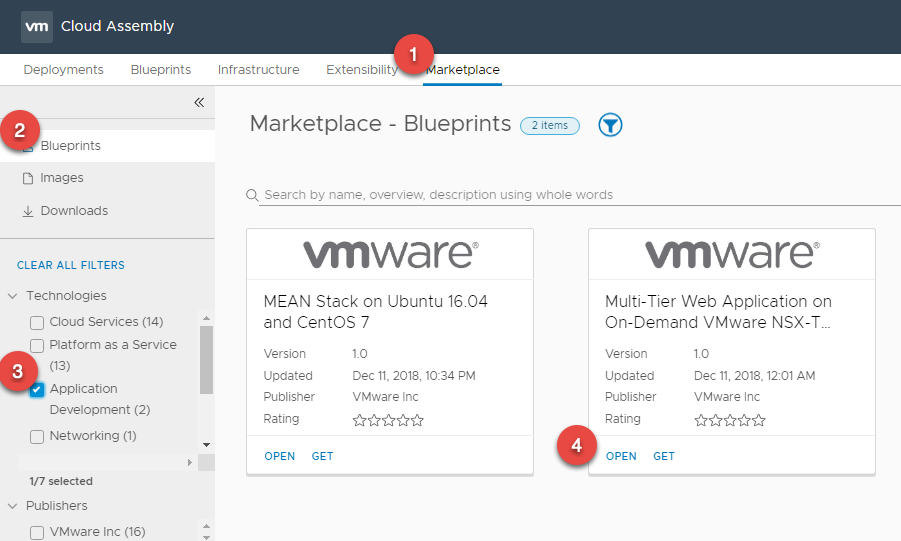
- Select the Market Place Tab, you will be able to see the available sample blueprints. We can choose to either
- Import the Blueprint directly into a Project
- Download the Blueprint YAML file
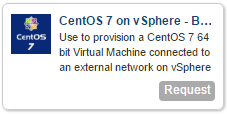
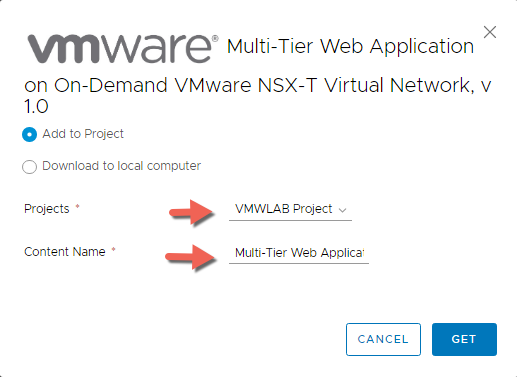
- For our blog I will be importing the Multi-Tier Web Application ( Word Press ) on On-Demand VMWare NSX-T Virtual Network listed under Technologies > Application Development.
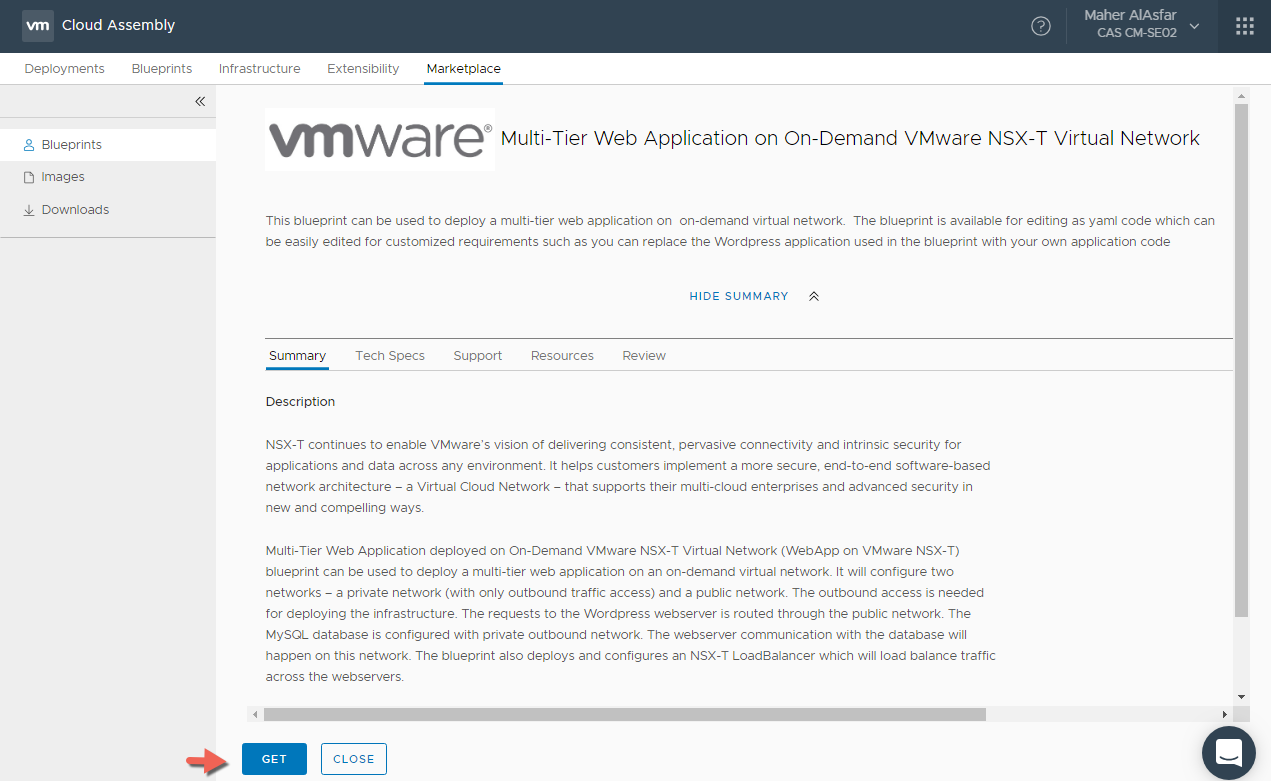
- Clicking Open will give us a chance to read the summary of what this blueprint is about and more importantly the Tech Specs tab will tell us all the requirements for how we should be configuring the Blueprint and what Images to actually use for example
- Click GET
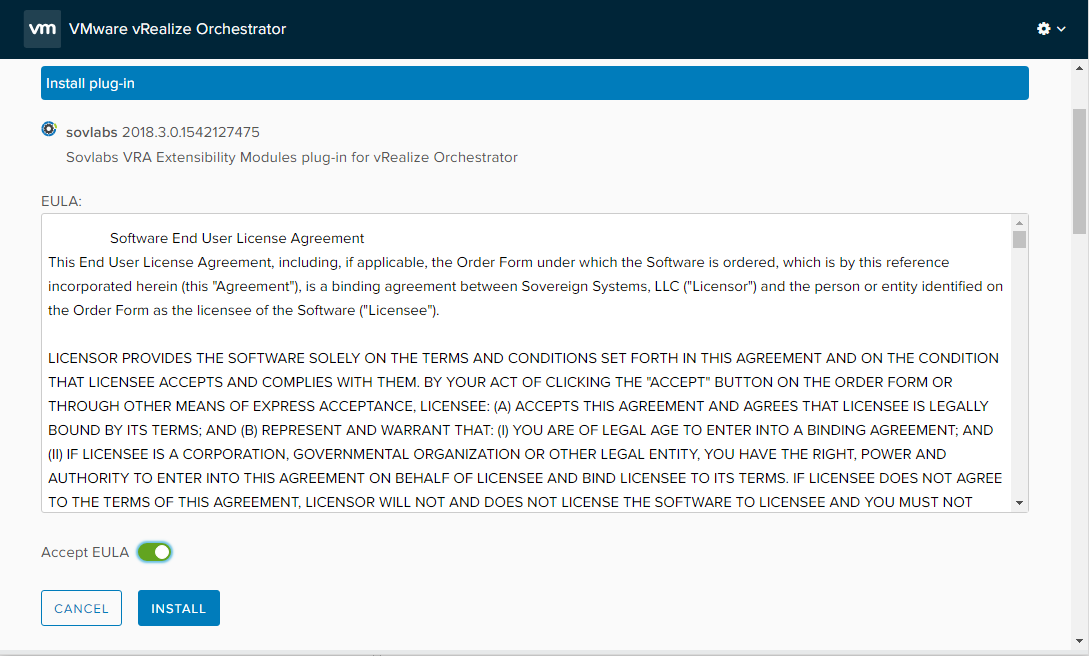
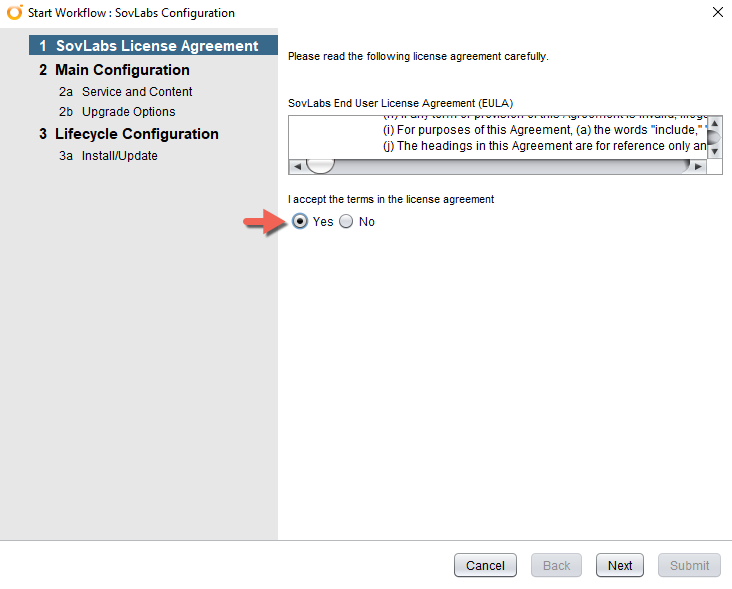
- You may need to Read and Agree to the terms of a license agreement after that click NEXT to continue.
- Here we will select to import it directly to our Project
- Now we can switch to the Blueprint Tab to validate that the blueprint has been added to the project.
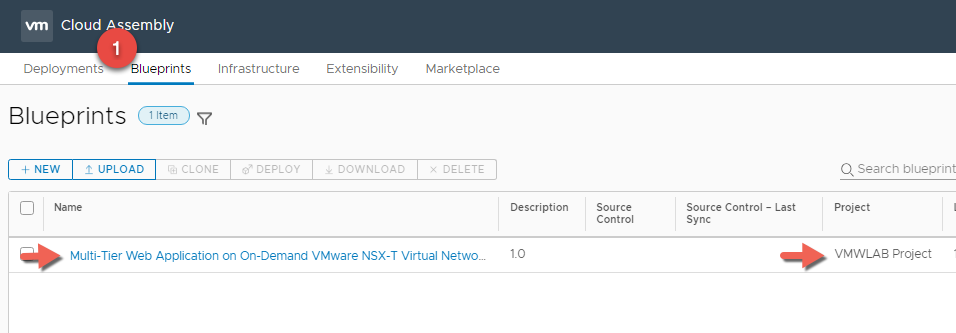
- Let’s Click on the Blueprint link to view its contents and observe the blueprint we imported from the marketplace.
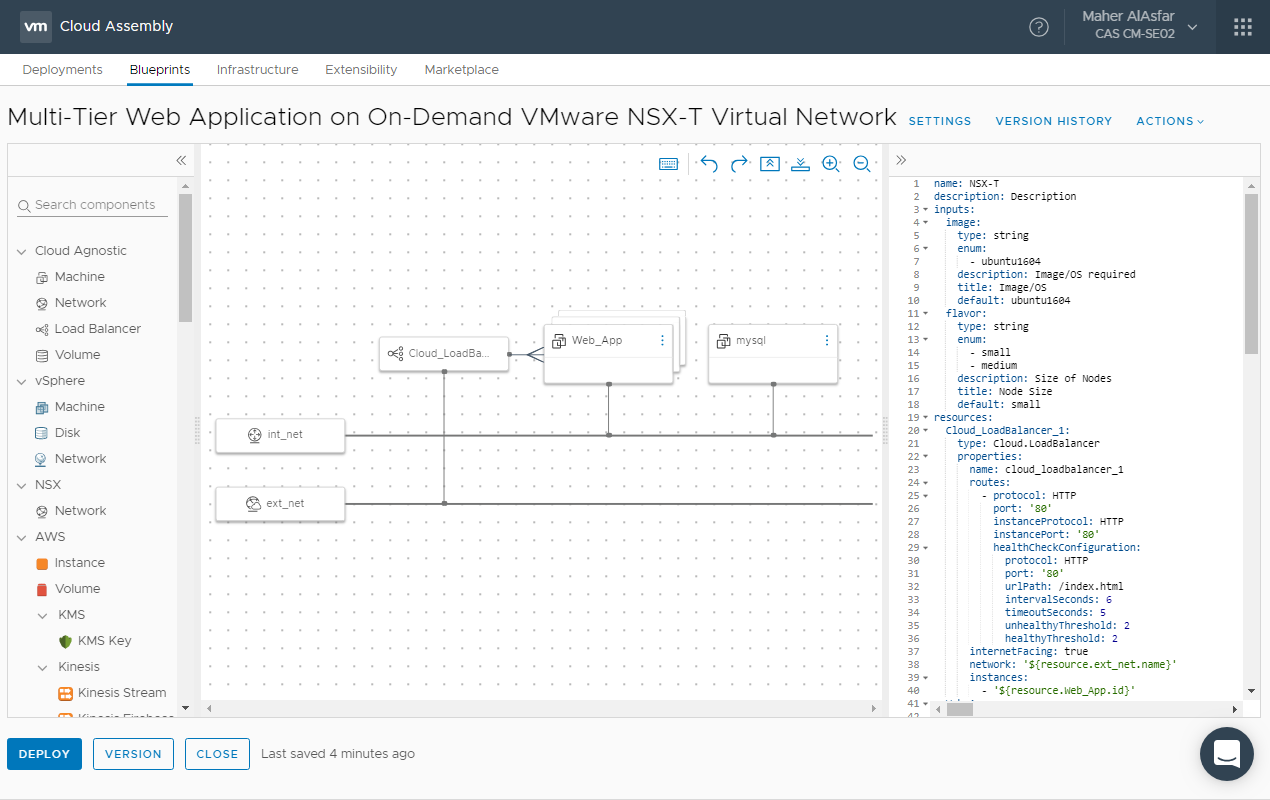
Here you go how awesome is that, infrastructure as code at our finger tips in a matter of seconds.
Blueprints from the market place will have temporary sample values assigned to them for the image, flavor, disk and network mappings. These will need to be updated with your own values of-course before attempting to do a deployment. For the propose of this blog we are simply demonstrating the existence of these blueprints to tweak and to learn from.
Creating and Deploying a Single Machine Blueprint
Here will be deploying a single-machine cloud agnostic blueprint based on all of our pervious configuration.
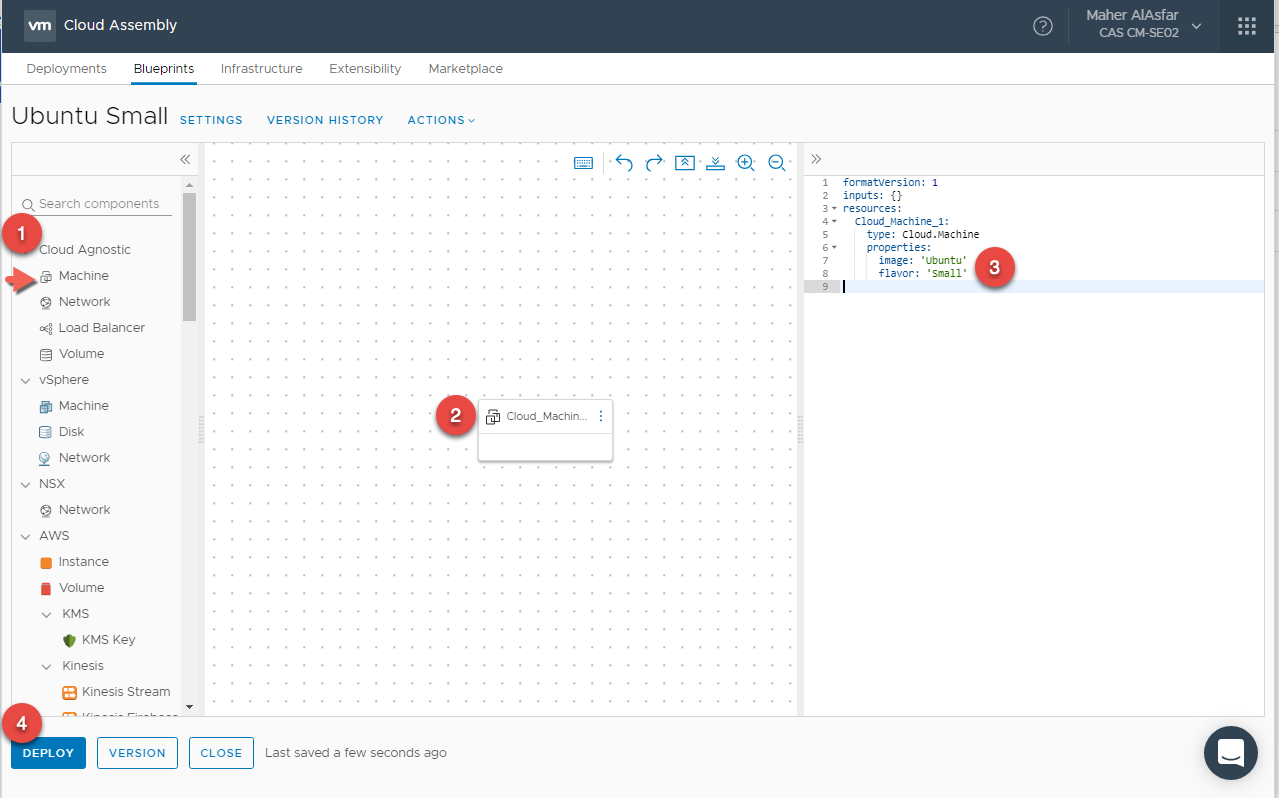
- In Cloud Assembly, navigate to Blueprints
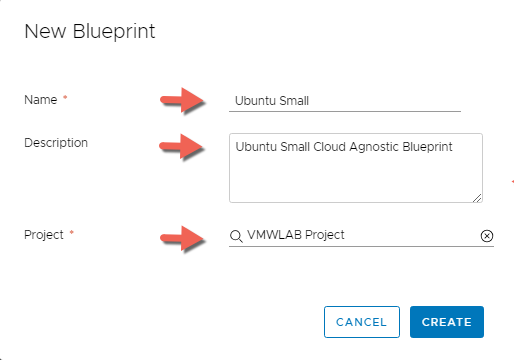
- Click + NEW
- Enter the following information, then Click CREATE:
- Name: Ubuntu Small
- Description: Ubuntu Small Cloud Agnostic Blueprint
- Project: VMWLAB Project
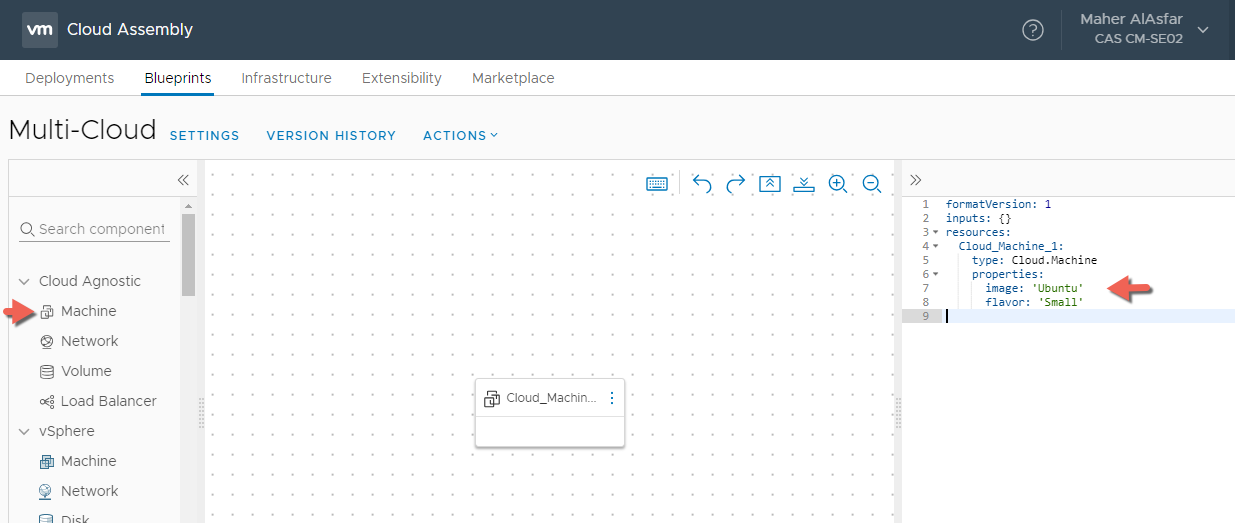
- Drag a Cloud Agnostic machine to the canvas. Cloud Agnostic objects are designed to be portable between all supported cloud environments. This includes vSphere, AWS, GSP and Azure. Object types includes Machines, Networks, Load Balancers, and Disk Volumes.
- In the code and under resources set the following :
- Image as Ubuntu
- Flavor as Small
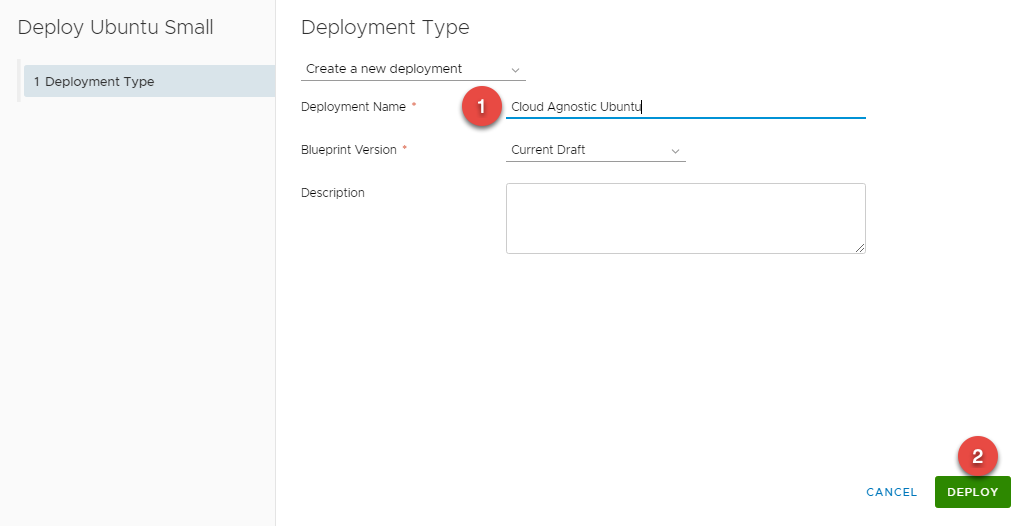
- Select Create a New Deployment, then fill the required fields:
- Deployment Name
- Blueprint Version
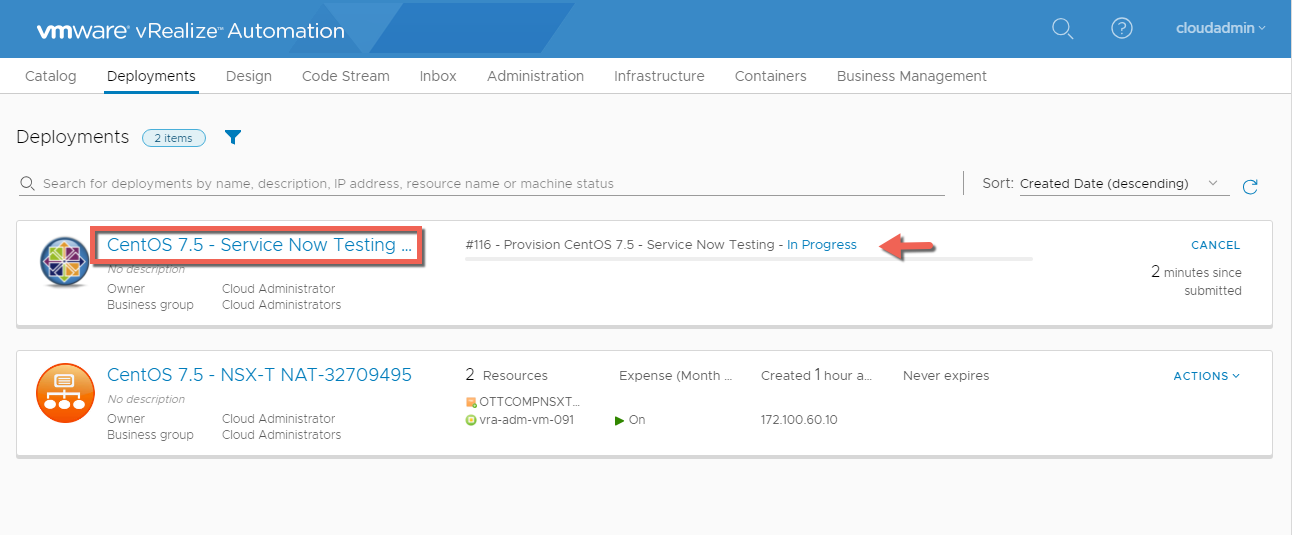
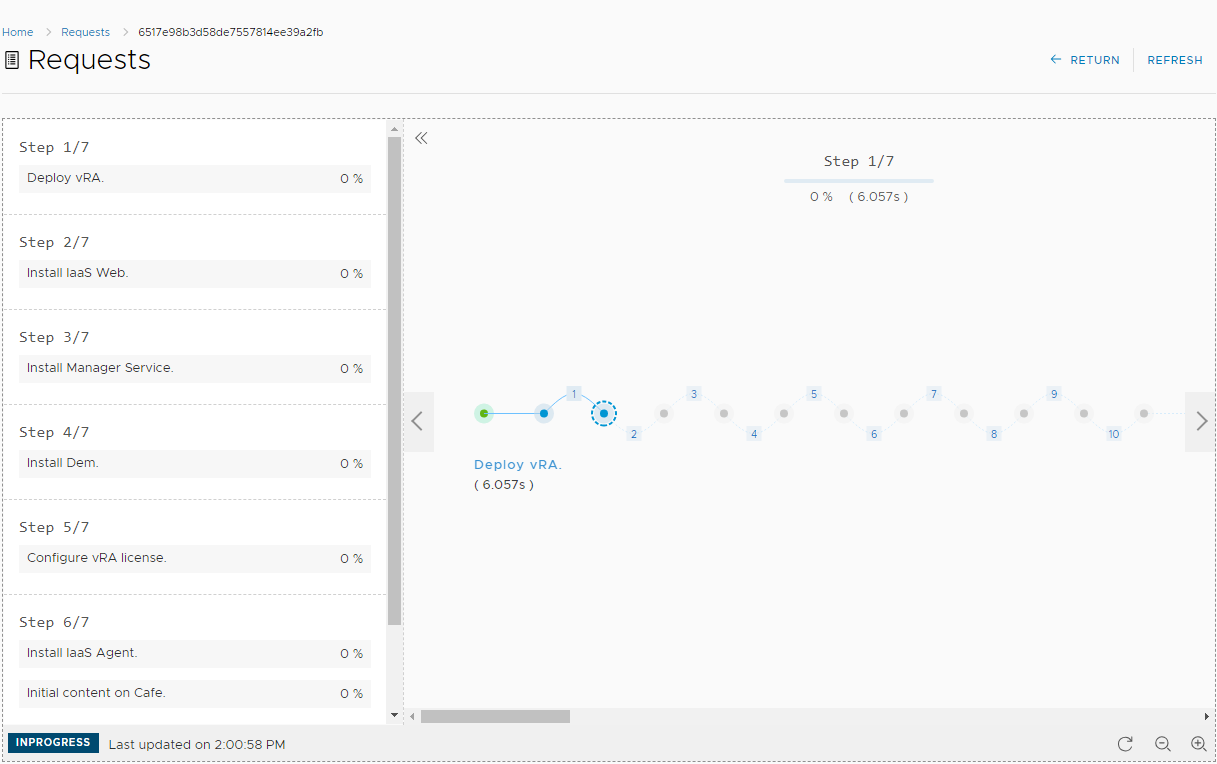
- Click DEPLOY and Monitor the status of the your request by navigating to the Deployment tab.
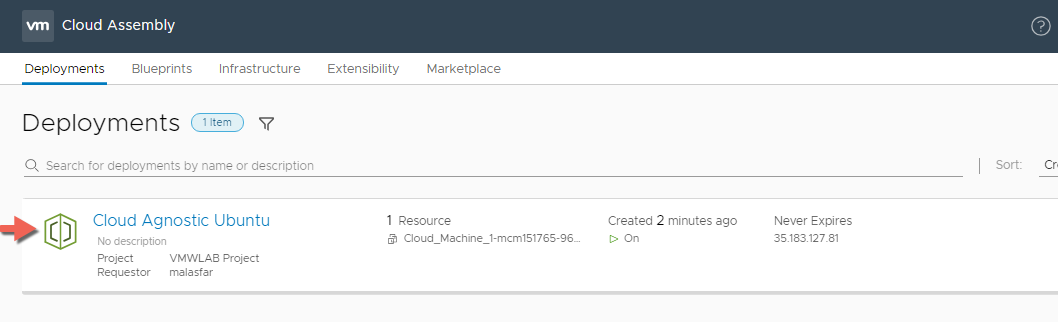
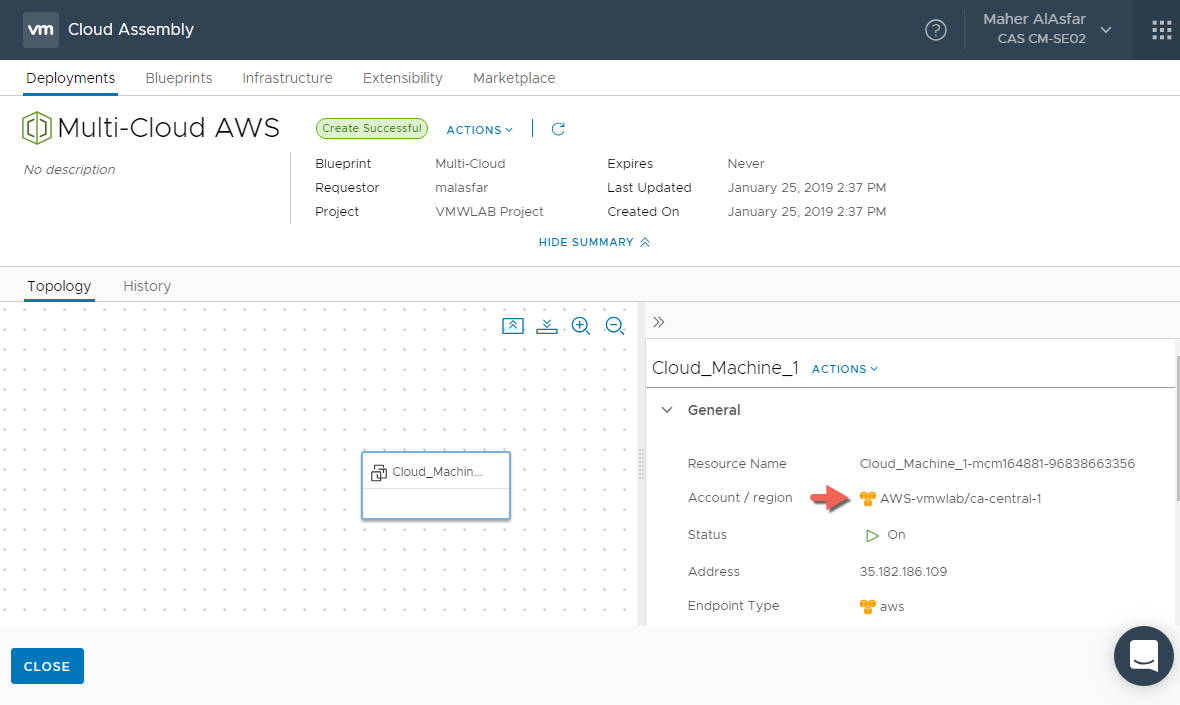
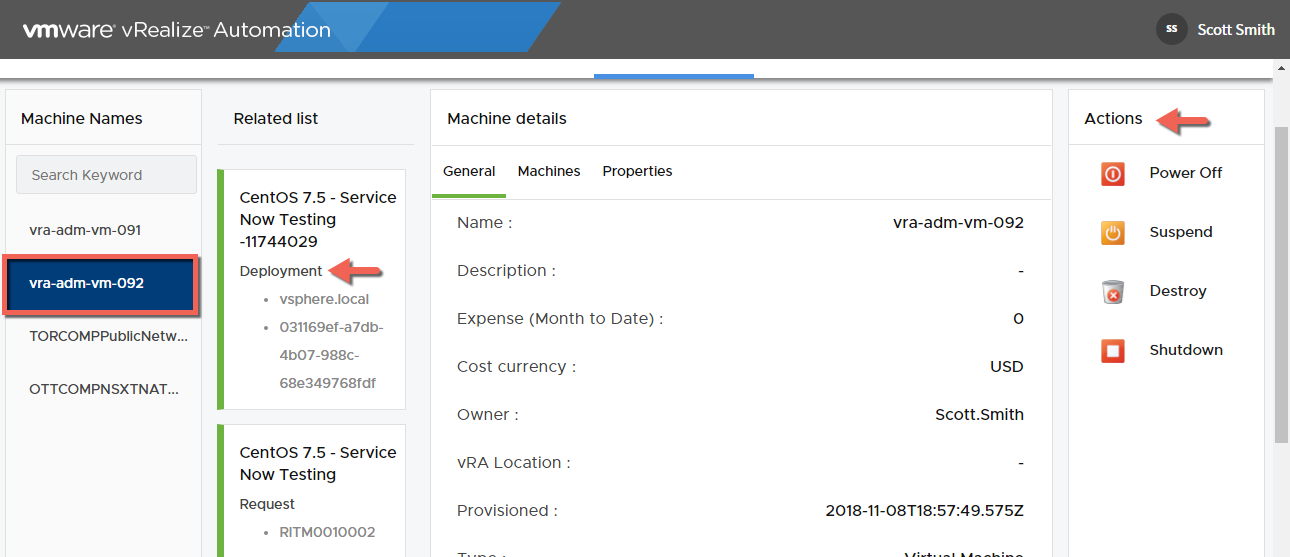
- When Provisioning is completed, view the deployment details by clicking on the deployment name and lets note where the machine was provisioned
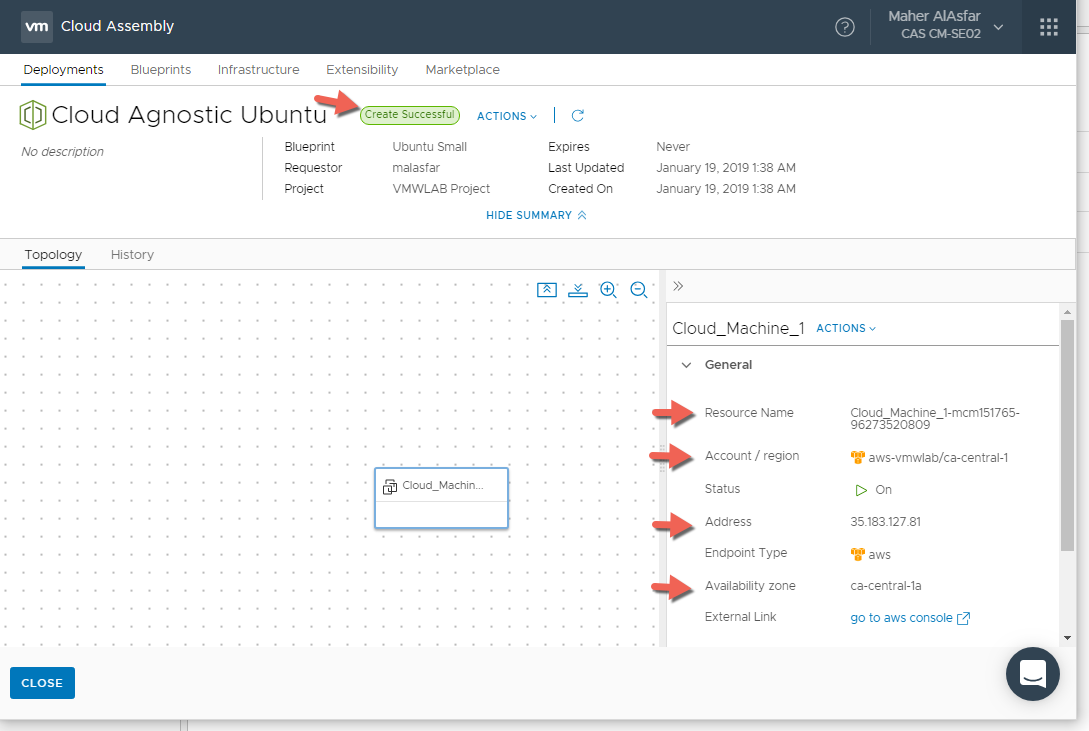
As you can see the machine was provisioned in AWS because if you remember, AWS Cloud Zone had the first priority when we added it during the creation of our project VMWLAB Project.
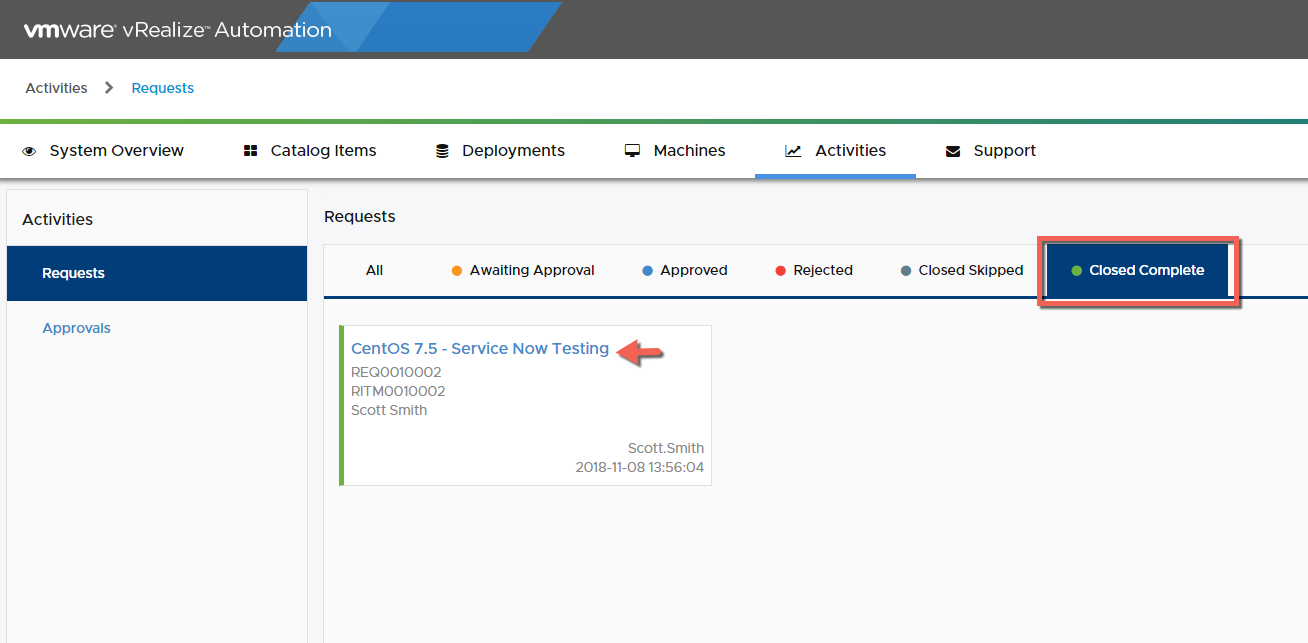
To figure out why AWS was selected we can also check the History Tab within the Deployment details where we can check all the Events for Requests for this deployment
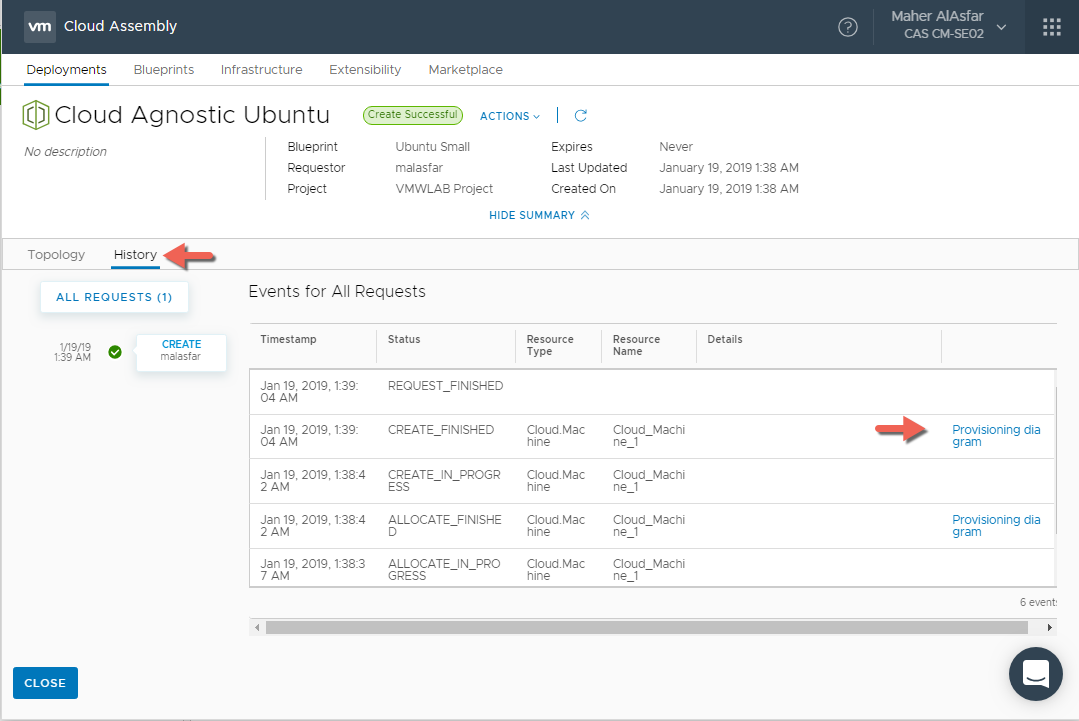
Here we can click on the Provisioning diagram shortcut for the ALLOCATE_FINISHED Event. This is will take us to Infrastructure > Activity > Requests to view the Request Details and see the various placement decisions made based on your Blueprint details.
Policy Based Placement
Multi-Cloud blueprints are capable of being moved between multiple environments leveraging tags to dictate their desired location via the Policy Based Placement Engine. In this section we will create a blueprint that is able to move between multiple cloud environment.
We have already created tags on the Cloud Zone Level that addresses the three environment we have Env:Development, Env:Testing, and Env:Production
We will go ahead and create additional tags against our environment but this time it will be based on our Cloud Platforms and on the compute Level for each of the platforms.
Note : Initially I have placed Capability Tags ( cloud:vsphere, cloud:aws, cloud:azure ) on the Cloud Account Type Level thinking I might need it but now I see more value in removing them from the Cloud Accounts level and instead setting them up at the Compute level within each of the Cloud Zone Type we have created.
Configuring Tag Policies For Placement
For each of the cloud zones we have we will create a Capability Tag on the compute level. I will document here how we do it on the AWS Cloud Zone and then apply the same steps on the remaining Cloud Zones.
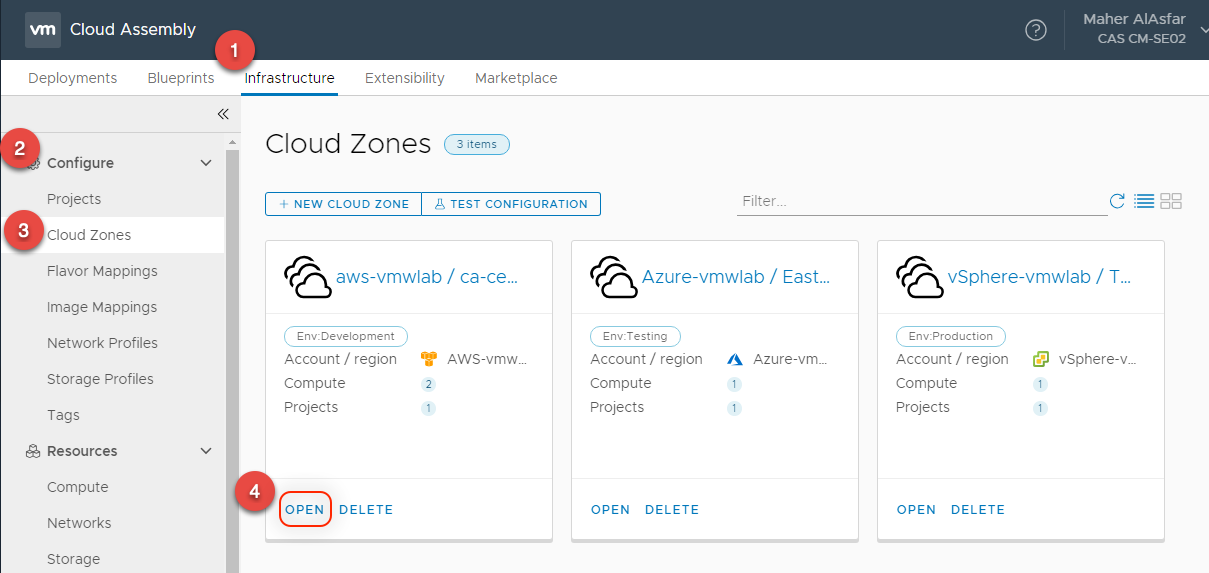
- In Cloud Assembly, navigate to Infrastructure > Configure > Cloud Zones
- Select the AWS Cloud Zone by Clicking OPEN
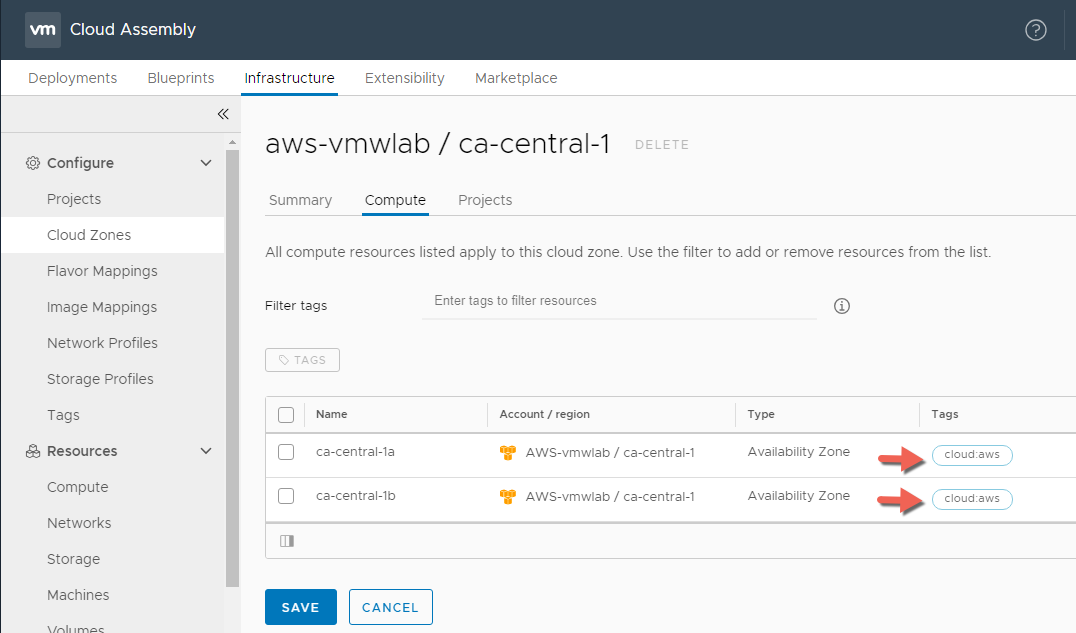
- Select the Compute Tab and check the box for the Regions you want to use, here I am selecting both Availability Zones.
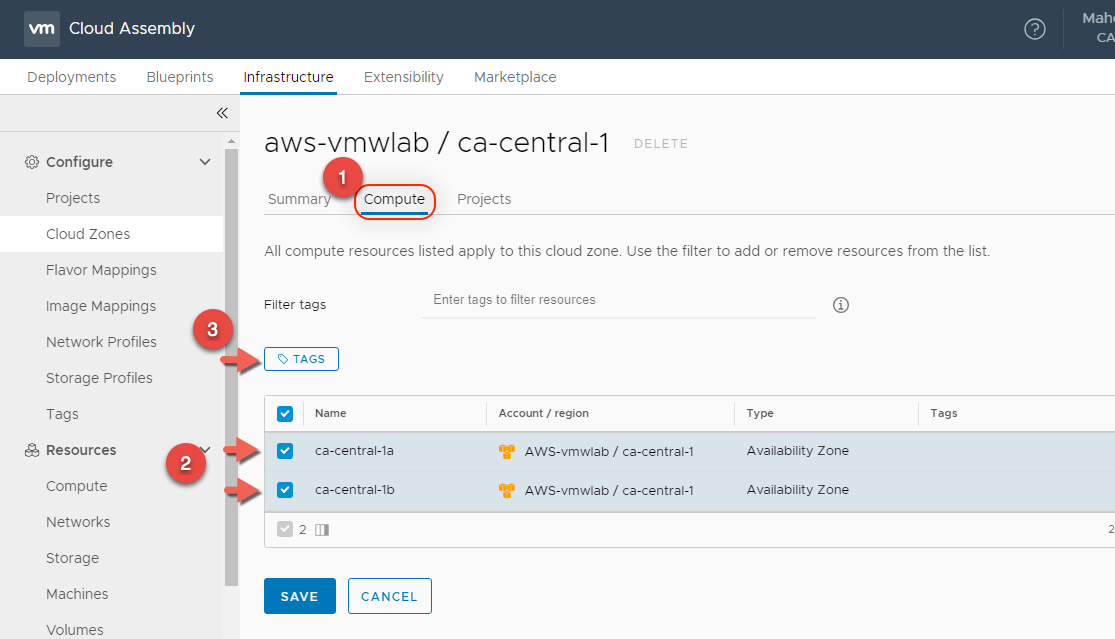
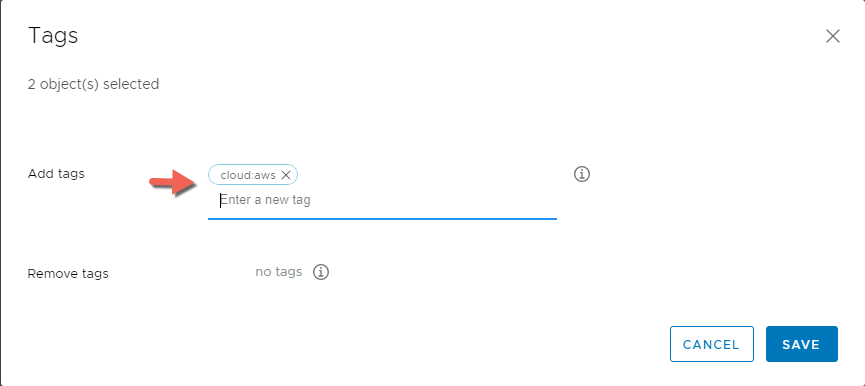
- Select TAGS and enter the name of the tag cloud:aws under Add tags field then click SAVE
- Verify that the tag has been applied to the both compute resources then click SAVE to compete the task.
- Will complete the same process on the remaining cloud zones Azure and vSphere, instead we will be leveraging cloud:azure and cloud:vsphere respectively.
Placing the tag at the compute level is a common user case for customers to separate clusters within an environment based on a use case. An abstract version of this concept exists in public cloud as well ( People may use different regions/zones for different user cases).
We might tag a cluster designed for Oracle workloads to leverage the app:oracle tag, allowing us to place these workloads on this cluster via the placement engine. Another use case is for compliance reasons where users may tag clusters based on compliance capabilities on specific environments to ensure workloads land in an environment that will help them pass audits.
Creating Multi-Cloud Blueprint
Let’s create a multi-cloud blueprint leveraging our basic tag placement set, we can now create a blueprint that leverages these tags as part of the placement.
- In Cloud Assembly, navigate to Blueprints
- Click + NEW
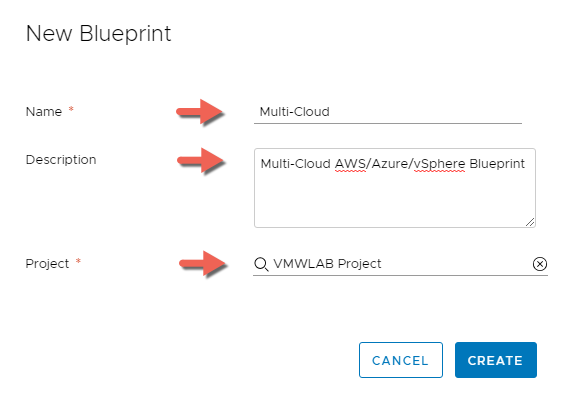
- Enter the following information, then Click CREATE:
- Name: Multi-Cloud
- Description: Multi-Cloud AWS/Azure/vSphere Blueprint
- Project: VMWLAB Project
- Similar to our single machine blueprint, will drag a Cloud Agnostic Machine Object onto the canvas and configure it with an image type of Ubuntu and flavor of Small
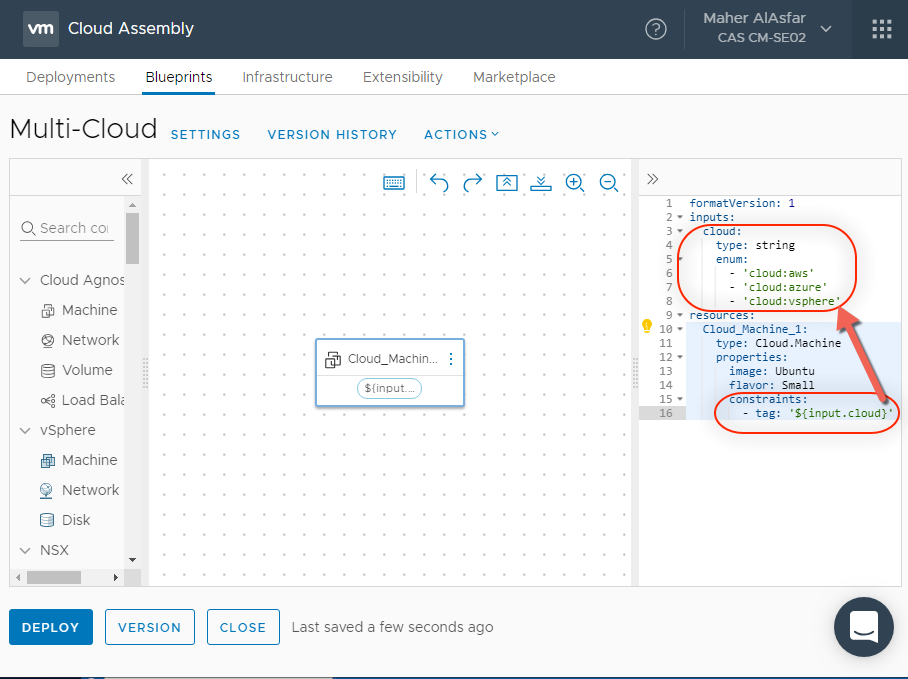
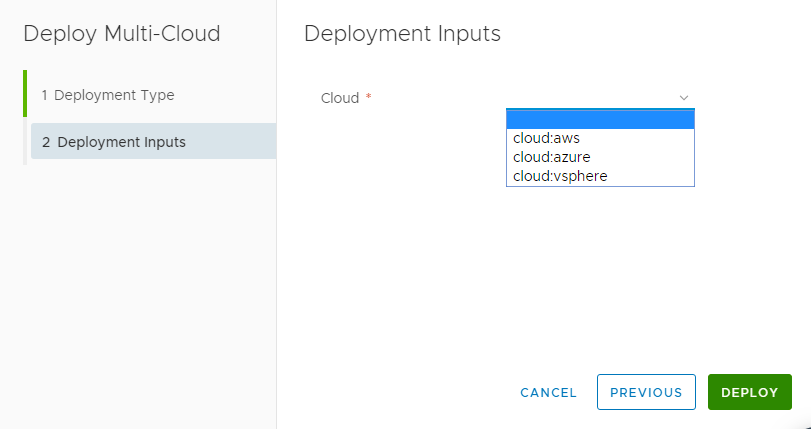
- Under inputs we will add a new field as a drop down for our cloud environment. We can accomplish this with the following YAML:
inputs:
  cloud:
    type: string
    enum:
      - 'cloud:aws'
      - 'cloud:azure'
      - 'cloud:vsphere'
resources:
  Cloud_Machine_1:
    type: Cloud.Machine
    properties:
      image: Ubuntu
      flavor: Small
      constraints:
       -tag: '${input.cloud}'
This instantiates our menu to have AWS, Azure and vSphere as drop down menu options.
- Also notice that we updated the Resources sections to include the constraints filed, referencing the tag properties, and a variable ‘${input.cloud}’ that references our drop down menu item. So what we select from the drop down menu will be the constraint tag that will decide the placement of the requested machine.
- Select DEPLOY and name the deployment and click Next to observe the Tagging option. Select the your choice and press DEPLOY
- After a few moments our deployment to AWS completes to our cloud environment.
- Select CLOSE and return to Blueprints. Initiate another deployment and select any other Cloud environment like Azure for example .
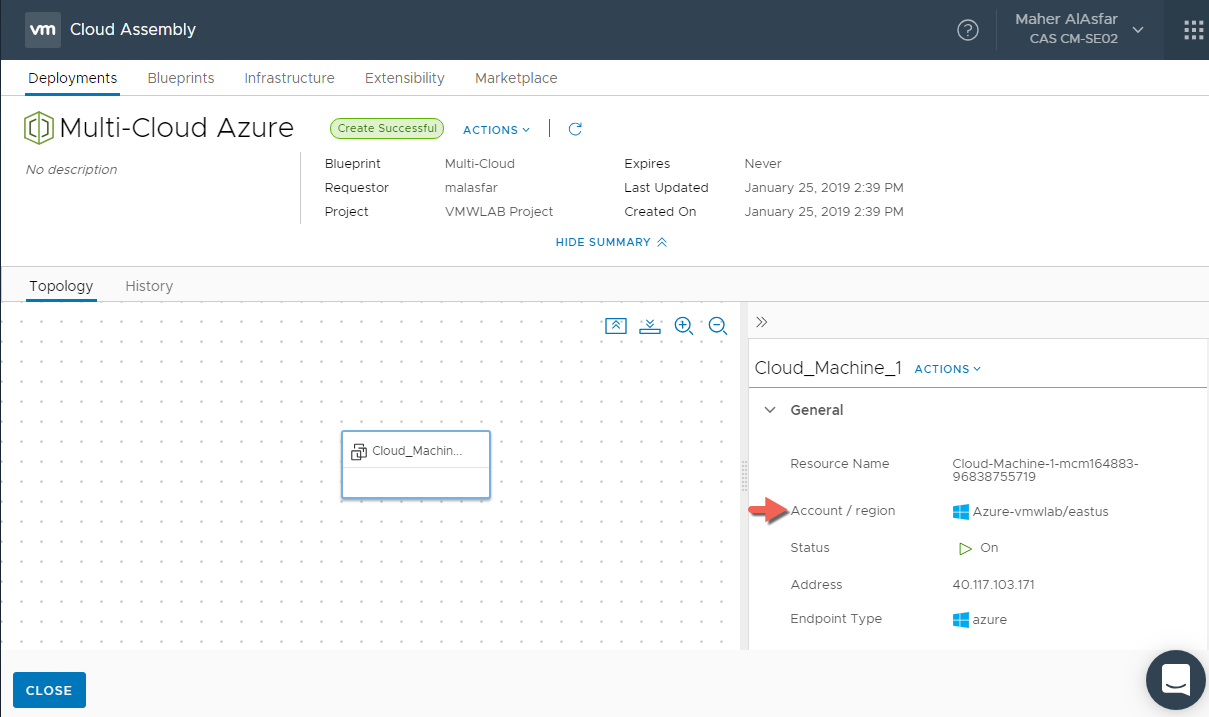
- After a few moments our deployment to Azure completes to our cloud environment.
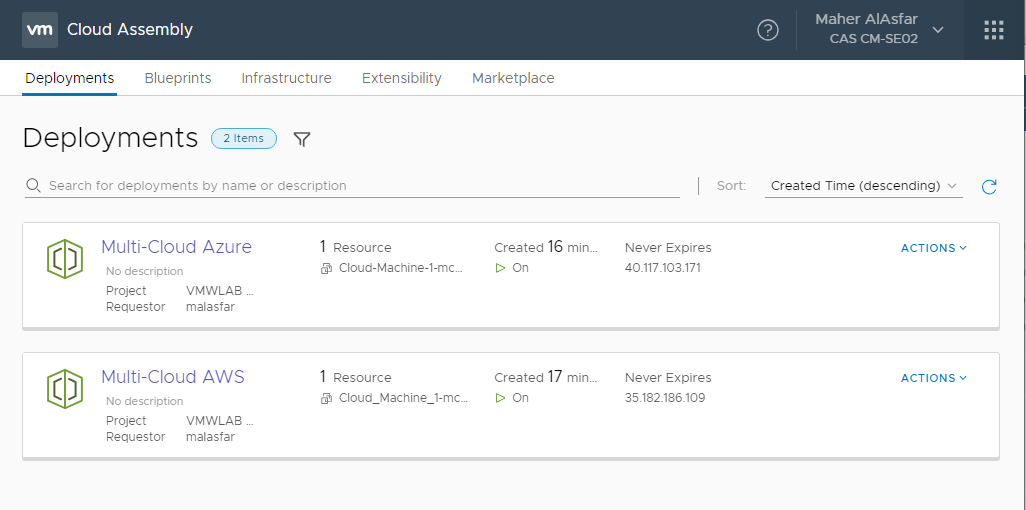
To summarize, we have created a Multi-Cloud Blueprint leveraging the YAML infrastructure as code and we presented to the requester a drop down menu based on Tagging constraints to select which Cloud environment he wants to deploy the machine to.
Thank you very much if you have made it this far. I m hoping part 1 of this blog was beneficial and worth your time in exploring what you can do with Cloud Assembly .
In part 2, will explore more advanced topics such as Customizing Blueprints with Cloud-Config, versioning and Iterating on Blueprints.
The End, Eh!
Sharing is Caring, Please Share Eh!:


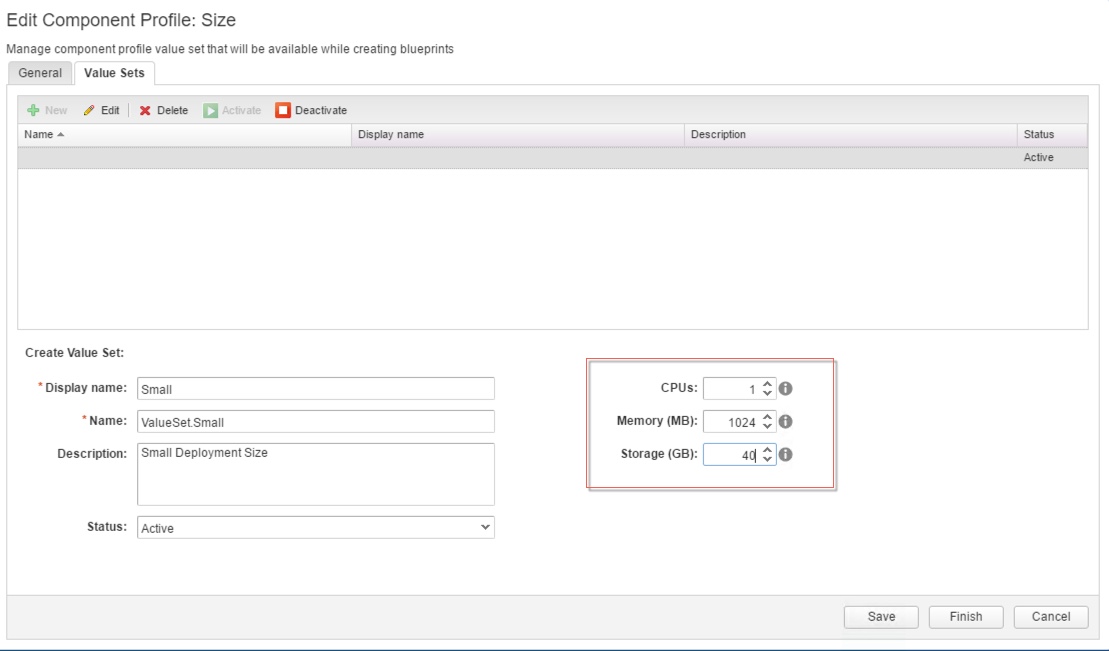
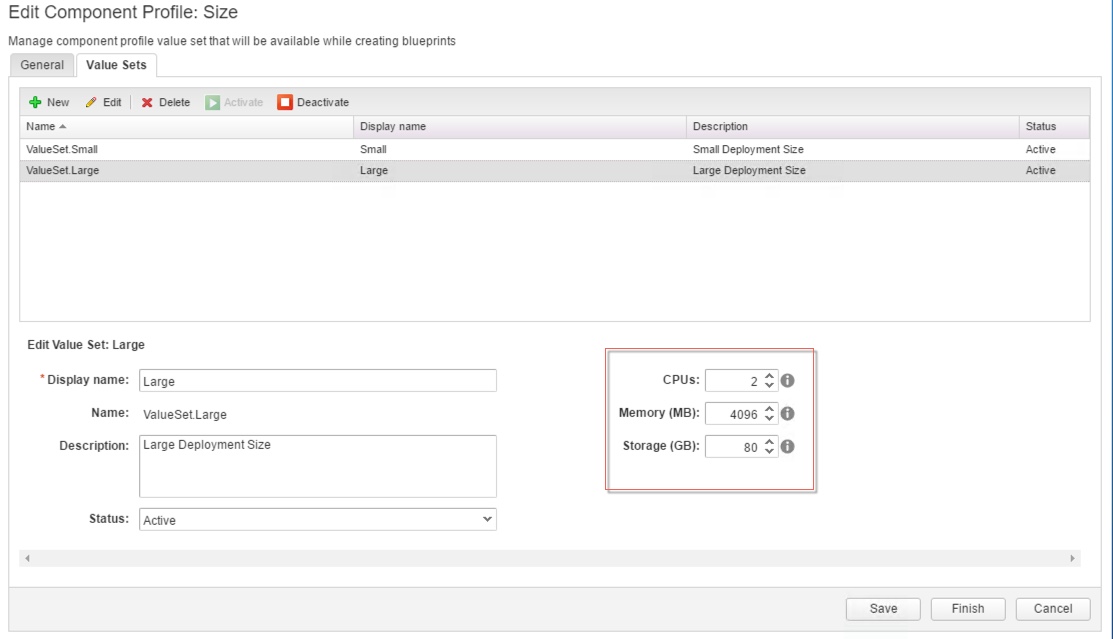
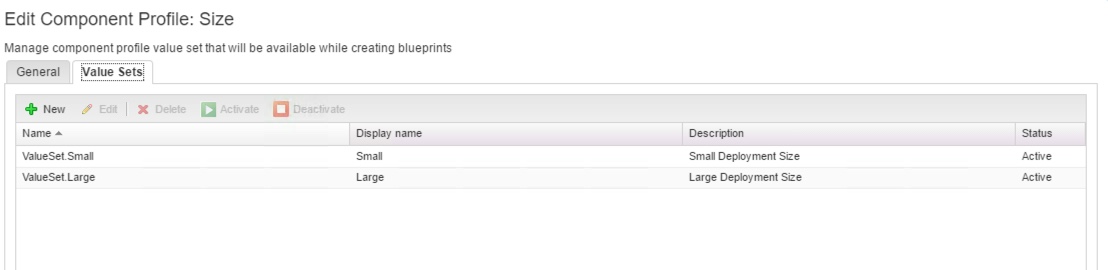
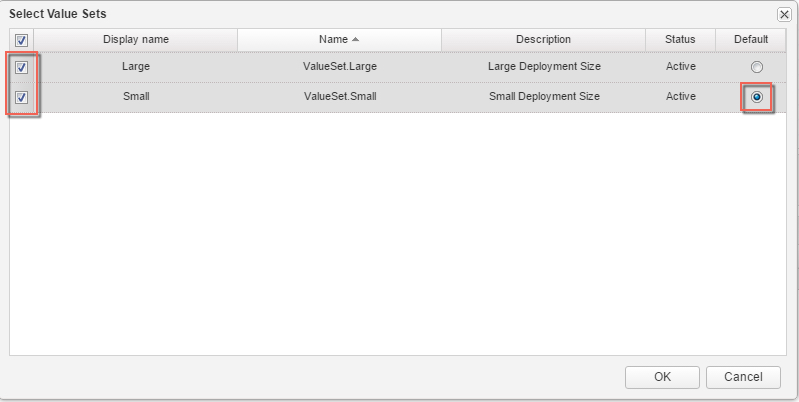
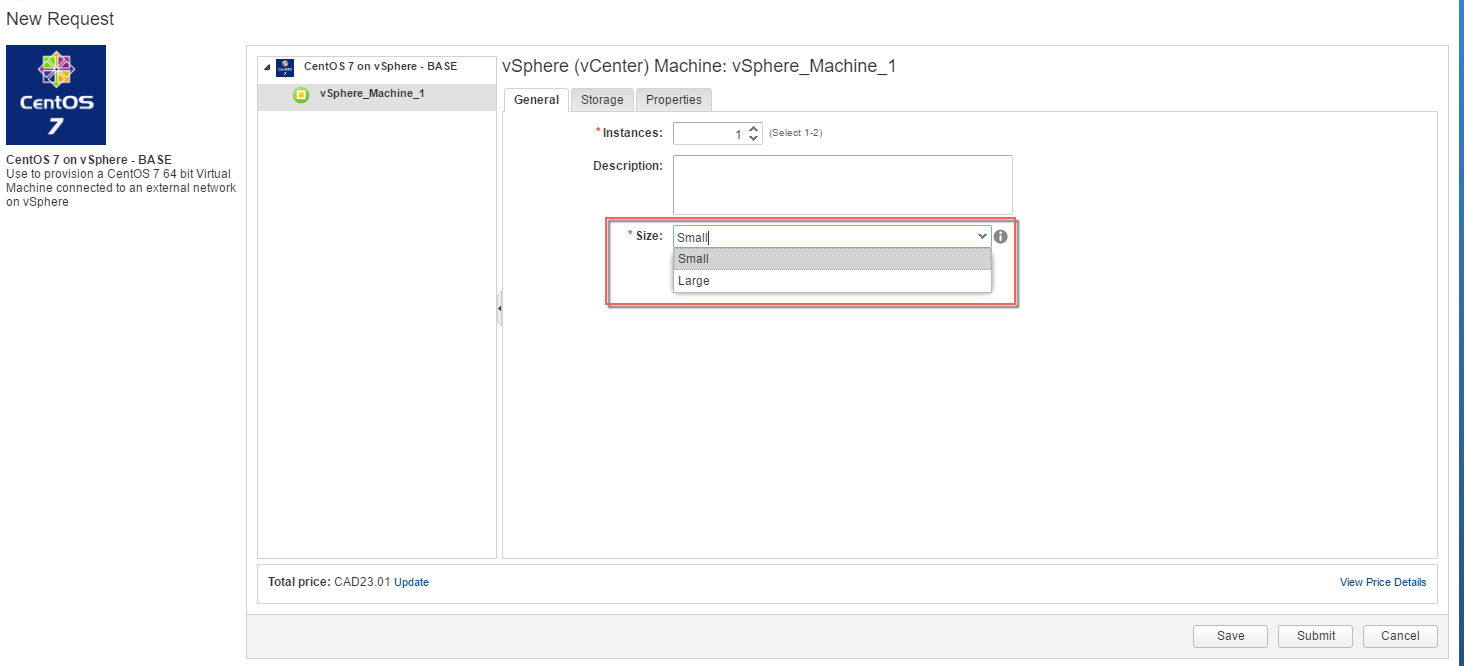
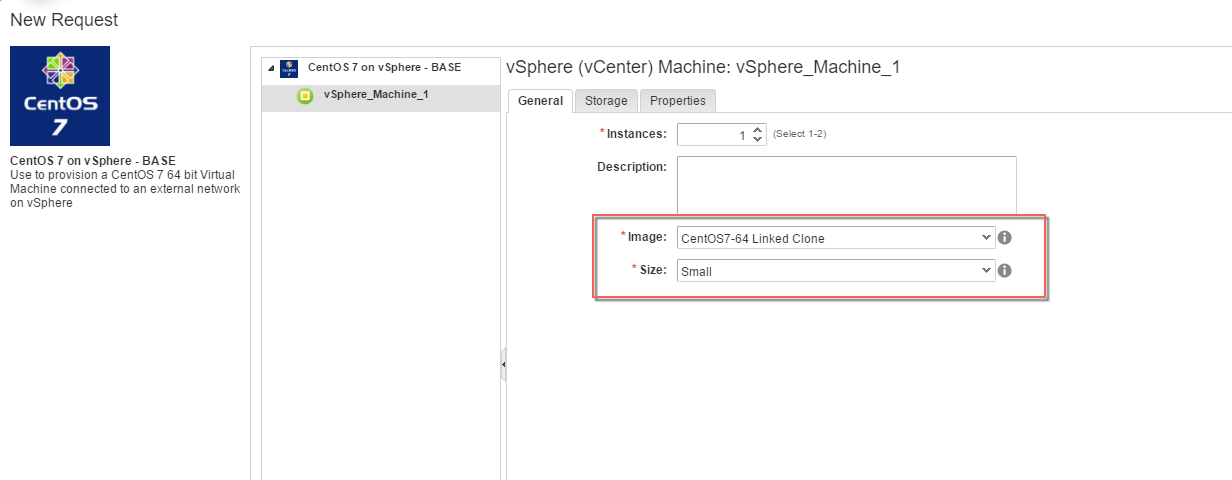
 4. Click the Value Sets tab and define a new value set by clicking New to create a small and a large size deployment value set for example.