vRealize Automation 7.3 is Released! – What’s New – Part 1

vRA-Product-Icon-Mac_0Oh my god I can’t believe that this is only a dot-release as you read through the What’s New section in the vRA 7.3 Release Notes, looking at the massive amount of features we are releasing with this release, its just mind blowing.

I can’t describe the amount of excitement that I m experiencing right now that a new version of vRA is officially out and that I can finally talk about it, and showcase some of its new 20+ spotlight features in this multi part vRA 7.3 What’s New blog series.

VMware continues the trend of delivering awesome innovations, improved user experience, and greater / deeper integration into the ecosystem its managing, while aligning its automation technology with the following core investment strategies :

  • Make the Private Cloud Easy
  • Enable Developers
  • Manage Across Clouds

In part 1 of this series of vRA 7.3 what’s new blogs, I will be showcasing the Prameterized Blueprints feature which fall under the  “Make the Private Cloud Easy” strategy pillar.

But before we get started I thought I would mention these Important upgrade Side Notes :

  • You must upgrade to either vRealize Automation 6.2.5 or 7.1, before you can upgrade to version 7.3
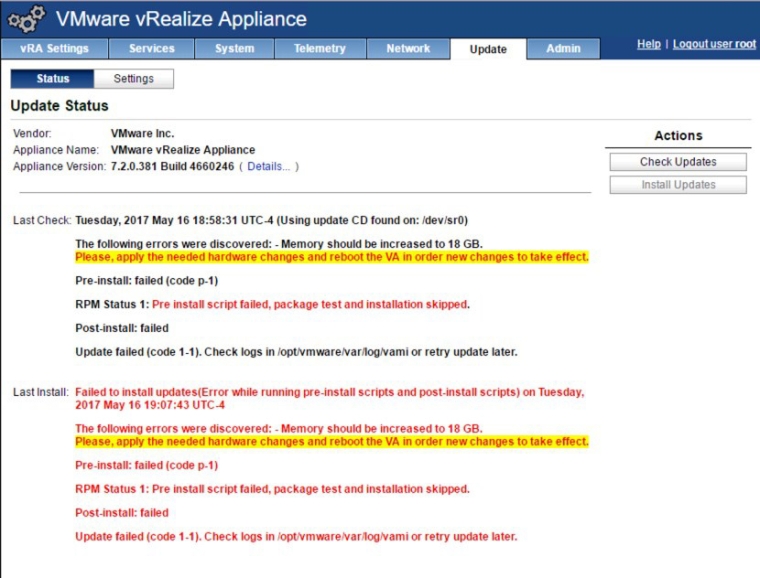
  • The Memory configuration should be increased to 18 GB on the vRA Appliance if you happened to reduce it, like I did myself in my lab otherwise you will get an error like the one below.

Memory Sizing Error

  • System Reboot is required of-course to complete the update, assuming everything went well with the vRA master appliance and its replicas if any.

upgrdeComplete

  • After you reboot the vRA appliance, Waiting for all services to start update Status appears on the Update Status page. The IaaS update automatically starts when the system is fully initialized and all services are running. So you don’t have to upgrade the IaaS component your self manually like what we used to do with the older editions, BUT instead You can sit back, relax and simply observe the IaaS upgrade progress on the Update Status page. How freaking cool is that Eh!

IaasAutoUpgrade

  • The automated update process is also supported on the distributed deployment model where after the master vRA appliance is successfully updated, all the replica nodes gets updated as well, after that the focus shifts to the IaaS components and the same thing happens where all the related IaaS services gets updated. 
  • The first IaaS server component can take about 30 minutes to finish, so be patient.
  • Also note that The active Manager Service node changes from a manual election to a system decision about which node becomes the fail-over server. The system enables this feature during upgrade

So now that we got that out of the way – Big Sigh!- ,  let’s get started now on the main topic Eh!

Parameterized Blueprints to Enhance Re-usability and Reduce Sprawl​

The new Component Profiles allows us to define both Virtual Machine sizes including ( CPU, Memory and Storage ) and source image attributes that helps the infrastructure architect enable what we refer to as the “T-Shirt Sizing” option for blueprint requests where an entitled user can pick from.

This abstraction using the Component Profiles allows us to efficiently manage blueprints by increasing re-usability while significantly reducing blueprint sprawl and simplifying your catalog offerings.

You can use component profiles to parameterize blueprints. Rather than create a separate small, medium, and large blueprint for a particular deployment type, you can create a single blueprint with a choice of small, medium, or large size virtual machine. Users can select one of these sizes when they deploy the catalog item.

From a governance and control perspective we continue to have the ability to trigger approval policies but now these approval can be based on the user size or the image selection conditions, including overrides.

The component profiles like everything else can be imported and exported using the vRealize Cloud Client.

The available component profile types are Size and Image. When you add component profiles to a machine component, the component profile settings override other settings on the machine component, such as number of CPUs or amount of storage.

Be aware that you cannot define other or additional component profile types other than those two.

To access Component Profiles, select Administration -> Property Dictionary -> Component Profiles 

ComponentProfiles

Component profiles are only available for vSphere machine components where you can use component profiles to define vSphere machine components in a blueprint.

Defining Component Profile Settings

You can define multiple named value sets within the Size and Image component profile types and add one or more of the value sets to machine components in a blueprint. Each value set that you define for the component profile type (Size and Image) contains the following configurable settings:

  • Name that sequesters see when they provision a machine
  • Unique identifier for tenant
  • Description
  • Set of value choices for each option in the values

ValueSet

When you request provisioning from the catalog, you can select from available value set choices for the Size and Image component profiles. When you choose one of the value sets, its corresponding property values are then bound to the request.

Configuring Component Profile Size Settings for Catalog Deployment

  1. Log in to the vRealize Automation console as an administrator with tenant administrator and IaaS administrator access rights
  2. Select Administration -> Property Dictionary -> Component Profiles 
  3. Click the Size in the name column or highlight it and click Edit

ComponentProfiles-Size4. Click the Value Sets tab and define a new value set by clicking New to create a small and a large size deployment value set for example.

Small CP

Small Value Set

Large CP

Now we have two Size Component Profiles as value set

  • Small   ( 1 vCPU, 1GB Mem, 40 GB Storage)
  • Larege ( 2 vCPU, 4GB Mem, 80 GB Storage)

size CP Final

Next would be to Add one or more value sets to the Size component profile by using the Profiles tab on a vSphere machine component as will see next.

Configuring Machine Blueprint by Adding the Size Component Profile to the Blueprint.

  1. Log in to the vRealize Automation console as an infrastructure architect.
  2. Select Design -> Blueprints
  3. Create a new Blueprint or in our case we will be editing an existing CentOS 7 on vSphere – Base Blueprint.

EditBluePrint.jpg

4. Select the Machine Type and click on Profiles  to add the size Component Profile we defined by clicking the +Add  link

ComponentProfiles

5. Once added and listed with the profile tab, select the Size Component Profile and click on Edit Value Sets 

sizeEditValueSets

6. Select the Value Sets you want to associate with the CentOS7 on vSphere – Base Blueprint, here we will select both Small and Large, while setting the Small as the Default and click Ok to configure the size component profile we are configuring for the blueprint with selected Value Sets ( Small and Large )

SizeValueSetsBlueprint

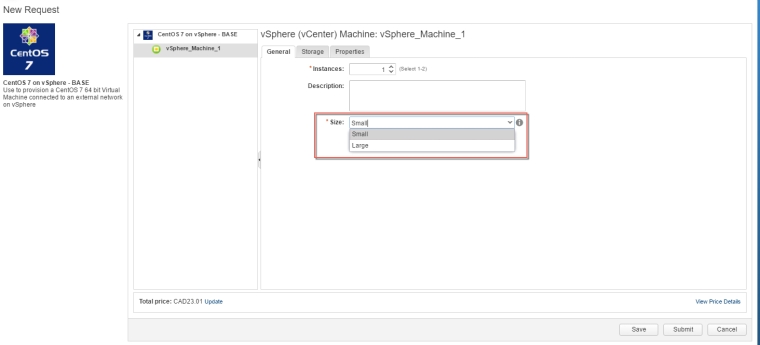
7. Once your done click finish on the blueprint to save the Blueprint parameters we just added, and your ready to request the CentOS7 on vSphere – Base Blueprint with the configured size parameters.

requestCentOs

8.  Select the vSphere_Machine within your blueprint deployment you requested and simply select the size of the Machine AKA “T-Shirt Sizing” and submit your request.

blueprintRequest

We can simply repeat the same process for the Image Component Profile where we define Image value set we can present to the requester as an option to choose from. 

Users can select from Linked Clone or Full Clone type images across Windows and Linux type OSs for example .  I will leave that one for you to explore my friends.

imageandSize


.The End. Eh!.

Automation and Orchestration vRA Blueprints vRealize Automation

Virtual Container Host As A Service [VCHAAS] With vRealize Automation – vRA 7.x

vSphere Integrated Containers Engine is a container run-time for vSphere, allowing developers familiar with Docker to develop in containers and deploy them alongside traditional VM-based workloads on vSphere clusters, and allowing for these workloads to be managed through the vSphere UI in a way familiar to existing vSphere admins.

2017-04-24_12-55-08

vSphere Integrated Containers comprises three major components:

  • vSphere Integrated Containers Engine, a container runtime for vSphere that allows you to provision containers as virtual machines, offering the same security and functionality of virtual machines in VMware ESXi™ hosts or vCenter Server® instances.
  • vSphere Integrated Containers Registry, an enterprise-class container registry server that stores and distributes container images. vSphere Integrated Containers Registry extends the Docker Distribution open source project by adding the functionalities that an enterprise requires, such as security, identity and management.
  • vSphere Integrated Containers Management Portal, a container management portal that provides a UI for DevOps teams to provision and manage containers, including the ability to obtain statistics and information about container instances. Cloud administrators can manage container hosts and apply governance to their usage, including capacity quotas and approval workflows.

These components currently support the Docker image format. vSphere Integrated Containers is entirely Open Source and free to use. Support for vSphere Integrated Containers is included in the vSphere Enterprise Plus license.

Now that we are done with the intro, we will only be focusing on VIC Engine in this post and how we can leverage vRealize Automation 7.x to make it even better and faster to deploy by users as a service.

I have been playing with vSphere Integrated Containers for a while now and since the early beta days. I can tell you that deploying and deleting the VCH Endpoint so many time was a bit painful since the command line is so rich including so many parameters that you can choose from where some are mandatory and some are optional, which of course can be a bit overwhelming specially when you fat finger some of these parameters as often as I do.

Example of the Linux command line with some of its parameters to deploy a Virtual Container Host on vSphere, looks something like this :

./vic-machine-linux create –name VCH_Name -t ‘UserName@domain.com:Password@vCener_IP_or_FQDN‘ –compute-resource Target_Cluster –public-network Target_Managment_Network –bridge-network Target_Bridge_Network –image-store DataStore_Name –volume-store DataStore_Name :default –dns-server DNS_IP_Or_FQDN –public-network-ip VCH_IP –public-network-gateway Gateway_IP/CIDR–force –no-tlsverify

During all this testing time I had to save the entire command line in a text file with all of its parameters, so I can simply copy and past the command when I need to, after replacing some of these parameters with the values I wanted to use, so I don’t have to type it over and over every single time I decide to deploy or delete a Virtual Container Host to test.

Having in mind our main use case for vRealize Automation and that is IT Automating IT , I wanted to find a way where I can somehow provide this as a service in my home lab where I can simply select the service and submit the request from the catalog.

Well, I did that some time ago and today I m excited to share that publicly on my new blog with all of you out there !

So please sit tight, enjoy the ride as I Explain…

In vRealize Orchestrator I managed to leverage the Guest Script Manager to take the command line with the majority of its parameters and automate the life out of it by creating the desired workflows use cases ( The Creation and Deletion of the VCH process ) then use these workflows as Anything as a service XaaS type blueprints in vRA to essentially present it as an item catalog where users can easily request to create a new VCH or delete an existing one.

Of course there are many other ways on how you can do the VCH automation piece and probably even better than the one I’m sharing here, but this is simply how I did it!.

Steps and User Experience

ScreenShot-1

1. Request the Service from the Catalog


ScreenShot-2

2. Provide the VIC Machine Information


ScreenShot-3

3. Provide the targeted vCenter Server


ScreenShot-4

4. Provide the VCH Configuration needed for the deployment


ScreenShot-5

5. Workflow executes in vRO to deploy the VCH endpoint on vSphere

This is so great on so many levels since now you can easily entitle any development groups for example, that really don’t have to know a whole lot on how VIC works and are simply able to request the service to access a docker API and provision Containers.

You can also wrap an approval / governance policy around it which vRA can easily provide and have all the parameter’s values available to users in drop-down list format within the XaaS Forms on the request page, so the requester don’t have to wonder when filling out these form requests, things like which cluster I should be deploying this to, What network I should be selecting, What Storage I should use and more importantly standardize these inputs to avoid typos to standardize the service overall so its consistent across the IT organization.


I tested both XaaS blueprints ( Create and Delete VCH ) and both works like a charm. I still though have to clean it up a bit but I will be sharing both the vRO package and the XaaS blueprints here on this post so others can use it or build on top of it and make it even better since I am not really an expert when it comes to developing vRO workflow but I m doing my best to learn even more.

High level Deployment Guide

Please be aware that this has not been tested yet outside my lab, so please provide feedback if you have any issues, in case I need to tweak things :

  1. Download the VCH 1.0 (Here) or VCH 1.1 (Here) Automation package depending on the VIC version bundle you have or planning to download and extract its content. The package includes the vRO package that includes the VCH workflows and the 2 XaaS VCH Blueprints for the VCH Create and Delete operation.
  2. If you download the 1.0 VIC bundle (Here) make sure its extracted to /workspace/vic on the desired VIC machine (The Machine that host the VIC Bundle), here you will use the VCH 1.0 in step 1.
  3. If you download the 1.1 VIC bundle (Here) make sure its extracted to /workspace/vic on the desired VIC machine (The Machine that host the VIC Bundle), here you will use the VCH 1.1 in step 1.
  4. Import the vRO package into the vRA embedded vRO instance using the vRO client
  5. Use the Cloud Client (Here) to import the two XaaS Blueprints into vRA where you can then publish and entitle them to users.
  6. Confirm that the blueprints are actually pointing to the respective VCH workflows that you imported perilously.

Please make sure to map the right VCH Automation package version with the right VIC Bundle version since some of the command syntax changed in VIC 1.1

Important Deployement Notes

  • This was done using the Guest Script Manager as I mentioned before which is already bundled in the VCH 1.0 vRO package along with the VCH workflows in the vRO package I Exported, so you don’t have to install the GSM yourself.
  • All the fields for this version is mandatory and can’t be skipped for now, but its something that you can definatly modify if you want to.
  • All the fields are static, so later on you can configure some of the field’s in XaaS forms as drop-down lists and provide value from you own environment such as Clusters Name, Network port-groups or storage..etc
  • The Workflow will deploy VCH with Server-side authentication with auto-generated, untrusted TLS certificates that are not signed by a CA, with no client-side verification. i.e. –no-tlsverify is hard coded as you will see in the create command mentioned below.
  • You have VIC bundle deployed and extracted to a folder called /workspace/vic/ on a Linux machine called out in the XaaS forms as the VIC Machine VM available within the same vCenter/environment. This can be the vRA appliance as well and you can modify the original Workflow to preset the values for the VIC machine properties section (2nd Screenshot above) so the user don’t even have to select it or go through the first request tab.
  • The VCH deployment can be used and manually added in Admiral using the certificate type credentials which can be obtained from the VIC Machine from the VCH folder created after a successful deployment . for example if you deploy an endpoint called VCH01, both the server-cert.pem and server-key.pem would be located in /workspace/vic/VCH01 folder on the VIC Machine.
  • This is the command line that being executed on the VIC Machine VM ( which is the VM that has the VIC bundle deployed and extracted to /workspace/vic ) . All the parameters that are used between vRA and vRO are in-between brackets.

The Create Command Used in the Create Workflow for VIC 1.0

./vic-machine-linux create --name [vchName] --appliance-cpu [vchCpu] --appliance-memory [vchMem] -t '[vCenterUserName]:[password]@[vCenterIp]' --compute-resource '[clusterName]' --public-network [publicNetwork] --bridge-network [bridgeNetwork] --image-store [imageStore] --volume-store [volumeStore]:[volumeName] --dns-server [dnsServerIp] --public-network-ip [vchPublicIp] --public-network-gateway [vchPublicGateway]/[vchPublicGatewaySubnet] --force --no-tlsverify

The Create Command Used in the Create Workflow for VIC 1.1

./vic-machine-linux create --name [vchName] --endpoint-cpu [vchCpu] --endpoint-memory [vchMem] -t '[vCenterUserName]:[password]@[vCenterIp]' --compute-resource '[clusterName]' --public-network [publicNetwork] --bridge-network [bridgeNetwork] --image-store [imageStore] --volume-store [volumeStore]:[volumeName] --dns-server [dnsServerIp] --public-network-ip [vchPublicIp]/[vchPublicIpSubnet] --public-network-gateway [vchPublicGateway] --force --no-tlsverify

You notice if you compare the create command between the two versions that some of the parameters were changed. i.e.  –appliance-cpu  renamed to –endponit-cpu

The Delete Command Used in the Delete Workflow is same for both versions

./vic-machine-linux delete --force -t '[vCenterUserName]:[password]@[vCenterIp]' --compute-resource '[clusterName]' --name [vchName]

Have fun Everyone!

Automation and Orchestration vRealize Automation vsphere integrated containers

Finally I’m a Blogger!

I can’t remember how many times that I thought about having my own blog where I can write and post about topics that I’m passionate about around my line of work in Cloud Management here at VMware, in the hope that someone out there may find it helpful.

Well my friends, It’s finally happening. Allow me to personally welcome you to my new and humble blog website VMwarelab.org

I joined VMware back in June, 2013 and man! it’s been such an amazing experience,  I love every minute of it and I honestly don’t think or see myself working anywhere else since I had the opportunity of working here after years of working with VMware Technology as a customer myself for one of the big Canadian Banks.

As a Software Defined Enterprise Sr. Systems Engineer at VMware I work with a great talented technical sales team of individuals proving the technology in the form of proof of concepts, demos and deep-dive presentations and helping our customers accelerate their Digital Transformation Journey  and empower IT to align ever more closely with the Businesses they support leveraging our Software-Defined Data Center.

SDDC is the foundation for the VMware Cross-Cloud architecture that enables enterprises to innovate freely in the clouds of their choice. Built on our industry-leading Software-Defined Data Center foundation which brings together best-in-class compute, storage, networking virtualization, and cloud management, our common operating environment lets you rapidly run, manage, connect, and secure apps across clouds and devices.

Hopefully this was a good, simple introduction to my new blog and myself, into the massive and amazing VMware blogging community, on the hope that one day I can get to that level.  I will mainly share posts around our Cloud Management tools as it comes to new products and features, How to guides and most importantly sharing interesting customer use cases that other individuals in the industry can benefit from.

At the end I want to say a big Thank You for taking the time in celebrating my first blog post with me, I hope you enjoyed it as much I did writing it, and before I end this post , I would like to leave you with these helpful and outstanding blogs that I hope you enjoy exploring, as I personally follow and always learn from:

About Me